1 Overview
Franzplan is a plain, very tiny solution for creating schedules for school use. The following pages are intended to support new users to become familiar with the application.
2 Setup
2.1 Inbetriebnahme
Den Franzplan gibt es in unterschiedlichen Produktvarianten. Abhängig davon erfolgt die Installation. in der Variante als Franzplan-WEB sind keinerlei Konfigurationsschritte zur Inbetriebnahme erforderlich. Dieser Abschnitt kann deshalb für diese Variante übergangen werden.
2.2 Single Sign On
The Franzplan can use the credentials of other application servers to
provide the login information, e.g. from IServ https://iserv.eu/. In this
case, the user logs on to the corresponding application and the
Franzplan accepts this information because he trusts it. From a
technical point of view, the OAuth2 protocol is used for this. In this
context, the Franzplan acts as a client. The external application server
is both a resource server and an authorization server. ### IServ Now the
configuration in hand of IServ (https://iserv.eu/) is described.
This requires configuration steps in IServ and in the Franzplan.
2.2.0.1 Configuration of Franzplan
The settings for SSO (Single Sign On) are made directly via
configuration parameters. There are several ways to set these
parameters. One way is to use the configuration file
application.properties. This file can be found in the home
directory of the installation.
Settings to register the clients
| Parameter | Description |
|---|---|
| spring.security.oauth2.client.registration.iserv.client-id | An alphanumerical value which identifies the client. \ |
It is assigned by `IServ` during configuration and must match with the correspondending entry in `IServ`.IServ and have to match
there.spring.security.oauth2.client.registration.iserv.authorization-grant-type | Grant type, fixed:
authorization_codespring.security.oauth2.client.registration.iserv.client-authentication-method | Authentication methode, fixed:
postspring.security.oauth2.client.registration.iserv.redirect-uri | Url for the redirect after successful authentication on
IServ.
Example:
https://test.franzplan.net/SchulPlaner/login/oauth2/code/iservspring.security.oauth2.client.registration.iserv.scope | List of rights which are set in
IServ. Example:
openid, profile, groupsspring.security.oauth2.client.registration.iserv.provider | Name of the provider:
iservspring.security.oauth2.client.registration.iserv.client-name | Name of the client:
iserv
Settings for the connection to the Ressource Server
Some settings for the connection to IServ depend on
IServ installation and should be asked at the
IServ erfragt werden administrator:
| Parameter | Example or fixed |
|---|---|
| spring.security.oauth2.client.provider.iserv.authorization-uri | Example: \ |
https://ggsmun.de/iserv/oauth/v2/authspring.security.oauth2.client.provider.iserv.user-info-uri | Example: https://ggsmun.de/iserv/public/oauth/userinfo
spring.security.oauth2.client.provider.iserv.jwk-set-uri | Example: https://ggsmun.de/iserv/public/jwk
spring.security.oauth2.client.provider.iserv.user-name-attribute | fixed:
preferred_usernamespring.security.oauth2.client.provider.iserv.user-info-authentication-method | fixed:
header
Settings to control the Franzplan
| Parameter | Description |
|---|---|
| franzplan.oauth2.teacher | If the user is known in IServ but not in Franzplan, the
user data are taken out of IServ. But the user should have
at least default rights in Franzplan to read the schedules. \ |
Therefore, a default teacher is then assigned. The abbreviation can be set here. \
Example : `d.teacher`IServ but not in Franzplan. Example :
GGSMUNfranzplan.oauth2.active | Switches SSO on or off (
true for
on, false for off). Fixed for
SSO: truefranzplan.oauth2.provider | List of providers (ressource-servers), which can be taken as authentication provider. The addressing was assigned above in chapter
Settings to register the clients.
Several providers can be specified, e.g. if a school operates several
IServ servers because it has different locations but which have a common
timetable.franzplan.oauth2.provider[0..n].id | The id of the SSO-client, e.g.
iserv.franzplan.oauth2.provider[0..n].name | Fiexed:
family_namefranzplan.oauth2.provider[0..n].givenName | Fixed:
given_namefranzplan.oauth2.logoutPage | Web which is loaded after clicking the Logout Button in Franzplan. Example:
IServ website
https://ggsmun.de/iserv
The assignment to user roles in the Franzplan can be done via IServ
groups. That enables the Franzplan to know which iServ groups correspond
to the roles in the Franzplan. Therefore the following parameters are
provided in the Franzplan configuration:
| Parameter | Description |
|---|---|
| franzplan.oauth2.role.schoolAdmin[0..n] | List of groups from IServ that is to be used to assign the role
school administrator (SchulAdministrator). |
| franzplan.oauth2.role.teacher[0..n] | List of groups from IServ that is to be used to assign the role
teacher (Lehrer). |
| franzplan.oauth2.role.schoolAssi[0..n] | List of groups from IServ that is to be used to assign the role
school assistent (SchulAssisten)t. |
| franzplan.oauth2.role.student[0..n] | List of groups from IServ that is to be used to assign the role
student (Schueler). |
| franzplan.oauth2.role.basisStudent[0..n] | List of groups from IServ that is to be used to assign the role
basis student (BasisSchueler). |
Example of settings in
application.properties:
spring.security.oauth2.client.registration.iserv.client-id=XYZ
spring.security.oauth2.client.registration.iserv.client-secret=XYZ-12345
spring.security.oauth2.client.registration.iserv.authorization-grant-type=authorization_code
spring.security.oauth2.client.registration.iserv.client-authentication-method=post
spring.security.oauth2.client.registration.iserv.redirect-uri=http://localhost:8080/SchulPlaner/login/oauth2/code/iserv
spring.security.oauth2.client.registration.iserv.scope=openid, profile, email
spring.security.oauth2.client.registration.iserv.provider=iserv
spring.security.oauth2.client.registration.iserv.client-name=iserv

spring.security.oauth2.client.provider.iserv.authorization-uri=https://ggsmun.de/iserv/oauth/v2/auth
spring.security.oauth2.client.provider.iserv.token-uri=https://ggsmun.de/iserv/oauth/v2/token
spring.security.oauth2.client.provider.iserv.user-info-uri=https://ggsmun.de/iserv/public/oauth/userinfo
spring.security.oauth2.client.provider.iserv.jwk-set-uri=https://ggsmun.de/iserv/public/jwk
spring.security.oauth2.client.provider.iserv.user-name-attribute=preferred_username
spring.security.oauth2.client.provider.iserv.user-info-authentication-method=header

franzplan.oauth2.teacher=d.teacher
franzplan.oauth2.school=GGSMUN
franzplan.oauth2.active=true
franzplan.oauth2.provider[0].id=iserv
franzplan.oauth2.provider[0].name=family_name
franzplan.oauth2.provider[0].givenName=given_name
franzplan.oauth2.logoutPage=https://ggsmun.de/iserv
franzplan.oauth2.role.schoolAdmin[0]=management
franzplan.oauth2.role.teacher[0]=teacher_jg1
franzplan.oauth2.role.teacher[1]=teacher_jg2
franzplan.oauth2.role.teacher[2]=teacher_fu
franzplan.oauth2.role.schoolAssi[0]=school_assi
2.2.0.2 Configuration entries in IServ
Administrator rights are required in IServ so thatto be
able to carry out the configuration of Single Sign On (SSO). To do this,
select the System menu item
underAdministration and here again
Single sign-on.
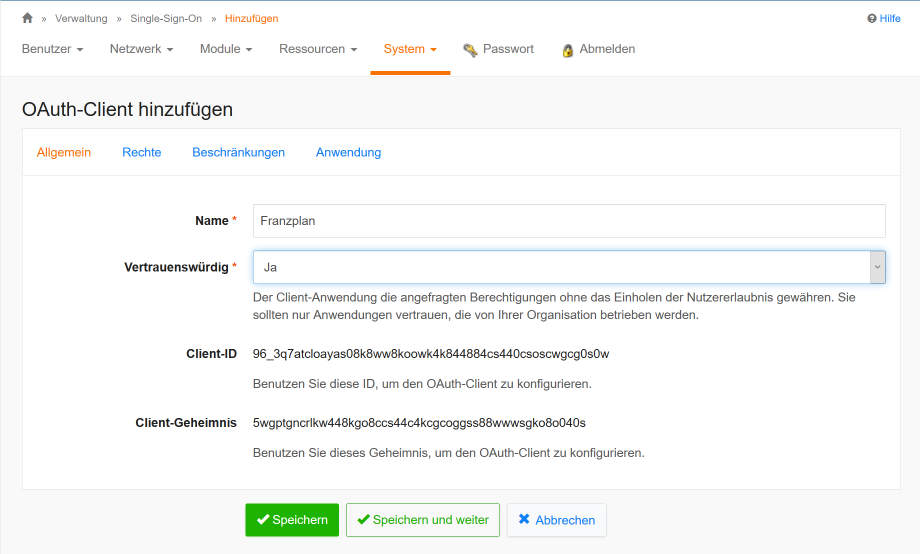
By clicking the + Add button, you can create a new entry
for the Franzplan.
First enter a name for the entry, e.g. Franzplan.
Under Trustworthy, selectYes from the
list.
The client ID and client secret are preassigned. Both entries must be
adopted in the configuration from the Franzplan and each with the
entries for
spring.security.oauth2.client.registration.iserv.client-id
and
spring.security.oauth2.client.registration.iserv.client-secret
have to match.
Example:
In section Restrictions click
Permitted Grant-Types the checkbox for
Authorization-Code
and
at Restrict scopes choose the checkbox for
groups openid and profil.
Example:

And final in section Application add the redirect-Url.
It corresponds to
http(s)://<Server-Address:Port>/SchulPlaner/login/oauth2/code/iserv.
where Server-Address and Port should be
replaced by the appropriate values of the Franzplan configuration.
Example:
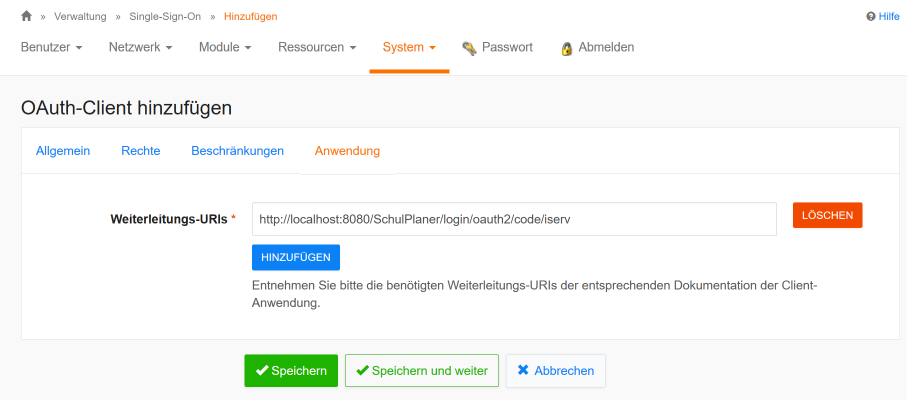
After confirm with Save the entry is created and ready
for use.

2.2.1 Assigning roles with SSO
In Franzplan a user can own different roles. However, these roles can only be
assigned if the users are known under the same user name both on the
authentication server (e.g. IServ) and in the Franzplan.
As long as a user is successfully authenticated via SSO, but is not
known in the Franzplan with the user name transmitted from the
authentication server (e.g. IServ), the standard
role is assigned and becomes BasisSchueler. Having this
role the user may only read timetables for classes and years and in addition the corresponding SSO-group must be configured for the
class.
2.3 Language
The user interface of Franzplan is multilingual. English and German are currently supported.
There are the following rules when assigning the language:
- If the language in the browser is set to German, the interface appears in German.
- If the language in the browser is set to English, the interface appears in English.
- If the language of the browser is set to an unknown language, the interface appears in the standard language.
If the language has been changed in the browser, the browser usually
has to be closed and restarted so that the change takes effect,
depending on the browser used. The default language is assigned during
installation. [Installationsprogramm]. In
this case the language is taken which has been choosen during
(#installation). It can be changed afterwards in the configuration file
application.properties
by setting the parameter:
franzplan.locale=de2.4 Initial setup of the database
If no database exists or the database has been deleted or renamed,
the basic data for the school must be entered first. This is done via
the Init button:

You will now be guided step by step through the
initial setup to make the basic settings for the school.
Such basic settings are e.g. school name, users, weekly schedule,
teachers, years, subjects and classes. All data that you enter here can
also be changed later. But they are necessary to be able to start wotrk
with the Franzplan at all. The setup is done in the following steps:
2.4.1 Step 1: School
First the data for the school are entered. It should be noted here
that the school abbreviation is a maximum of 10 characters long,
contains no spaces. School is a key attribute and can only be changed
later with great effort. The name of the school can be chosen freely and
may be 256 characters long.
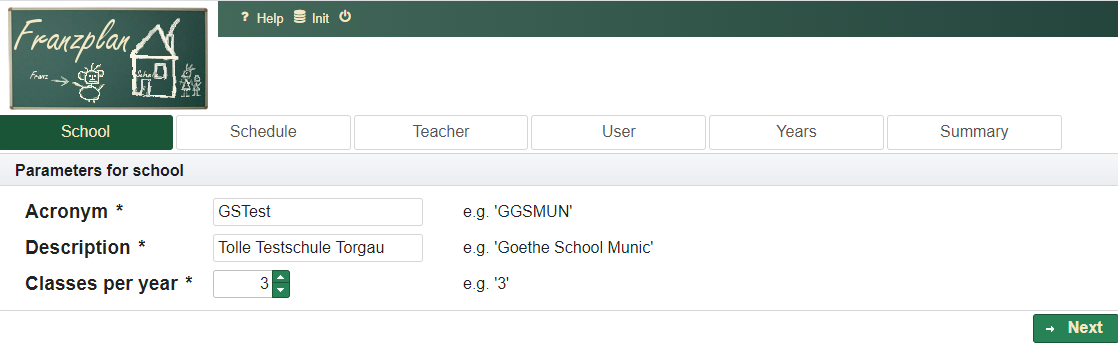
Then click on Next.
2.4.2 Step 2: Schedule
The schedule can be used to specify the days on which lessons are
usually given and also the number of hours (maximum number per
day).
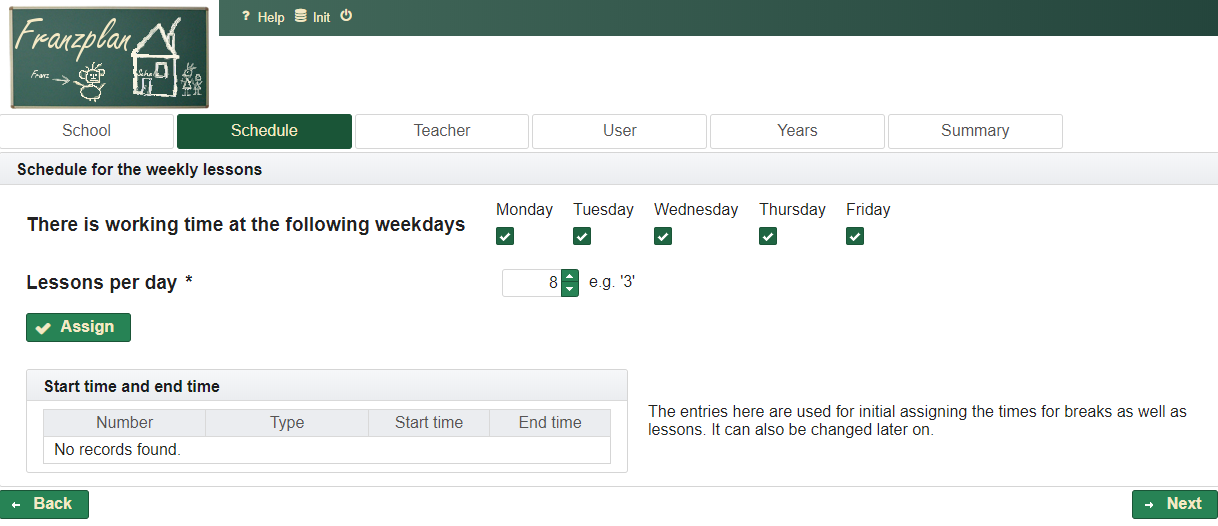
To keep it simple, the standard setting can be adopted with
Assign and everything can be changed afterwards.
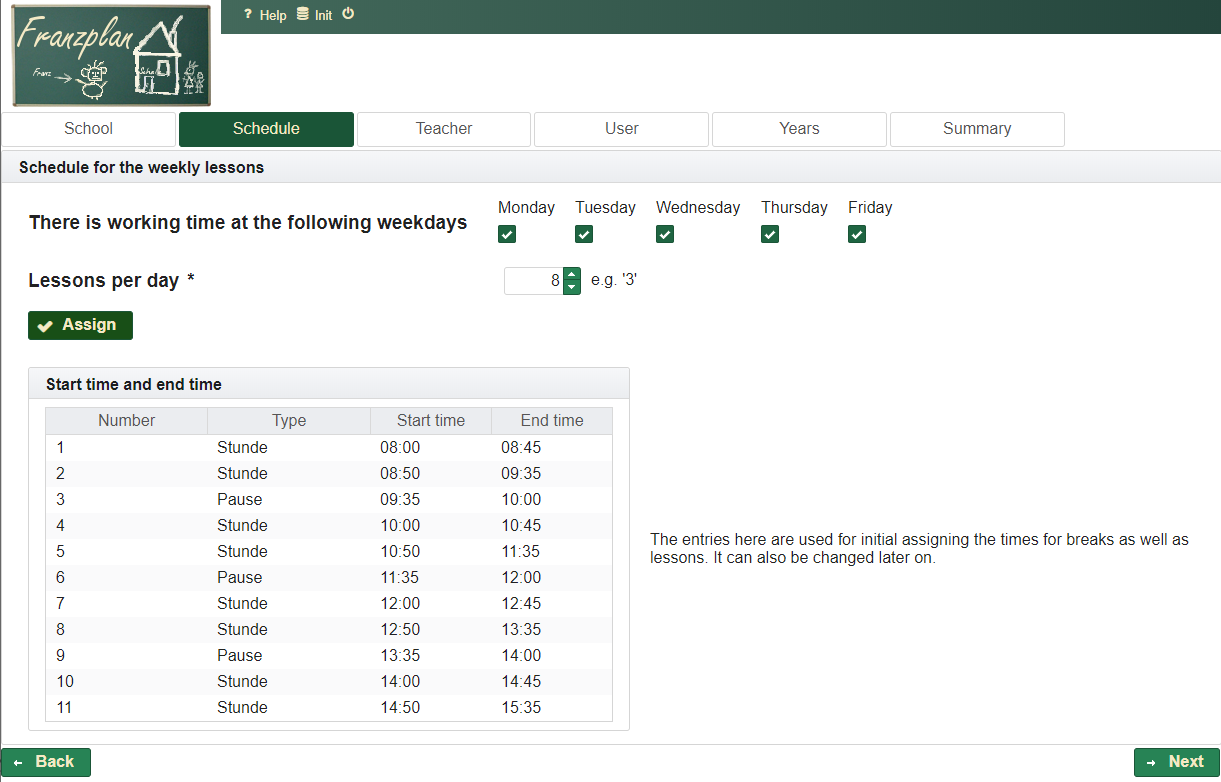
Both are then confirmed with Next.
2.4.3 Step 3: Teacher
Every teacher who works with or looks into the Franzplan is a user
with a user ID. Teachers in turn have teacher abbreviations, last names
and first names. In this dialog here this information is entered for the
teacher who creates the timetable. He has the role of “school
administrator”.
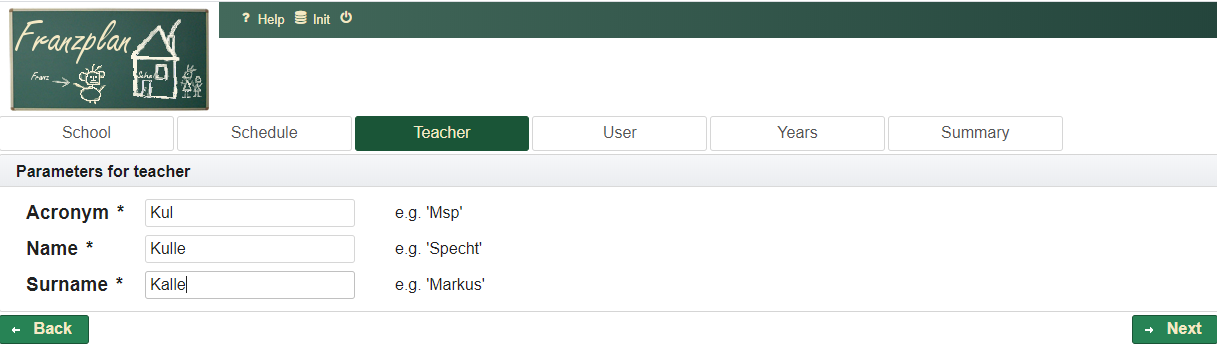
After entering the information, click on Next again.
2.4.4 Step 4: User
To be able to work with the Franzplan, you have to log in with a user
ID. While we entered the teacher in the previous step, the associated
user is now configured. The user ID can correspond to the teacher code,
but does not have to. In our example, the teacher Kalle Kulle has the
teacher abbreviation Kul and the user
IDKalle.Kulle. With this user ID he logs on to the
Franzplan.
Importantz! The user ID is case
sensitiv!
The user entered here automatically receives the role of
school administrator. Users having this role can create and
maintain the timetables, as well as do most of the other tasks that are
required to create the timetables. This also includes creating subjects,
classes, other teachers … In addition, another administrator is required
who has additional rights. He has the user ID admin. This
user ID cannot be changed here. He can carry out further maintenance
work, e.g. Create backups, restore the database and also manage the
license key. A password must also be assigned for the user
admin. It should not be the same as the user’s password for
the school administrator (i.e. the school planner). 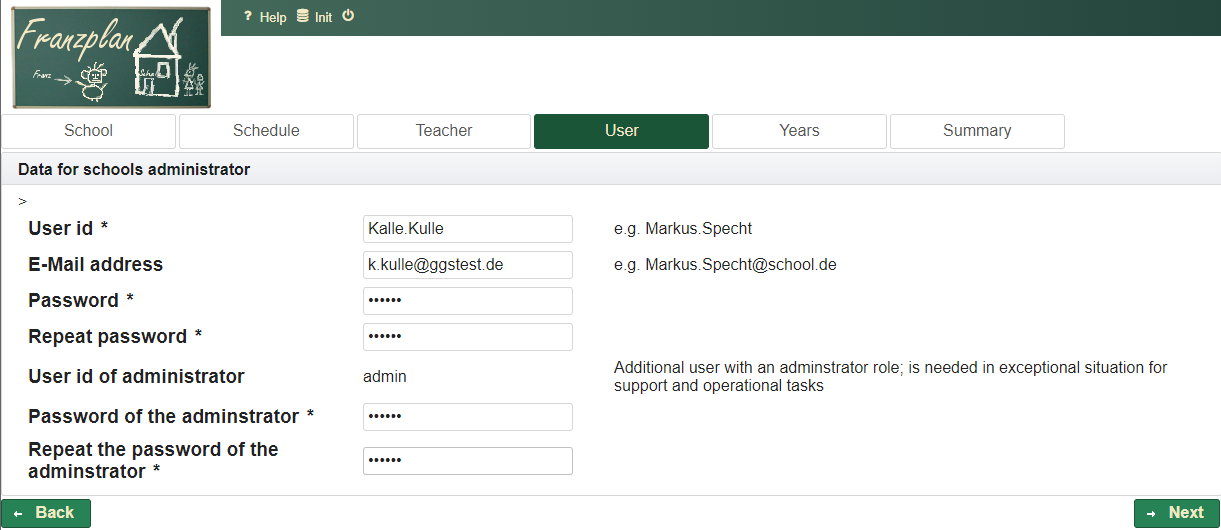
Then click on Next again.
2.4.5 Step 5: Years
At least one year must be created.
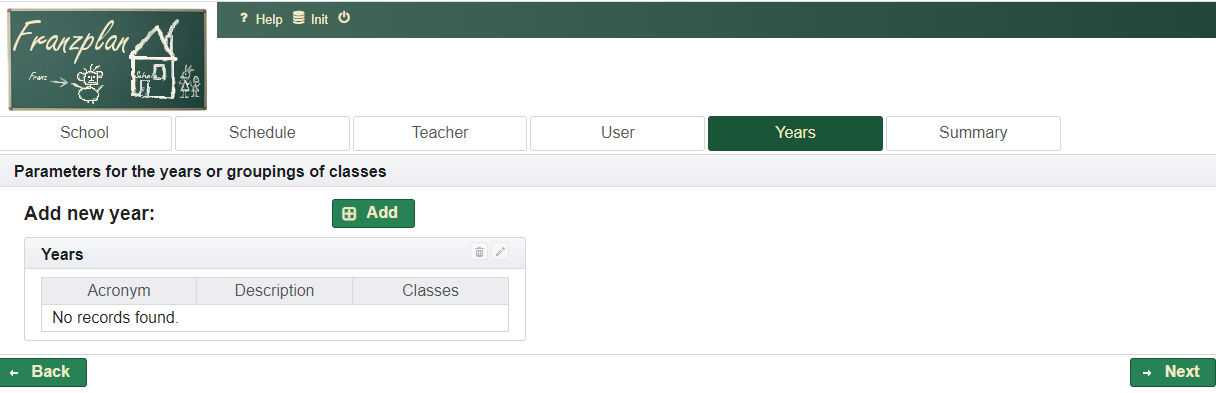
To do this, click on Add
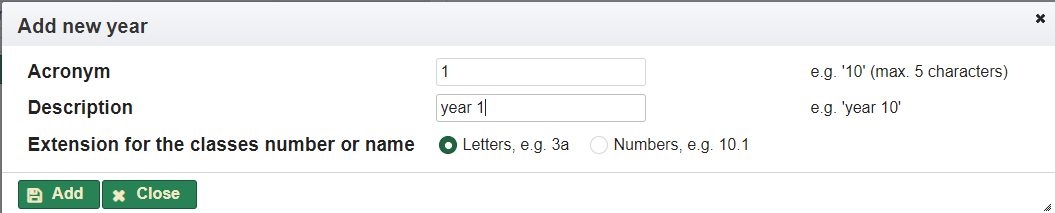
and enters the years abbreviation and a description for the year, if
necessary add also further years. This basic data can also be changed
later.
Finally click on Next again.
2.4.6 Step 6: Summary
In the last step you can check the data again and confirm
finally.
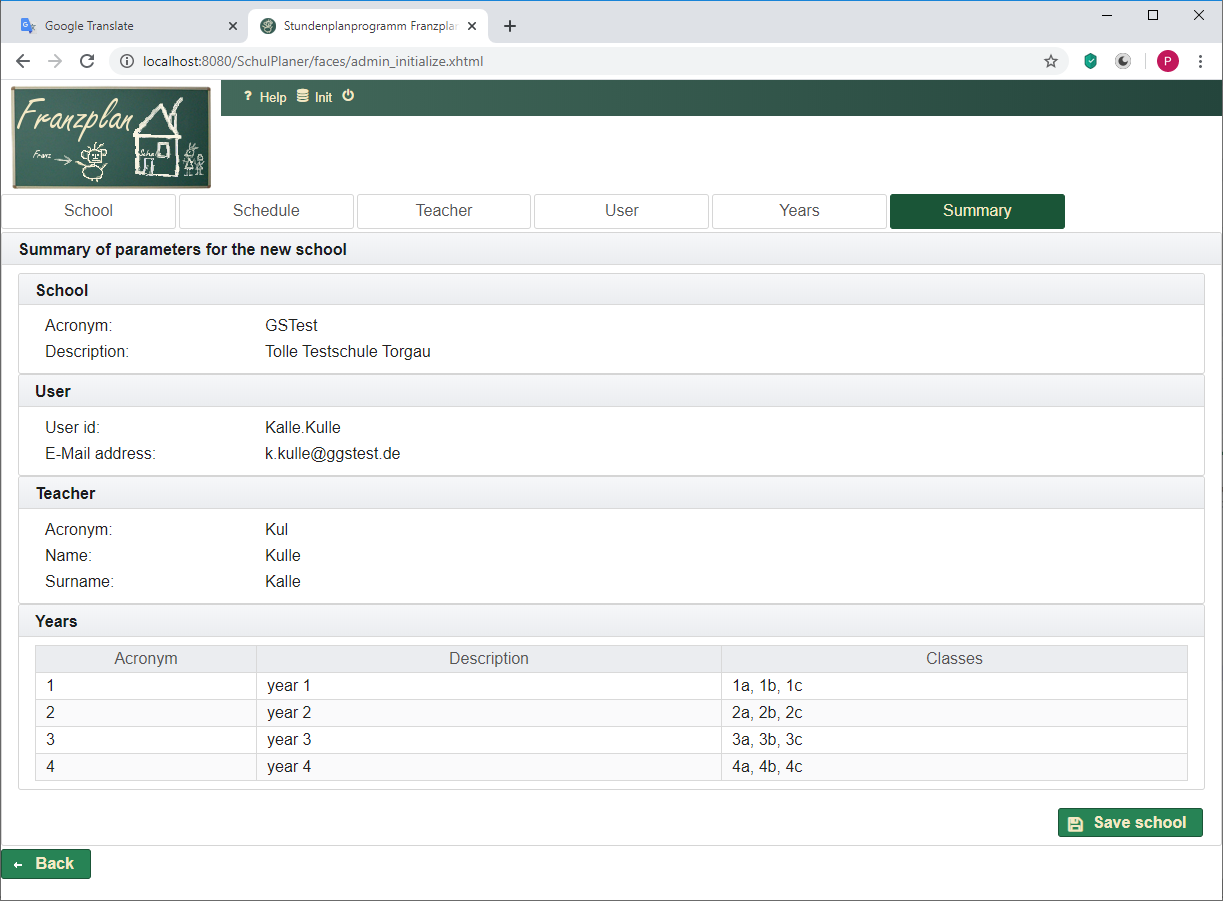
If everything is correct, click on Save school.
The school is set up now and you can get started by signing in:
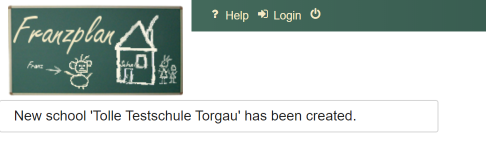
3 Login
After successful Installation and initial setup you can start with the actual work. To do this, you first have to sign in on the Franzplan. The application can be reached via the homepage. Depending on whether it is a server-based variant or an installation of Franzplan on your own PC, Franzplan van be reached in different ways.
3.1 Browsers properties
Independend on whether you are working with Franzplan-WEB or the
local installation Franzplan-DT, operation is always carried out via the
browser. The security settings of certain browsers can lead to the
blocking of certain interactive content, which however is necessary for
the work. Z.B. ist bekannt, dass wenn der InternetExplorer die
Sicherheitsstufe ‘hoch’ aktiviert hat, bestimmte Menüs nicht mehr
dargestellt werden. In such case the security level should be set to
Standard. In any case, it is recommended to use a more
modern browser that supports the current HTML standards, e.g. Mozilla
Firefox or Chrome.
3.2 Internet
The centrally hosted version of Franzpln (Franzplan-WEB) can be reached via the Internet using the URL https://www.franzplan.de. From here, the various options of the school planner are linked.
If the link to Franzplan (e.g. http://franzplan.de/SchulPlanerTest) is entered directly
in the address line of the browser, the standard page appears:
To be able to use Franzplan, the user must authenticate himself
there. To do this, he clicks the Login button. Usually you
log in with your username and password. Each user have assigned a
certain school. After registration, access to this school is granted. A
user can have one or more roles.
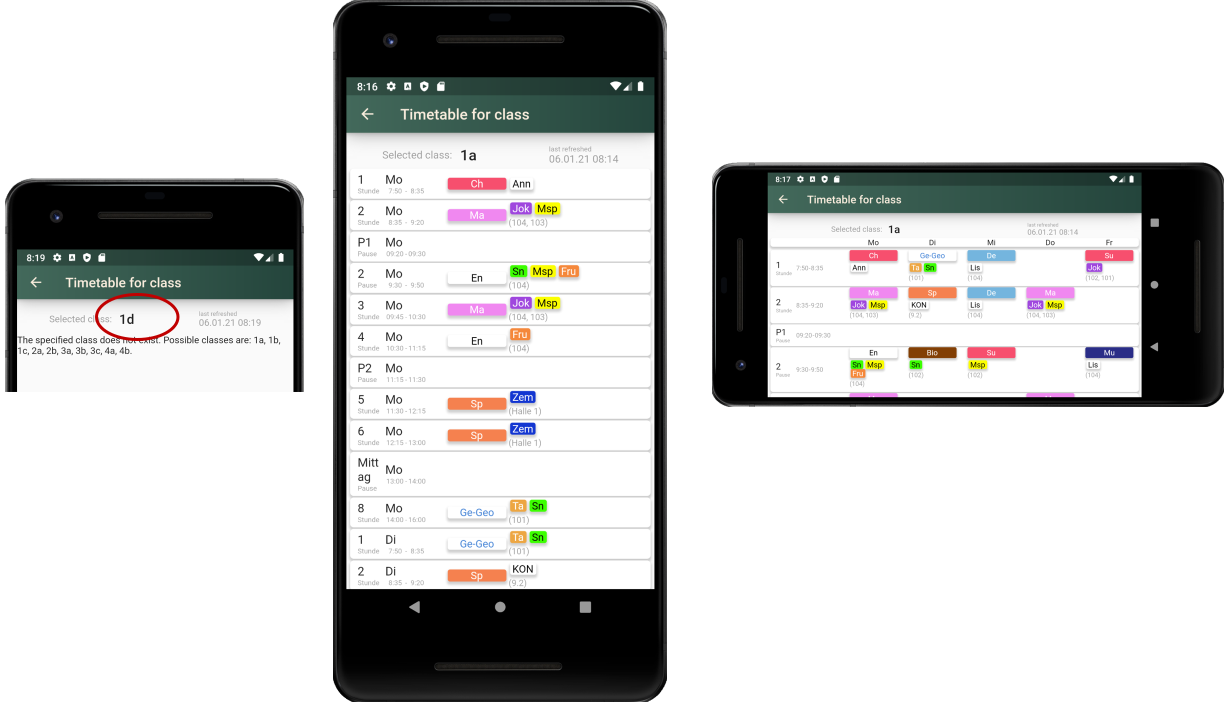
3.3 Login via IServ
Depending on the installation, the Franzplan can use the credentials
of IServ (https://iserv.eu/).
In this case, clicking the Login button will check whether
the user is already logged in to IServ with the following options:
- Registration with IServ has not yet taken place:
: The login page of IServ appears. After successful authentication with IServ, the main page of the Franzplan opens. - Registration with IServ has already been carried out: : The main page of the Franzplan is opened immediately. Registration with the Franzplan is not necessary.
A logout in the Franzplan does not result in a logout in IServ. Usually the IServ page is loaded when you log out of the Franzplan. If you have registered in the Franzplan and are working in another tab in the IServ and logging off there, you can still continue working in the Franzplan, without having to log in again. After a certain period of time, however, this connection loses its validity and the Franzplan also jumps back to the registration page.
4 Basics
The following chapter provides information on the basic procedure for
working with the Franzplan. After login, we will find the following menu
items in the header:

4.1 Home
Link to the main page
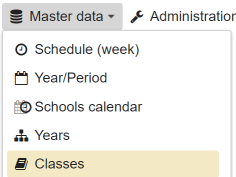
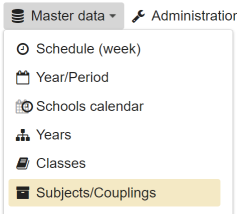
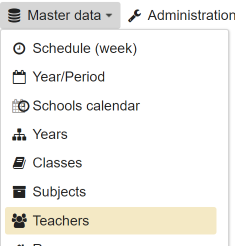
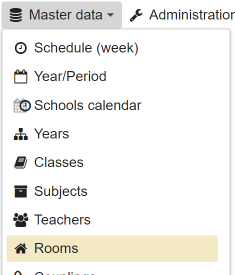
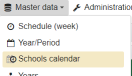
4.2 Master data
Contains the submenus that are necessary to manage the data that are used as the basis for the lesson planning.
Specifically, these are:
| Menu Item | Explanation |
|---|---|
| Weekly schedule | The times the timetable is based on are determined here. |
| School years/periods | All plans relate to school years or periods. |
| Years | The class levels or years are defined here. |
| Classes | The classes themselves are managed here. |
| Subjects/Couplings | The subjects and couplings are managed here. |
| Teachers | Every teacher must be known with an entry. |
| Rooms | The rooms used for teaching must also be specified. |
| Students | Students can also receive separate accesses and can therefore also be defined here. |
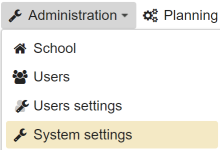
4.3 Administration
The menu items for system administration and configuration are placed here.
| Menu Item | Explanation |
|---|---|
| Manage users | The settings for the users are stored here. Password changes, for example, are possible here. |
| User settings | Personal settings for color scheme and presentation. |
| System settings | Settings for the configuration of the system behavior. |
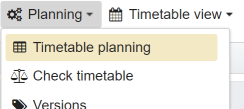
4.4 Planning
Alle Arbeiten, die zur Erstellung und Änderung des Stundenplans nötig sind, werden unter diesem Menüpunkt erledigt.
| Menu Item | Explanation |
|---|---|
| Timetable planning | The timetable is changed / edited here. |
| Check timetable | Here the current timetable can be checked with regard to the restrictions. |
| Timetable versions | Different timetable versions can be managed. This makes it possible to create substitution plans and activate them if necessary. The actual timetable remains unchanged then. |
| Teachers allocation | The teaching obligation is settled here. |
| Requirements | Contains the menu items to set requirements for automatic planning. |
| Automatic planning | The functions for the automatic creation of a timetable are included under this point. |
4.5 Timetable view
Here are the different views of the finalized timetable with the following submenus:
| Menu Item | Explanation |
|---|---|
| View to years | This view of the timetable is sorted by year. |
| Teachers view | The current timetable is prepared here for each teacher and can be printed out. |
| Classes view | The current timetable is shown here for each class and can be printed out. |
| Rooms view | The current timetable is shown here for each room and can be printed out. |
In addition to the information about the registered user, the school and
the currently active timetable, the header also contains the following
menu items
- Help:
- Link to the help pages
- Logout:
- Sign off the current user
There is also the option to change the version of the timetable: . However, the change here is only
active until the end of the current session (session), i.e. until the
logout or closing of the browser window. If the version is to be changed
sustainably, this must be done via the menu [Versions] (#versions).
. However, the change here is only
active until the end of the current session (session), i.e. until the
logout or closing of the browser window. If the version is to be changed
sustainably, this must be done via the menu [Versions] (#versions).
4.6 Subjects, Bars, Couplings
When planning the hours, a distinction is made between subjects, couplings and bars. The differences are clarified below.
4.6.1 Subjects
A subject is assigned to exactly one class in the timetable. One and the same subject can therefore be taught in several classes at the same time without conflict. A subject is identified by its abbreviation. A display name can also be assigned. Subjects with the same display name are displayed in the timetable together as one entry.
4.6.2 Couplings
The term ‘course’ is often used in lesson planning. Courses are
subjects that are taught across classes. In other words, subjects are
usually defined as courses if they are taught in several classes at the
same time.
However, the term ‘course’ can also be found in other contexts. To be
precise, the term ‘coupling’ is therefore used. A coupling is a
combination of subjects that are taught in different classes at the same
time. They are managed under a separate menu item: Manage couplings
4.6.3 Bars
Bars are a ‘simple’ way of presenting cross-class lessons in the timetable. Only the presentation of the timetable entries belonging to a bar is combined. Within a bar there is no check for colisions for teachers and rooms.
It is therefore recommended to use couplings whenever possible instead of
using bars in the planning.
In the abbreviation, bars have to differ from a subject so that they
can be represented in the timetable with their specifics and also do not
cause any apparent conflicts in room planning and teacher assignment. It
therefore makes sense to give a bar a unique name for each class
level.
Example:
- Ma
-
Abbreviation for the subject Mathematics; can be used for any
class
- Ma 8
-
Abbreviation for the 8th grade mathematics bar, in which several classes
have lessons in the same rooms with the same teachers at the same time.
The timetable check will not report an error to the teachers or rooms
assigned to the
Ma 8bar, although the teachers / rooms are assigned to different classes at the same time. However, should such overlaps occur in subjectMa, this is a mistake for the timetable check and will be reported as error.
It makes sense for the subjects for meal or break supervision to be
managed as a coupling, so that they are presented in a coherent,
cross-class manner in the timetable.
Examples of subjects / bars:
- Mathematics
-
Entries for a simple subject and a bar

- Lunch
-
Entries for the definition of subjects for break supervision with time
correction

There are bars in which teaching is carried out across all grades. In
this case, a collision check should not result in an error. To do this,
these bars must be marked as cross grades.
5 First steps
Before the timetable can be entered, the master data (weekly schedule, classes, subjects, rooms, graduation requirements …) must first be created. It takes time and should be done in a specific order to avoid overtime. The following explanations follow the recommended order.
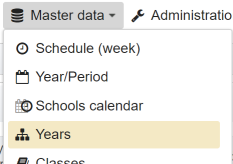
5.1 Master data
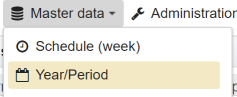
First master data must be entered. The settings can be found under
the menu item Master data: 
5.1.1 School year/Period
Different timetables can exist for one school. These are
differentiated as timetable versions or variants and these are in turn
assigned to specific school
years or periods. As soon
as the school is initially set up, there is at least one school year /
period. A weekly schedule version is also defined. First of all, you
only have to check whether the start and end dates (from / to) are
correct and correct them if necessary. In our example school, the school
year starts on September 3, 2018 and ends on June 26, 2019:

5.1.2 Schedule (week)
The schedule for a school week forms the basis of the timetable. This
must be created first. This can be done under the menu item Masterdata-Schedule. All
hours or breaks with the respective times are listed here for each day.
See Schedule (week)…
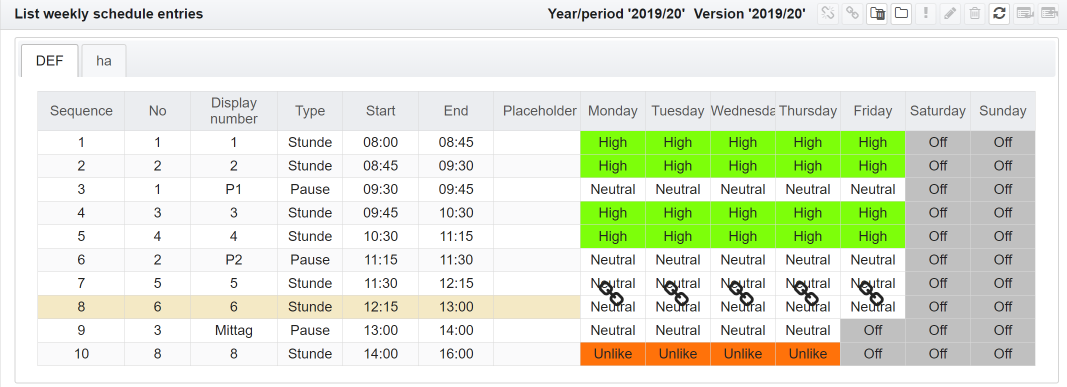
An example of a schedule would look like this:

Hours 1 and 2 as well as hours 3 and 4 are marked as possible double
hours and also marked as ‘high’ so that hard subjects are preferably
taught there. Because the hour 6 was unlike, the machine
will try to avoid placing the hours in this time when planning.
5.1.3 Years
The lessons in the Franzplan are organized on the basis of years or
course levels. If there is no such structure in the respective school,
at least a ‘pseudo’ year must be created. It can have any name. The
school abbreviation is useful for such a ‘pseudo’ year. Years have also
been created when the school is set up. More details can be found under
Years. Usually there is nothing to configure
here. An example:

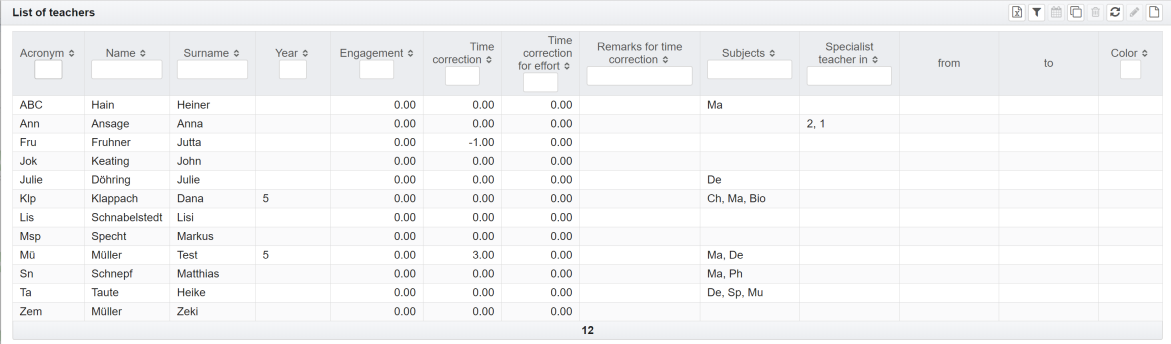
5.1.4 Teachers
Ultimately, the master data of the teachers are also important for
regular school operations. At least every user of the Franzplan must be
assigned to a teacher. Explanations can be found here: Teacher. Initially, one teacher is set up
for the school. All other teachers have to be added then.
Example:
5.1.5 Classes
The classes are entered under the menu item Masterdata-Classes. Classes are
assigned to at least one year. Just like the initial schedule and the
years, the classes have already been created, but can still be changed.
Further explanations can be found under manage classes…
Example:
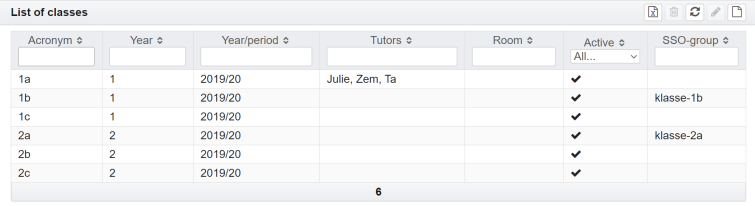
In the example it can be seen that the school has three classes, because in class 1 three classes are taught. However, classes 2c, 3c and 4c do not exist. They are therefore deactivated so that they are not taken into account in the automatic lesson planning.
5.1.6 Subjects
Initially, a number of standard subjects are created. However, any additional subjects can also be defined. The administration is explained here: Manage Subjects.
5.1.7 Users
After the teachers have been defined, the users can also be entered. However, only your own user is required for planning. Please make sure that the users assign themselves a strong password. The password can be changed by the user at any time. Further information: Manage users….
5.1.8 Rooms
The definition of the rooms complete the picture. There are also no rooms initially. It is not absolutely necessary to define rooms from start. Often the classes have got there own rooms which are not used by any others. Further information is available at: Manage rooms.
5.1.9 Couplings
Lessons which are taught in cross-class or cross-year manner is combined in couplings. Further information: Manage Couplings…
5.1.10 Students
Students only need to be maintained and managed in connection with learning development reports. Students are not required to create timetables.
5.2 Planning
Now you can start scheduling.

It must be decided whether it is sufficient to do the hourly planning by hand or whether the system should generate an automatic proposal. The further procedure depends on this:
Manually
Then you can start planning your lessons straight away.Automated
Here you have to enter additional data as requirements for the machine.
6 Masterdata
6.1 Manage school years/periods
Different timetables can exist for a school, differentiated as
timetable versions or variants and these are in turn assigned to
specific school years or periods. The following hierarchy is used:
- Timetable version
- A specific timetable is available in a specific version or variant. You can switch between these versions at any time. The currently loaded version is edited. The header shows which version is loaded. A version or variant belongs to a specific school year or period.
- school years/periods
- One or more school years / periods can exist for one school. At least one timetable version is assigned to every school year or period. Rooms, classes, classes, subjects and teachers as well as the weekly schedules are assigned to the school years / periods. They can therefore be managed in such a way that changes (adding, removing) have no effect on the other school years / periods.
Changing a year or period is done implizitely by loading the version. Because a version is assigned to one year/period
the change will happen automatically. The current school year or period
is shown in the header:

All administrative activities / changes to rooms, classes, classes, subjects, teachers, weekly schedules refer to this school year.
By clicking  the timetable version and thus the school
year / period can be changed.
the timetable version and thus the school
year / period can be changed.
6.2 Manage weekly schedule
The timetable for the school is based on a weekly schedule. It can be
created and changed by the school administrators. A school can work with
multiple weekly schedules. For example, it may happen that the break and
lesson times for the upper level are different from those for classes 5
to 10. For this reason, each weekly schedule entry has an abbreviation
that is used to assign it to the relevant schedule. If it is necessary
to work with different schedules (e.g. in schools with a separate upper
level), additional boundary conditions must be observed. If more than
one schedules are defined, each schedule is shown as a separate
tab.
Important: Different schedules should be used wisely,
e.g. if the times differ! Each additional schedule has a high impact on
response times.
When defining the classes, the reference between the class and a specific weekly schedule is done via the abbreviation of the weekly schedule.
The table explains the attributes for the schedule:
| Attribute | Meaning |
|---|---|
| Sequence | The order determines at which position in the timetable the respective entry should be taken into account. This is particularly important if different times for different grades have to be taken into account. In the simplest case, it is simply numbered from 1 for each day. |
| No | The number of an entry appears in the printout of the timetable. It is part of the key for the unique identification of the entry. |
| Display number | The identifier or display name that the entry should have in the
timetables, e.g. Break 1, if not only the number of the
entry should appear. |
| Type | Der Typ kann die Ausprägungen Stunde und Pause annehmen. Er erscheint ebenfalls im Ausdruck des Stundenplans und gehört zum Schlüssel für die eindeutige Identifikation des Eintrages. |
| Start | Defines the start time of the respective hour / break. The entry is made in the format <2-digit hour>: <2-digit minute>, example 06:25. |
| Ende | Defines the end time of the respective hour / break. The entry is made in the format <2-digit hour>: <2-digit minute>, example 07:10. |
| Placeholder | It may be necessary for certain entries to be listed in the schedule
but not to appear in the schedule. This is particularly the case when
working with multiple school schedules. Then such entries are marked as
placeholders. Possible expressions for this are yes or
no. |
Example for a schedule:
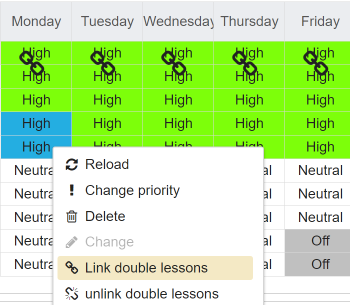
A priority can be assigned for each cell in the weekday column. This
attribute is intended as a preparation for an optimization function, but
is also used to indicate when the preferred hard subjects
should be taught and also to show deviations from them. Hard subjects
are marked with a flash in the timetable if they are scheduled in times
that are not marked with the priority high or
mandatory. Columns that only contain entries with
Off are hidden in the timetables. To change the priority,
the entries must be selected. To do this, click on them with the left
mouse button and the CTRL key pressed. They are highlighted
in color. A context menu opens with the right mouse button: 
Possible priorities starting with the lowest:
| Priority | Meaning |
|---|---|
| Off | no lessons: there are no lessons. If this is entered in every line
for a day of the week (e.g. Saturday), this day of the week is not shown
in the timetable. By default, Saturdays and Sundays are Off marked. |
| Unlike | This teaching time should not be taken with ‘hard’ subjects. |
| Neutral | This teaching time should not be taken with ‘hard’ subjects. |
| High | This teaching time can be planned with ‘hard’ subjects. |
| Mandatory | This teaching time can be planned with ‘hard’ subjects. |
The symbol  marks the entries that can
be connected as double lessons. This marking can be made if both entries
to be connected have been clicked while holding down the ‘CTRL’ key.
Both entries that can be connected to each other are then highlighted in
dark.
marks the entries that can
be connected as double lessons. This marking can be made if both entries
to be connected have been clicked while holding down the ‘CTRL’ key.
Both entries that can be connected to each other are then highlighted in
dark.
Either entire lines can be selected or individual cells in the columns for the days of the week. An entire line can be selected in one of the columns left of the weekdays. Depending on this, the menu items in the context menu (right mouse button) or the buttons from the header are active. Folding things are possible:
 |
Reload table |
 |
Delete marked entry |
 |
Copy selected entry and insert it below the selected one |
 |
Copy selected entry and insert it above the selected one |
 |
Change entry |
|
Mark entry as double hour; This menu item is only active if both entries which shall be connected have been clicked while holding down the ‘CTRL’ key. Both entries that can be connected to each other are then marked in dark background color. \ |
Example:
 |
|  | Unlink the existing connection as
a double hour
| Unlink the existing connection as
a double hour
6.2.1 Create a new weekly schedule entry
When creating a new weekly schedule with the button  an existing one is used as
a template. An abbreviation for the new entry must be assigned as well
as the weekly schedule must be selected which the new one is based on.
Deleting a weekly schedule only works as long as there are multiple
weekly schedules. At least one weekly schedule must be available.
an existing one is used as
a template. An abbreviation for the new entry must be assigned as well
as the weekly schedule must be selected which the new one is based on.
Deleting a weekly schedule only works as long as there are multiple
weekly schedules. At least one weekly schedule must be available.
6.3 Manage years
The years are configured under this menu item. Each year is assigned to a specific weekly schedule. The following attributes are relevant:
| Attribute | Meaning |
|---|---|
| Abbreviation | Short name of the year, e.g. 7, 8, 12 … The abbreviation is used to identify the year. |
| Description | The description is just displayed on different places, but not used as identification. |
| Schule | Abbreviation of the school |
| Weekly schedule abbreviation | If it is a school that works with several weekly schedules, e.g. in
schools with upper secondary level, the correct abbreviation must be
selected here. See also Manage
schedule … In most cases, however, this is not the case, i.e. there is exactly one weekly schedule for everyone and this column contains the standard schedule. Usually this is ‘SEK1’. Different schedules should only be used if the lesson/break times for years differ. Each additional schedule increases the response times when planning, because a complete schedule is calculated on its basis and approved against conflicts with each other. |
| Additional information | The additional information is a free text that is displayed below the timetable in the years view. This entry is optional. |
The following activities can be carried out to manage the years:
 |
Create new entry |
|
Reload table |
|
Delete marked entry |
|
Change entry |
6.4 Manage classes
The entries for the classes can be collected under this menu item. Each class is assigned to a year and a school year/period. The following attributes are relevant:
| Attribute | Meaning |
|---|---|
| Acronym | Short name of the class, e.g. 7.1, 8.2, 12.4… Classes are identified via these acronym. |
| Year | Each class is assigned to a year, the abbreviation of this year is shown here. |
| Year/period | Assigned school year or period |
| Tutors | List of tutors or class teachers assigned to this class. These teachers are assigned by default as soon as a new schedule entry is created. |
| Room | classroom This room is assigned by default as soon as a new schedule entry is created. |
| Aktive | Indicates whether the class is activated in the specified school
year / period. This has an impact on lesson planning. Classes that are
not activated getting not assigned lessons in the automatic lesson
planning. For example, a school can have assigned three classes per year by default. In some years, however, only two classes were set up. In this case, the superfluous classes will be deactivated in the years with fewer classes. So they are not planned. |
| SSO-group | This attribute is only available if Single Sign On is possible and
configured for the login. Here the group is entered, whose users can access the timetables for the class or year. Example with IServ: A standard user is assigned to group class-1b
in IServ. After login with IServ, he will be shown the class plan for
class-1b and the class plan for year 1, because class 1b is
assigned to this year in Franzplan. All standard users who are not assigned to group class-1b in IServ cannot access neither
the plan for year 1 nor the class plan of class 1b. Important: The SSO procedures differ in terms of the data that are transmitted. The entry that is listed in the group configuration under Account is transmitted in the IServ. |
The following activities can be carried out to manage the classes:
|
Create new entry |
|
Reload table |
|
Delete marked entry |
|
Change entry |
|
Create a new coupling](#manage-couplings) and overtake the selected classes in the creation dialog for the coupling. |
6.5 Manage subjects and couplings
Subjects aa well as couplings must already exist before they can be
assigned to timetables. A teacher can only be entered in the timetable
in connection with a subject. This means a subject must be defined even
for supervision times ( e.g. a break, lunch time or at the
beginning).
The list of subjects and couplings is displayed in the same view and
managed together side by side.
6.5.1 Manage subjects
The following attributes are relevant:
| Attribute | Meaning |
|---|---|
| Acronym | Short name of the subject, e.g. Ma, Deu, GL… The subject is
identified using this acronym. If the subject is a bar, the abbreviation
must be chosen that it differs from a ‘normal’ subject. See also the explanations under Subjects, Bars, Couplings … |
| Display name | With this name the subject appears in the timetable if the change mode is not switched on. If the display name is empty, the abbreviation of the subject is displayed in the timetable. In the timetable for the individual teacher (teacher view, however, the abbreviation of the subject is listed always. |
| Description | This column can include an additional description of the subject. It is only a comment and does not appear in the timetable view. |
| Bar | This attributes indicates, whether it is a bar. The values
Yes (bar) or No (no bar) can be assigned. The
timetable entries belonging to a bar are displayed together. There is no collision check for teachers and rooms within the bar. So the user must pay attention to this. An alternative to bars is the administration of timetable entries as coupling. See also the explanations under Subjects, Bars, Couplings … |
| Inter-year | There are bars in which teaching is carried out across more than one
year. In this case, a collision check should not result in an error. To
do this, these bars must be marked accordingly. The values
Yes (cross-year) or No can be assigned. This
possibility is actually out of date. It is better to map cross-year
classes with Couplings. |
| Hard | Marks the ‘hard’ subjects. We call those subjects ‘hard’ that should be taught at preferred times in the weekly schedule. These times are marked with the corresponding priority in the weekly schedule. See also Manage weekly schedule … |
| Color | A color can be specified here with which the subject is to be highlighted in the timetable for better recognition. The color can be entered numerically or selected from the color palette. Colors can also be stored for teachers. As soon as a color is assigned for the subject, the color for the teachers is ignored in the presentation of the timetable. |
| Time correction | Time correction compared to the actual timetable in minutes, see Time correction … |
The following activities can be carried out to manage the subjects:
|
Create new entry |
|
Reload table |
|
Delete marked entry |
|
Change entry |
 |
Copy a marked entry |
 |
Delete a filter used in the header |
 |
Takeover entries from other school years/periods |
|
Create a new coupling](#manage-couplings) and overtake the selected subjects in the creation dialog for the coupling. |
6.5.2 Manage couplings
Lessons can be seen as coupling if they are taught cross-subject and/or cross-classes. Couplings are then assigned like subjects in the timetable with the advantage that a separate entry in the timetable does not have to be managed for each of these subjects or each class involved. The assignment of the teachers to the subjects contained in the coupling and in addition to rooms can be done when creating or changing the special timetable entries.
Example:
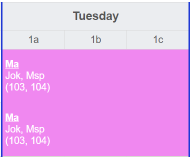
or in edit mode:
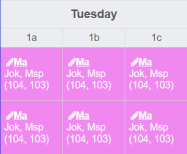
Here a coupling was defined for the subject of mathematics. Classes 1a,
1b and 1c are taught in parallel. 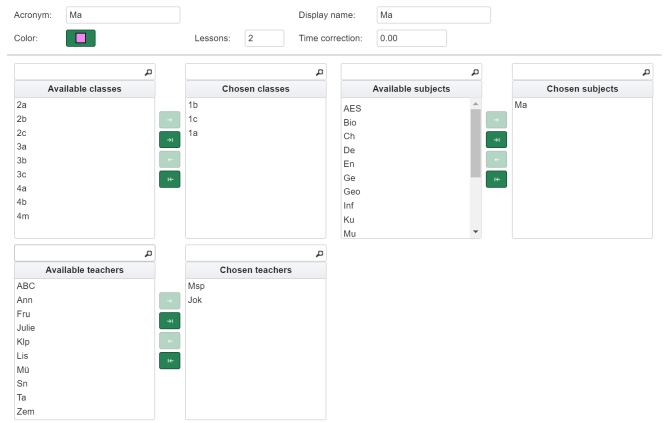
In addition, the teachers can already be assigned here. These are also
adopted when the entry is entered in the timetable.
The following attributes are relevant:
| Attribute | Meaning |
|---|---|
| Acronym | Abbreviation of the coupling, z.B. Ma 9 … The coupling is clearly identified via this abbreviation. |
| Display name | Dieser Name erscheint im Ausdruck für den Stundenplan und in einigen Anzeigen. |
| Classes | The list of classes that are taught together. |
| Subjects | The list of subjects that are taught together. |
| Teachers | The list of teachers for this lesson. |
| Color | A color can be specified here, with which the coupling should be underlaid in the timetable for better recognition. The color can be entered numerically or selected from the color palette. |
| Time correction | Time correction compared to the actual timetable in minutes, see Time correction. |
| Lessons | The number of hours per week for this lesson. |
The following activities can be carried out to manage the couplings:
|
Create new entry |
|
Reload table |
|
Delete marked entry Deleting couplings only causes the couplings to be removed from the current school year / period. The associated subjects are not deleted. |
|
Eintrag ändern |
|
Delete a filter used in the header |
 |
Check couplings Lists the inconsistent coupling entries: combinations of subject and class that occur in more than one coupling. |
 |
Export the view as a csv file The file is downloaded and opened using Excel if the browser’s default settings are taken. |
6.6 Manage teachers
Teachers who are managed under this menu item are also mandatory for
creating a timetable.
List of attributes:
| Attribute | Meaning |
|---|---|
| Acronym | Teachers acronym. The teacher appears under this abbreviation in the timetable. |
| Name | Surname |
| First name | First name |
| Year | Optionally, the teacher can be assigned to a year. The teacher can be filtered under this year. The assignment otherwise has implications for automatic lesson planning. Depending on the prioritization, lessons in the classes are preferably given to teachers from their own year. |
| School | Acronym of the school |
| Engagement | This is the target value for the teacher’s planned weekly assignment. The entry is made in minutes or number of lessons. It depends on what settings have been made for the school. It is checked during accounting against the actual use according to the timetable and also evaluated / observed in the automatic planning. A calculation example for the calculation of the teaching obligation can be found here: Time correction |
| Deviation WT | This value captures deviations related to regular working hours. This applies to part-time work, partial retirement, building up or reducing a working time account or also age reduction hours. this could also be additions and deductions from the activity in the new school year, e.g. functional positions. |
| Takeover | This value shows the deviation from the previous year. It is based on the calculation of the working time in the previous year in relation to the teaching obligation in the same period. |
| Personal card | The transfer from the index card includes surcharges and deductions from the personal documentation of the teacher, e.g. substitution, cancellation, class trips, … |
| Time correction | Additional corrections to the working time which are also taken in account during calculation of the engagement. |
| remarks for time correction | Here some remarks can be inserted for explaining the different time corrections. |
| Subjects | The optional list of assigned subjects has in the automatic planning. Depending on the prioritization, the teacher is preferably employed in the subjects specified. |
| Specialist teacher in | This optional list of assigned years is taken into account when selecting the teachers in the automatic planning and for the suggestions for selecting teachers who are still free. Depending on the prioritization, the teacher is preferably assigned in the specified years. |
| From | Operation from (date), Based on the from-to range, it is recognized whether a teacher is included in the account for the entire school year or only based on certain timetable versions. If the field is empty, the teacher will be considered for the entire period. This is particularly interresting in connection with teacher accounting if a teacher joins in half a year. |
| To | Operation to (date), see `From’… |
| Color | A color can be specified here, with which the teacher should be
highlighted in the timetable for better recognition. The color can be
entered numerically or selected from the color palette. Colors can also
be stored for subjects. However, once a
color is assigned to the subject, the color for the teacher is ignored
in the presentation of the timetable. If several teachers are assigned
to one class, several colors are displayed accordingly. This works up to
a maximum of 10 teachers. Example:  The color for the teacher is only
used in the timetable for the year and in the planning view. The color
of the teacher is irrelevant in the class, room and teacher plans. The color for the teacher is only
used in the timetable for the year and in the planning view. The color
of the teacher is irrelevant in the class, room and teacher plans. |
| Text color | This color is used for the text of the teacher in the timetable for better recognition. The text color is set automatically if this value is not given. |
| SSO user | This corresponds to the teacher’s SSO username in the system being used for authentication. This value is only necessary if single sign-on is being used. |
| usable for planning | This attribute controls whether the teacher should be used for automatic planning. However, a teacher can always be manually added to the timetable. This is useful, for example, if the teacher is a substitute who is only filling in at short notice and therefore should not be included in the automatic timetable. |
The following activities can be carried out to manage teachers:
|
Create new entry |
|
Reload table |
|
Delete marked entry |
|
Change entry |
 |
Take over entries from other school years / periods. This affects teachers who are not yet assigned to the current school year, i.e. do not yet appear in the list. |
 |
Take on teaching engagements from other school years / periods. Here the teaching obligation including the deviation from other school years can be taken over. The prerequisite is that the relevant timetable versions in the school year from which the numbers are to be taken over are marked as ‘calculation-relevant’. |
6.6.1 Time correction
The times from the weekly schedule are used and summarized for the
accounting of the teacher hours. The time taken into account may not
correspond to the actual period from the timetable. This can be
corrected by this time correction. For example, times can be credited to
the teacher that are not included in the timetable.
Example:
A teacher works in part time and has a regular engagment of 700 min per
week. In the previous year, he was unable to take a few hours of
replacement and therefore credited 90 minutes, which he had to work less
this year. He gives 14 hours at all and 5 hours in sports. Because of
the travel and clearing times, he will be credited with 25 minutes for
this assignment. This is done by the Franzplan during calculation
because the 5 min correction time is configured at the subject.
He is a subject coordinator and gets credit for 45 minutes.
From the personal records, 10 minutes are transferred.
Therefore the following entries are taken for the masterdata of this
teacher:
| Regular engagement: | 700 |
| Deviation WT: | 0 |
| Takeover: | -90 |
| Personal card: | +10 |
| Credit hours: | +45 |
| Time correction for effort: | +25 |
Ergebnis der Abrechnung:
| Regular engagement | Deviation WT | Takeover | Personal card | Credit hours | Engagement | Accounting | Difference |
|---|---|---|---|---|---|---|---|
| 700,00 | 0,00 | -90,00 | 10,00 | -45,00 | 575,00 | 605,00 | 30,00 |
6.7 Manage rooms
The rooms are configured under this menu item. A room can be assigned
to one or more subjects. So far this is
purely optional and is only for display.
The following attributes are available:
| Attribute | Meaning |
|---|---|
| Description | The description of the room. The room appears in the timetable under this description. |
| School | Abbreviation of the school, if there is sufficient authorization to see this column. |
| Subjects | List of assigned subjects |
| usable for planning | This attribute controls whether the room should be used for automatic planning. |
The following activities can be carried out to manage the rooms:
|
Create new entry |
|
Reload table |
|
Delete marked entry |
|
Change entry |
6.8 Manage students
Managing students is optional. They are not required for the planning but can have permissions to see the results.
6.9 Schoolcalendar
The school calendar is mainly used for substitution planning and the definition of the weekly model.
It is planned to use it later for the output of daily timetables.
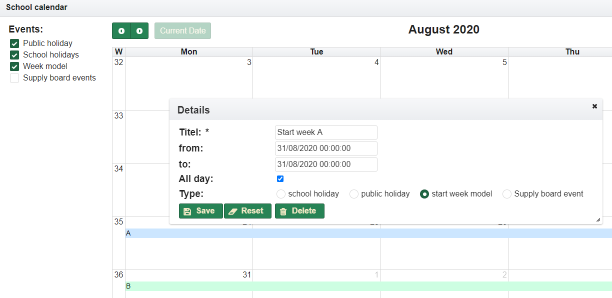
To create an entry, just click on the corresponding date field in the
calendar. Now you can give the event a title and specify the time span
of the event. If the whole day is to be taken into account, the check
mark next to All day must be set.
The type of event is also important. The entry of vacations and
public holidays has so far no effect.
6.9.1 Start of the weekly model
The selection Start weekly model specifies that the
first week of the weekly model starts on this date. This information is
taken into account when the current week is displayed in the timetable
views.
Example:
Such starting points for the weekly model can be set several times, e.g. if the sequence of weeks changes during the year or after the end of the holiday.
7 Administration
All activities that are necessary for system administration are summarized under administration. The following data are affected:
| Data type | Description |
|---|---|
| School | The basic data for schools are defined here (school abbreviation,
schools name, …). In the desktop version (Franzplan-DT) this is possible for exactly one school. |
| Users | Here the users are set up with their user ID and the initial password. |
| User settings | This point contains some settings for the current user. |
| System settings | This point contains parameters that are valid system-wide. |
| Database | The database can be backed up or restored from previously created backups. |
| License key | Management of the license key. |
7.1 Manage schools
This function is only available to users with the ‘Administrator’ role.
The basic data for the school are entered here.
There is only one school in the desktop version for the Franzplan
available. Only the name of the school and the speed (maximum number of
classes per year) can be changed here.
In addition, the basic values for teacher accounting can be
entered:
- Engagement: This value is used as the standard value for the engagement of the teacher if nothing has been entered in the basic data of the teacher or the value there is 0.
- Engagement [hours]: This value is used as the standard value for the standard engagement if the accounting is calculated in lessons.
- Time per lesson [minutes]: This time is used to calculate the actual working hours if the accounting is calculated in lessons.
- Calculate per lesson: If this value is checked, the the accounting is calculated per lesson. Engagement in teachers entries is then in number of lessons instead of minutes. One lesson is taken into account with the specified time in minutes.
7.2 Manage users
Under the menu item ‘Administration users’ it is regulated who can
access the school with which role and therefore which data they can see
and change.
You can also change the password here by marking the user’s data
record and then clicking the button / menu item  .
.
A user can have one or more roles. Known roles are:
| Role | Explanation |
|---|---|
| Lehrer (teacher) | Users with this role can view and print timetables for the own
teacher as well as timetables for classes, rooms and years. Users with this role can set a new password themselves. |
| SchulAssistent (school assistent) | Holders of this role can view and print timetables. However, users with this role cannot set a new password themselves. This role can be used if the teachers of a school should have read access to timetables, but the effort should be avoided to set up an individual user for each teacher for this purpose. |
| SchulAdministrator (school administrator) | Owners of this role have the same rights as owners of the role
Lehrer and can in addition also use the complete
administration menu for their school: Manage timetable Manage classes Manage subjects Manage rooms Manage teachers Manage requirements Check timetable |
| SuperUser | Owners of this role can perform certain additional functions that
are not assigned to the School Administrator by default. For example, this includes deleting all timetable entries for a specific version directly from the planning view. |
| Schueler (student) | Owners of this role can view and print out timetables for the classes and the timetables for years. Users with this role can also set themselves a new password. |
| BasisSchueler (basic student) | Holders of this role can view and print out timetables for the classes and the view
to years. However, users with this role cannot set a new password themselves. This role can be used when students in a school should have read access to timetables, but should avoid the hassle of setting up an individual user for each student. |
| Administrator | This role does exist also in the version of Franzplan that runs on
your own workstation (Franzplan-DT). It includes extended rights for performing maintenance work, e.g. Creation of backups, Restoring the database from previous backups, managing the license key |
List of attributes:
| Attribute | Meaning |
|---|---|
| User-id | Die Benutzer-Id. Mit dieser Id meldet sich der Benutzer am Franzplan an, z.B. Markus.Specht. Groß- und Kleinschreibung wird unterschieden. |
| First name | First name of the user |
| Name | Surname of the user |
| Teachers acronym | The short name of the teacher. |
| e-Mail address of the user (optional) | |
| School | The school is for information only, is predetermined. |
| Roles | One or more roles, see above … |
The following activities can be carried out to manage the classes:
|
Create new entry |
|
Reload table |
|
Delete marked entry |
|
Change entry |
|
Change password |
7.3 User settings
Each user can make a few individual settings themselves and thus
influence the presentation of the timetable on the website and in the
Excel printout.
If no special settings are made, the standard settings are active. The following attributes can be set:
| Attribute | Meaning | Standard |
|---|---|---|
| Border color between the days | Sets the color of the border between the days of the week in the HTML view for the years. | Black |
| Border width between the days | Sets the width of the border between the days of the week in HTML view for the years in pixels. | 1 px |
| Background color for breaks | Sets the color of the cell background for breaks in the HTML view for the years. | No difference to lessons |
| Background color for lessons | Sets the color of the cell background for lessons in the HTML view for the years. | White with slight shading between even and odd lines |
| Width of lesson columns | Sets the width of the columns in the HTML view for the years in pixels. | 40 px |
| Height of a row in vertical planning view | Set the row height for the vertical view. | 20 px |
| Excel background color for table header | Sets the color for the background of the heading in Excel. | Blue |
| Excel background color for lessons | Sets the color for the background of the lesson rows | white |
| Excel background color for coupplings | Sets the color for the background of the coupling columns and cells | No difference to breaks or hours |
| Excel background color for breaks | Sets the color for the background of the rows containing breaks | light green |
| Excel width for lesson columns | Sets the width of the columns in the Excel view for the years in pixels. | 30 px |
| Excel width of lesson columns in overall view | Sets the width of the columns in the Excel overall view for the years in pixels. | 30 px |
| Excel font size | Sets the font size in Excel view. | 14 px |
| Separate double lessons in Excel view | Specifies whether the double hours should be separated in Excel view. | Standard: no, i.e. are shown connected |
| Years filter in years view | Selects the years to be displayed in the years view. This is particularly helpful when the timetable for the years are to be shown on a kiosk board. If no year is selected, all years are displayed. | |
| Time interval for kiosk mode in years view [seconds] | Time span in which a year is displayed if kiosk mode is set. After the time has elapsed, the next year is switched on. | 60 seconds |
| Time interval for kiosk mode in classes view [seconds] | Time span in which the timetable for a class is displayed if kiosk mode is set. After the time has elapsed, the system switches to the next class. | 30 seconds |
| Time interval for kiosk mode in teachers view [seconds] | Time span in which the timetable for a class is displayed if kiosk mode is set. After the time has elapsed, the system switches to the next teacher. | 30 seconds |
| Time interval for kiosk mode in supply board view [seconds] | Time span in which the timetable for a class is displayed if kiosk mode is set. After the time has elapsed, the system switches to the supply board of the next day. | 30 seconds |
7.4 System settings
The settings valid for each school are made here, which apply regardless of the user who is logged on. So far, these are the following parameters:
| Attribute | Meaning | Standard |
|---|---|---|
| User for the kiosk mode | User who is used when the timetable view starts in Kiosk mode with automatic login. In this mode
there is no login with a password. Therefore, only users who have no
rights other than the SchulAssistent role can be used here.
The list contains all users who meet this criterion. The desired user
must have been created beforehand. |
Empty |
| Address filter for kiosk mode | If this parameter is set, automatic registration in kiosk mode is only possible if a connection is established from an IP address that corresponds to this filter. The information is given as a regular expression. | Empty |
| Template for teachers accounting | Here the template is stored the Word document for teacher accounting is based on. There are replacement patterns, see Replacement pattern for Word template | empty |
| Current template for teachers accounting | The current template for teacher accounting is displayed here. The current template can also be downloaded for further processing. After a change it has to be uploaded again. | Empty |
7.5 Manage database
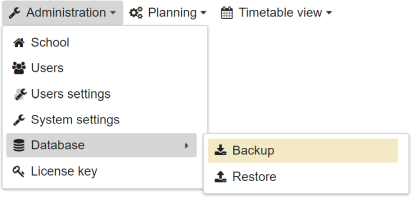
This function is only available to users with the ‘Administrator’ role.
The data entered the timetable program by the timetable planner and
used for timetable planning is stored in an internal database.
For the sake of simplicity, this can be thought of as a large file in
which the data is stored in a structured manner and sorted in such a way
that it can be quickly found and read in various contexts. So that these
data, which have been painstakingly recorded by the time planner over
time, can be saved against sudden incidents, there is the option of
saving them separately. This is also called data backup. The data is
written to a file. It makes sense to copy a backup to another, safe
place. In an emergency (e.g. in the event of data loss), the data is
then available for restoration (also known as ‘restore’).
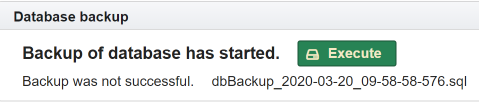
7.5.1 Backup
To back up the database, simply click the ‘Execute’ button.
The system creates a new file with the backed up data in the ‘backup’
subdirectory and outputs the name of the newly created backup file on
the user interface.
You can check this in the explorer. The output of the ‘backup’ directory
contains all the backup file just created:
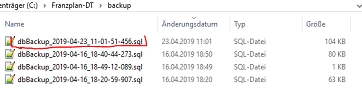
The recommendation is to copy this file and save it in a protected
location (secured network drive or similar) that can be accessed in the
event of a necessary recovery.
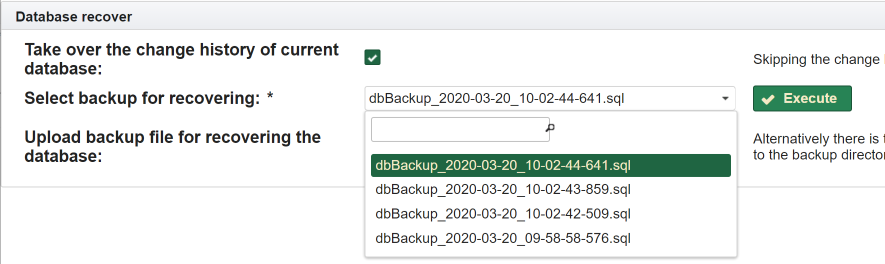
7.5.2 Restore
There are two ways to restore from previous backups.
7.5.2.1 Load directly from the backup directory
If the desired backup from which the database is to be restored is
still in the backup directory of the Franzplan, it can be
selected here from the list of available backups and loaded with the
Execute button.
7.5.2.2 Upload a backup
Alternatively, a file can be uploaded that was previously saved. To
do this, the file is selected and uploaded with
Upload.

7.6 Manage license
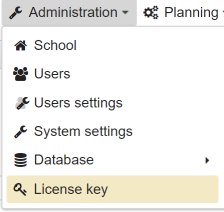
This function is only available to users with the
‘Administrator’ role. By default, this is the user called
admin, which is created when the database is
initialized.
When delivered, Franzplan is provided with a test license, which must
be replaced with a valid license key after the test phase.
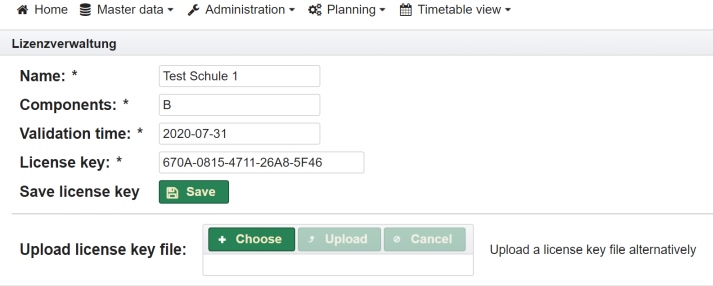
You can enter the license information manually or upload the file with
the license key. The file has the following format:
franzplan.key.value=4A24-B471-62D1-F545-0B94
franzplan.key.components=B
franzplan.key.name=Test Schule 1
franzplan.key.date=2019-05-30
When entering data manually, the fields are filled in with the
license information as specified and confirmed with Save. A
prerequisite for uploading a license file is that you have received the
license key from Franzplan Support by email. Please contact Franzplan Support. If the license
is not valid or is about to expire, the corresponding messages will be
displayed at Login.
8 Planning
8.1 Timetable planning
The view to timetable planning shows the timetable for all classes
and years and gives a complete overview. Out of the box, the panels for
viewing the graduation requirements, teachers engagement and the actual
planning view are included here.
The arrangement of the panels can be changed by clicking on them in
their header and moving them with the left mouse button held down.
The panel for the graduation requirements
and the teacher-planning can
also be minimized or hidden completely if it is not needed.
The header shows which timetable
version it is inclusive its acronym and activation status. Here the
timetables are also changed or created. Depending on your preference,
you can choose between three different view types and switch between
with the button  in menu
 .
.
The output in Excel then also changes according to the selected display
type:
- View to years
- Years appear in separate tabs, days of the week are arranged in columns.
- Weekday view
- Years appear in separate tabs, days of the week are separated.
- Complete view or overall view
- All classes, teachers and rooms are visible on one page.
8.1.1 Planning view functions
The following functions can be performed. Some functions are only active in change mode and can also be accessed as a context menu with the right mouse button:
|
Reload timetable | |
|
Delete marked entry | |
 |
Delete all entries for the current timetable version | |
|
Copy marked timetable entry | |
 |
Opens a new browser tab containing the view for checking the timetable | |
 |
Move timetable entry | |
 |
Exchange marked timetable entries | |
 |
Load another timetable version.
The currently loaded timetable version on which changes are currently
being made is displayed in the header:  |
|
 |
Switches synchronization off: Changes to the current timetable are then no longer automatically transferred to other timetable versions. | |
 |
Activates the synchronization: This means that all changes to the
timetable are automatically adopted in all timetable variants for the
current period / school year. Existing entries in the relevant timetable variants that are not currently displayed are overwritten. |
|
|
Here you can take over the schedule entries for couplings and
subjects from other school years / periods. All entries for the selected
subjects and couplings are copied. Additional information: Takeover timetable entries. |
|
 |
Circle change of merked timetable entries with checking of collisions | |
 |
Replace or echange teacher, see Replace or exchange teacher… | |
 |
Replace rooms, see Replace rooms… | |
 |
This function can be used to search for and allocate free places for classes/subjects or couplings including the teachers and rooms, see Find free places… | |
 |
This function can be used to search for free places for configured graduation requirements, see Find free places for graduation requirements… | |
 |
This is the entry to the automatic planning, see Automatic planning… | |
 |
Dieser Menüpunkt beinhaltet das Submenü für die Funktionen hinsichtlich Import, Export und Drucken. | |
 |
Export timetable to Excel. It can then be printed from Excel. | |
 |
Here the complete timetable can be exported in a JSON format in order to import it into other programs again, e.g. ‘DieSchulApp’, and to use it further. This feature is available in context menu only. | |
 |
A previously exported timetable can be imported again here. See also import timetable… | |
 |
Here the complete timetable can be exported in a CSV format in order to import it into other programs as UNITIS format again, e.g. ‘DieSchulApp’, and to use it further. This feature is available in context menu only. | |
| This function contains the submenu for all items related to the substitution planning. | ||
 |
This function is related to the substitution planning. The date can be set, which the hint to an available substitution plan can be displayed. | |
 |
This function is related to the substitution planning. There it is possible to switch to view of substitution plans directly. | |
|
This menu item contains the submenu for all functions that are available for configuring the display. | |
 |
Switches to change mode or back again.
Changes to the timetable can only be made in change mode. In doing so, contracted cells are
separated. More detailed explanations can be found in the section below. |
|
 |
Switch colors for the subjects on or off | |
 |
Show hidden years again | |
|
Switch between different views: view to years, weekday view und overall view | |
 |
Switch on or off timetable collisions | |
 |
This function is enabled if the panel for the teacher planning view is dropped. It can be used to display it again. | |
 |
This function is enabled if the panel for the graduation requirements view is dropped. It can be used to display it again. |
8.1.2 View to years
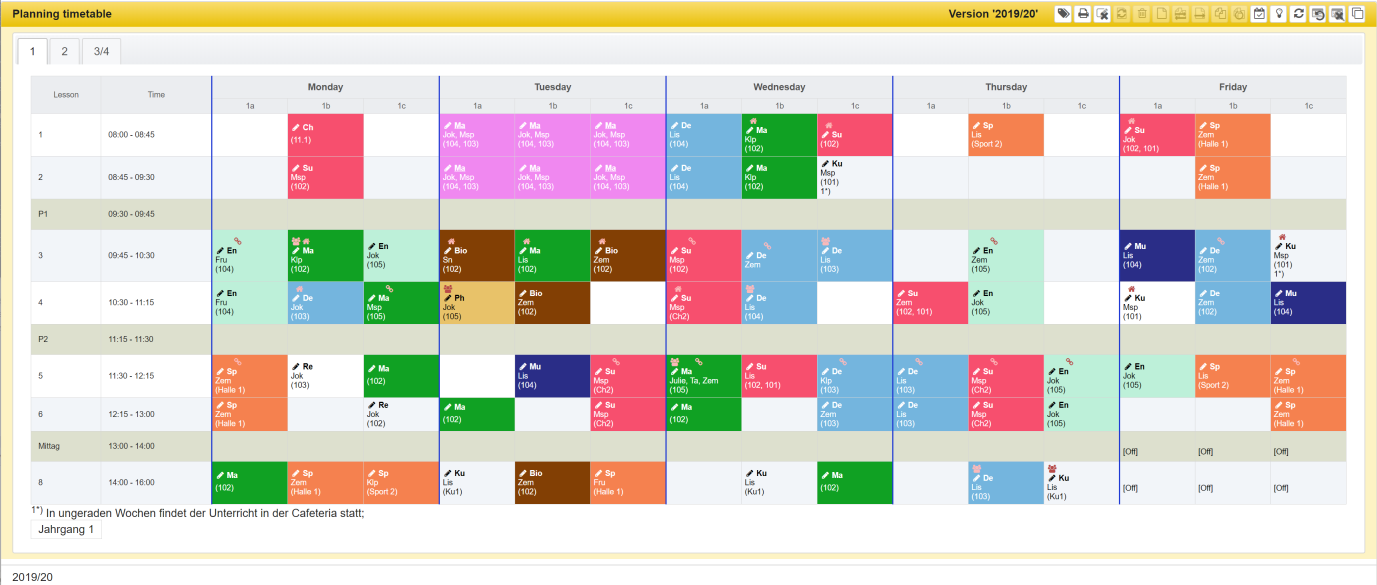
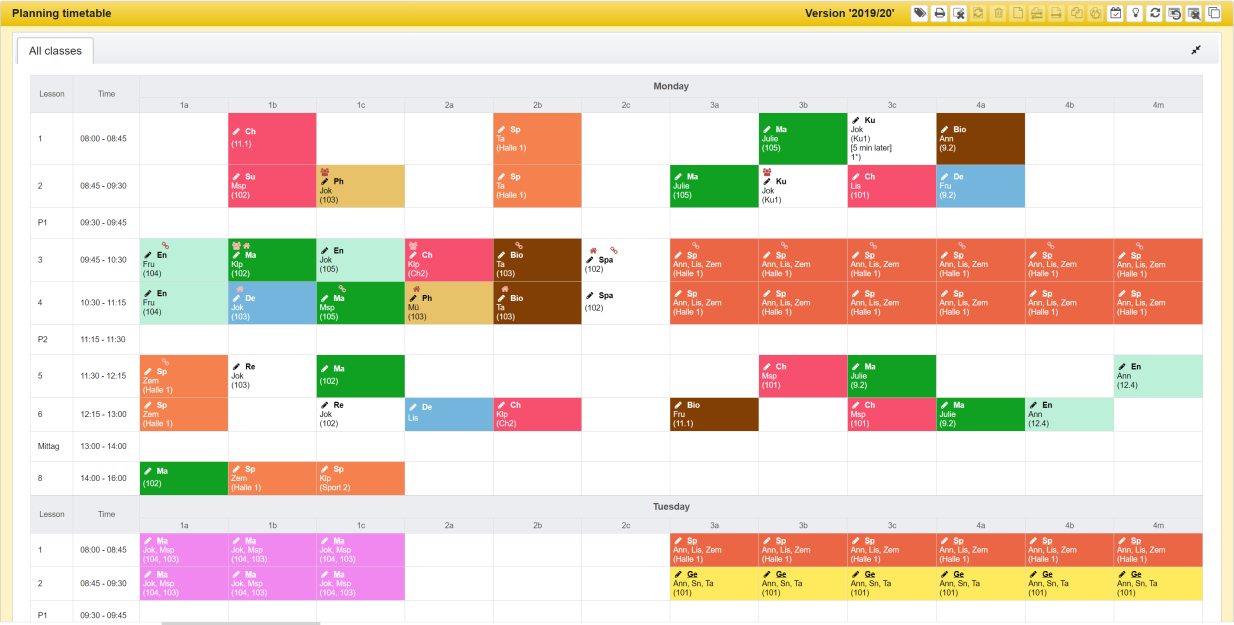
8.1.3 Weekday view
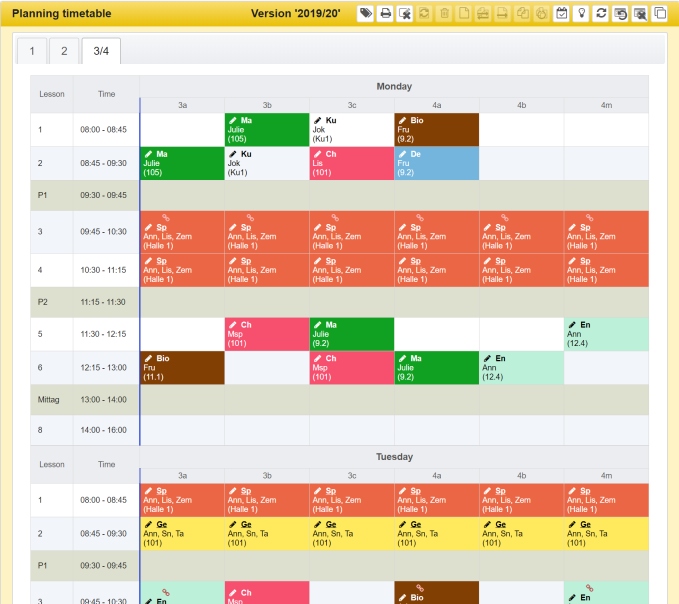
All classes can also be displayed in a tab in the view. You can
switch between displaying all classes in one tab and separate tabs for
each year.
To do this, simply click the button  or
or
 in the top right corner of the
view.
in the top right corner of the
view.
It is also possible to change the text height by clicking the button
 .
.
8.1.4 Overall view
The overview view shows the schedule entries for each resource
(class, teacher, room) in a row with horizontal segmentation of the days
of the week and hours.
This view is based on the system of a conventional timetable or room
planning board.
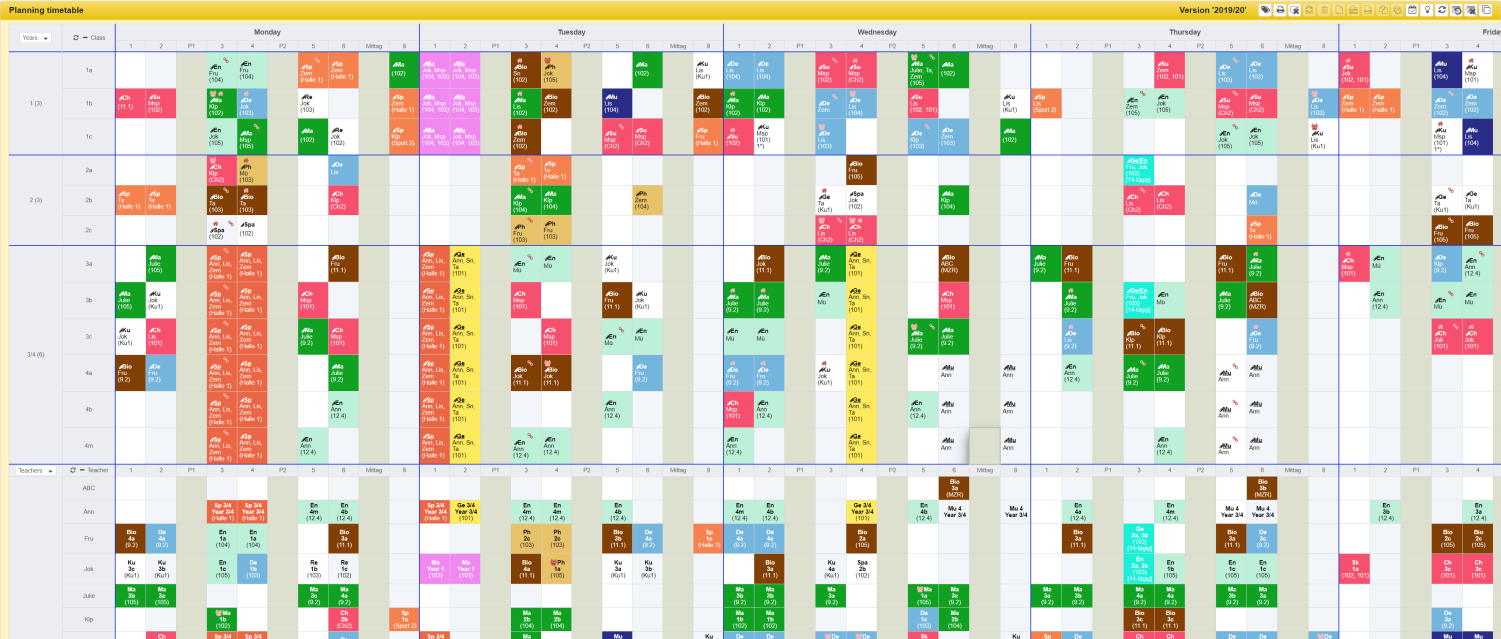
In this view, you can filter the resources (teachers / classes / rooms) that are to be displayed together using check menus.
The following video shows the function for displaying and filtering in the overview view: Filter overall view
An additional entry is listed in the context menu off the overview
view:
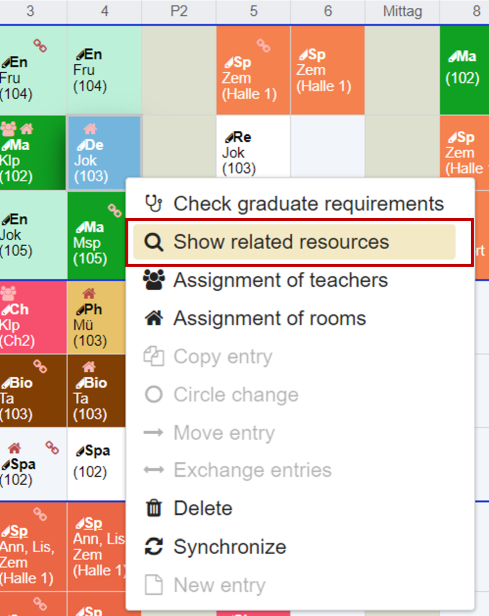
If this is clicked, only the teachers and rooms that are assigned to the selected entry are displayed.
8.1.5 The timetable entry
The single schedule entry contains the following data:
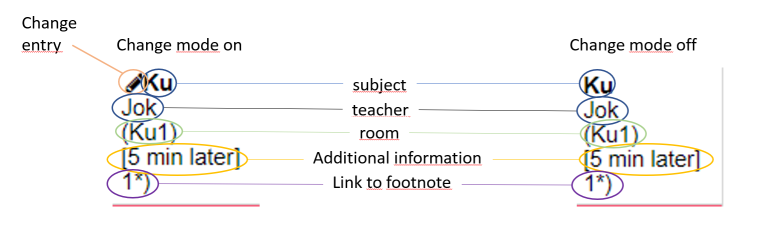
| Attribute | Meaning |
|---|---|
| Subject | The acronym of the subject. Ist der change mode is switched off, the display name for the subject is shown here, if available. |
| Teacher | The acronym of the teacher. More than one teacher can be assigned. |
| Room | The room number in parentheses. Multiple rooms can also be assigned. |
| Additional information | An additional piece of information that can be given when creating the timetable entry and is displayed directly in the cell. |
| Footnote | You can also set footnotes when creating the entry. This is only given as a reference and appears as text under the timetable. |
|
Link with which the entry can be changed, this is only active in change mode. |
 |
Link to the substitution plan. It is displayed as an overlay. This function is available, if the modul for substitution planning is activated. |
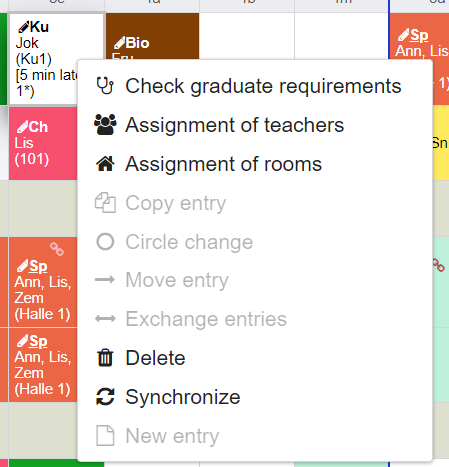
If you click on a cell, it appears with a thicker frame. With the
right mouse button you can activate a context menu, via which some menu
items can be reached directly.
Example:
8.1.6 Displaying collisions
As soon as a change to the timetable has been made, the complete
timetable will be reloaded. A collision check is carried out when
reloading. This is particularly advantageous if several users change the
timetable at the same time. As a result, the cells in which collisions
occurred are marked.
The following markings are used:
 |
An affected teacher is scheduled several times. A tooltip provides more information about the timetable entry with which this conflict exists. |
 |
A room is planned several times. A tooltip provides more information about the timetable entry with which this conflict exists. |
 |
A teacher is scheduled at a time that is marked as ‘Can’t’ for him. |
 |
A teacher is scheduled at a time that has been marked as ‘Don’t want’ for him. |
 |
A ‘hard’ subject is scheduled at a time that is not designated for this lesson in the weekly schedule. |
 |
A double hour is scheduled at a time that is not provided for double hours in the weekly schedule. |
All conflicts can also be listed under the menu item Check timetable.
8.1.7 Display the graduation requirements
This panel shows the current status of fulfilling the planned
graduation requirements for every class related to the subject.

Following functions are supported:
 |
Drops the panel away. It can be toggled in again within the planning view. |
 |
Minimizes the panel. |
 |
Reopens the panel again if it is minimized. |
 |
Changes the text size wuthin the panel. |
 |
This can be used to select the class for which the status of the graduation requirements shall be listed. |
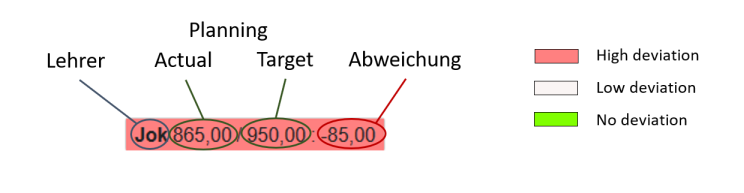
The graduation requirements themselfs are listed there as chips with
the following meaning:
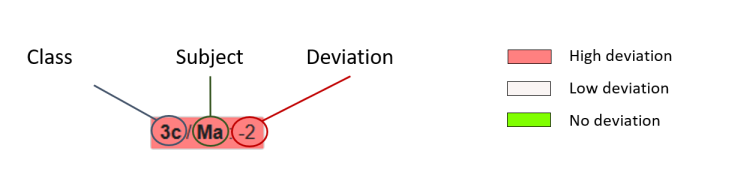
The deviation is calculated against the specifications under graduation requirements for the individual subjects.
8.1.8 Display the teacher planning
In the teacher planning panel, the current planning status is
displayed for each teacher.

Following function are possible:
|
Drops the panel away. It can be toggled in again within the planning view. |
|
Minimizes the panel. |
|
Reopens the panel again if it is minimized. |
|
Changes the text size wuthin the panel. |
The scheduling of the teachers is again listed in the form of chips.
Their content has the following meaning:
The deviation is calculated from the information out of the view Manage teachers.
8.1.9 Change timetable entries
8.1.9.1 Change mode
To be able to change timetable entries, the change mode must be
activated. This is the default. If the change mode is not active, it
must be switched on. To do this, click the button in menu . Now the presentation of the timetable
changes. If the change mode is already switched on, it can be switched
off with the button  in menu . However, this is only necessary if
the display does not appear in clear arrangement. Depending on the mode,
the schedule entries are displayed differently.
in menu . However, this is only necessary if
the display does not appear in clear arrangement. Depending on the mode,
the schedule entries are displayed differently.
- Bars
- Bars usually span several cells. These cells are usually displayed connected. Each cell is separated in change mode. See also the explanations under Subjects, Bars, Couplings.
Important! It is recommended to always use couplings instead of bars. See also Subjects, Bars, Couplings…
- Symbol for change entry
-
Cells that already have an entry have
got this link for changing an entry. The same happens just by a
doubleclick on the cell.
8.1.9.2 Create new timetable entry
To create a schedule entry, click on the free cell. Now the cell is
outlined. Press the right mouse button now. A context menu
appears.
Click on New entry.
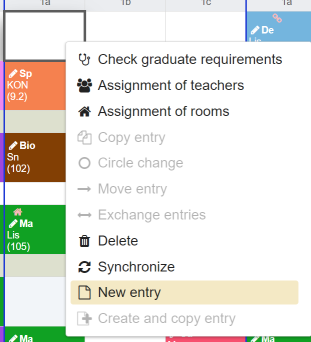
The same happens also if just a doubleclick on a free cell is
performed.
A dialog appears for entering the values for a timetable entry.
Depending on whether it’s a coupling or not, the attributes are
distributed over several tabs.
The following attributes are available:
| Coupling | A course or a coupling is when different classes and subjects are
taught at the same time. If this button is pressed, the entry
Subject changes toCoupling or vice versa. |
| Subject | All subjects or couplings can be selected that were previously created under Manage subjects or Manage couplings. It is possible to select exactly one subject or a coupling. |
| Class | If the value for coupling is set to No, the class can
be selected here. Otherwise the class was already assigned when the
coupling was defined. Exactly one class can be selected. |
| Time correction | The time correction affects the calculation of the teacher assignment. A lesson may not be fully taken into account. \ |
In this case, a correction can be made here. The specification is
optional and is done in minutes. |Teacher| The list for selected
teachers is automatically filled with the teachers who are permanently
assigned to the respective class. |Rooms| The list for selected rooms is
automatically filled with the rooms that are permanently assigned to the
respective class. |Teacher-subject-room| There is an option to assign
teachers to rooms and subjects for coupling. For this purpose, an extra
tab appears for couplings. This allocation is observed in the timetables
for the teachers and the rooms. |Additional information| The additional
information appears in the timetable in the respective cell in square
brackets. The specification is optional. |Footnote| Additional
information can also be given as a footnote. It does not appear directly
in the timetable cell, but is listed as a footnote. It can be determined
in which timetables the information is to be displayed. To do this, the
corresponding checkmark must be set for
Year,Teacher, Class
orRoom.
Example:
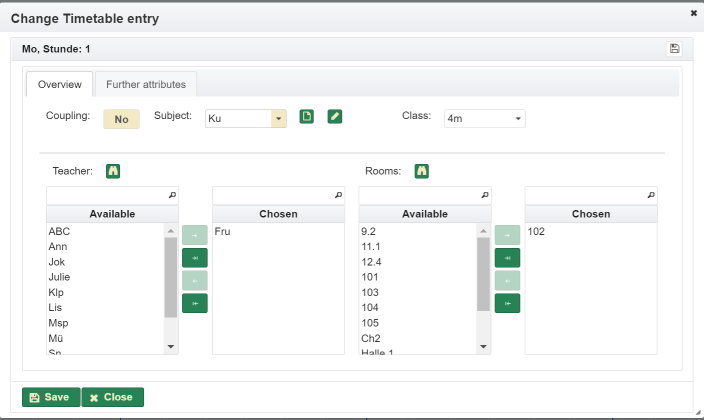
The result would be shown in the timetable as follows:
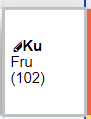
8.1.9.3 Create new timetable entry and copy
It is possible to create several entries for the same combination of
teacher and subject in one step. To do this, simply click on several
free cells while holding down the CTRL key. These cells are
then all framed thickly. After that the menu item
Create and copy entry can be selected in the context menu
with the right mouse button.
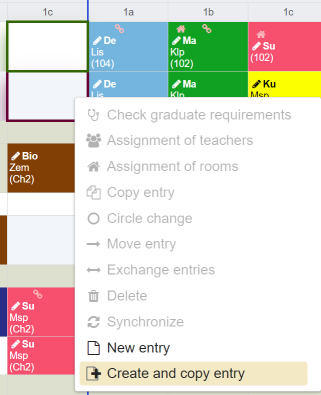
The other entries are created as explained under Create new timetable entry. As a
result, the newly created entry is immediately duplicated on all other
activated cells.
8.1.9.4 Create new timetable entry from teacher and subject
With the help of the content of the panels for the graduation
requirements and teacher planning, the creation of new timetable entries
can be simplified.
You can simply click on a subject in the graduation requirements panel,
select the corresponding teacher in the teacher planning panel and click
on the cell in which the lesson is to be taught.
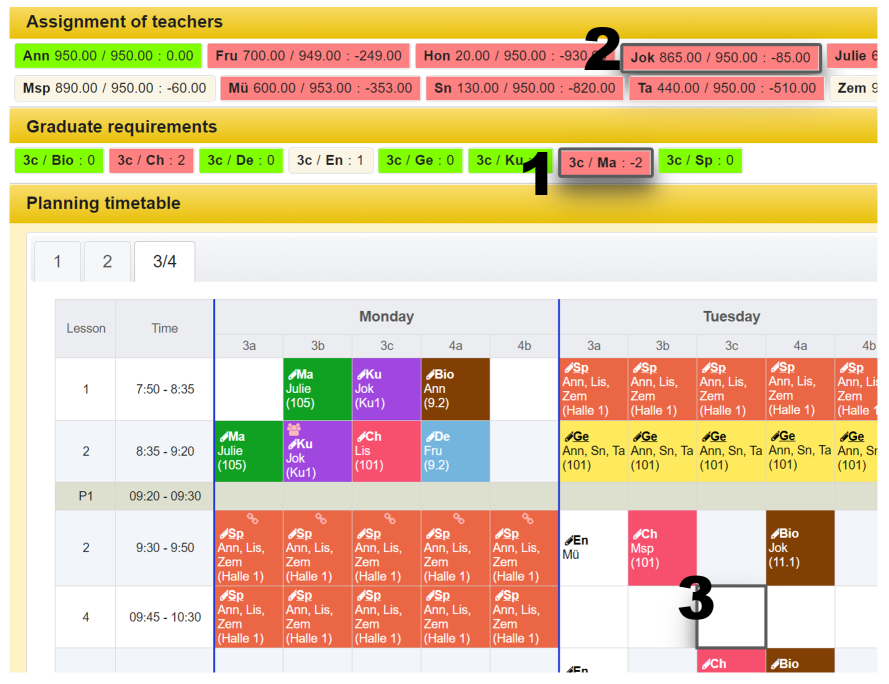
The dialog for creating the timetable entry opens immediately. The
teacher and subject are already entered.
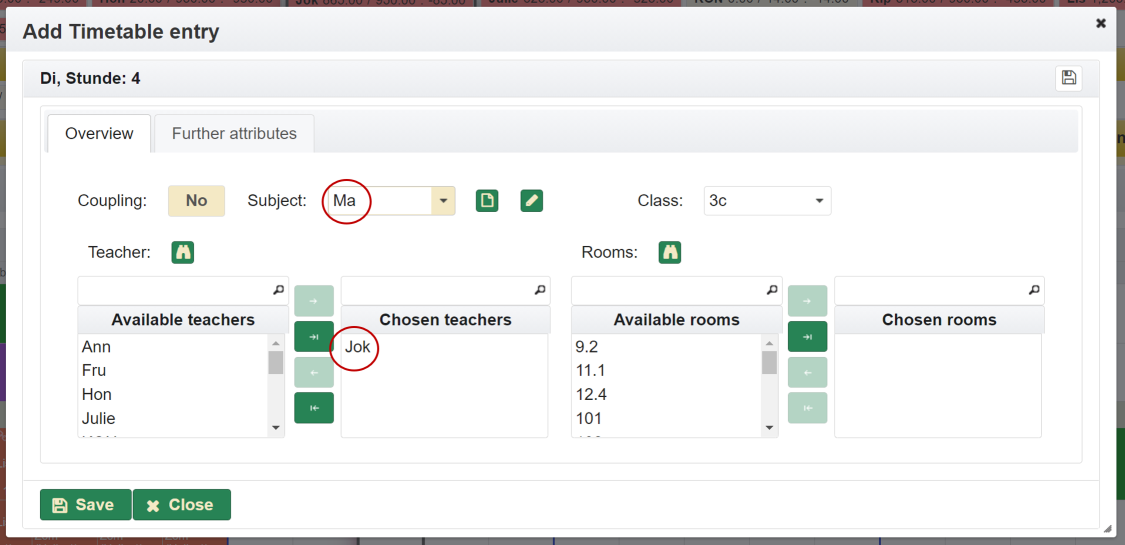
After checking the content just Save have to be clicked
and the entry is created. If more entries of same type have to be
created just do it with a copy.
This functionality can also be used for several cells at the same
time. To do this, mark the free cells with the CTRL key
held down. The last cell has to be clicked instead while holding down
the Shift key so that the program knows when the selection
is complete.
8.1.9.5 Change timetable entry
To change a timetable entry, click on the link in the respective cell that is to be changed.
A dialog appears for entering the values for this schedule entry. The
same attributes are available as for the Create new timetable entry.
8.1.9.6 Move timetable entry
A timetable entry can be easily moved. To do this, the cell to be
moved is clicked on without clicking the link for changing. Now the cell
is outlined. Next, repeat the process on the target cell. The first
marked cell is now outlined in green, the target cell in red. The
context menu (right mouse button) is also active.
Example:
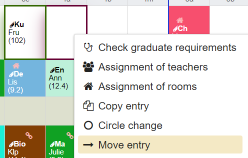
Here the item Move entry is selected. The view then
reloads. The entry has been moved. It does not matter whether the target
cell already contained an entry. This will be overwritten.
8.1.9.7 Copy timetable entry
Copying a timetable entry is similar to moving it. The cell to be
copied is clicked on again and then the target cell. The cell to be
moved is now outlined in green, the target cell is outlined in red. In
the context menu (right mouse button) the menu item
Copy entry is clicked. As a result, both cells are
identical. The cell to be copied can perform multiple copying operations
at the same time. To do this, press the Ctrl key when you
click on the target cell and every other cell to be copied into. Then
several cells are outlined in red. Example:
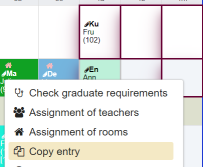
Result:
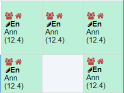
8.1.9.8 Exchange timetable entry
If both marked cells contain an entry, they can also be interchanged.
In this case, the menu item Exchange entries is also active
in the context menu (right mouse button).
8.1.9.9 Delete timetable entry
One or more schedule entries can be deleted. These must be marked and
the menu itemDelete is selected in the context menu (right
mouse button). If there are several entries you do it with the help of
the Ctrl key.
Important for couplings: The timetable entries for all
classes defined in the coupling are moved / copied / deleted / exchanged
simultaneously!
This also applies to the classes from other years.
8.1.9.10 Circle change
When a cicle change is done, the marked entries form a closed chain
and are shifted by one step in the order of their marking. The last
highlighted entry is put in the place of the first highlighted.
Example:
- Mark the entries
: 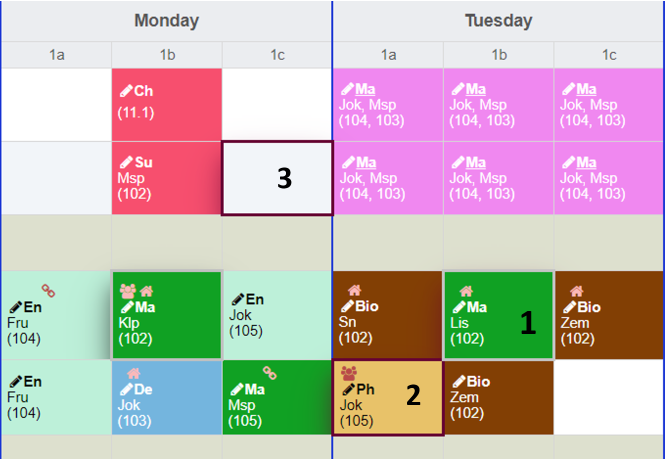
- Exchange will tale place in this manner
: 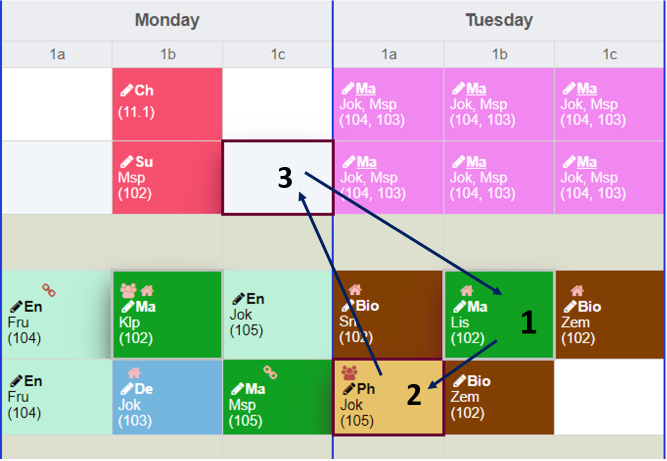
- Show collisions
: 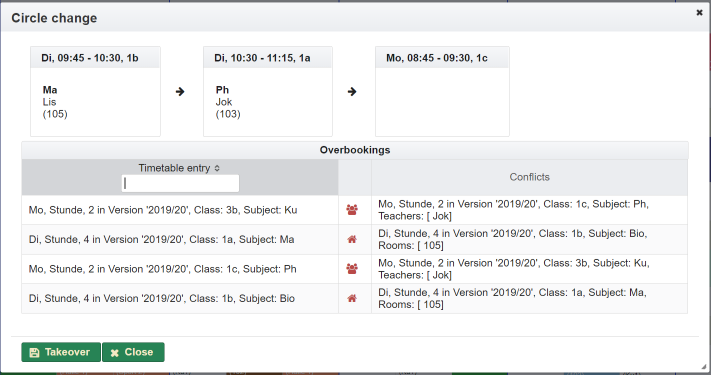
- Finished
: 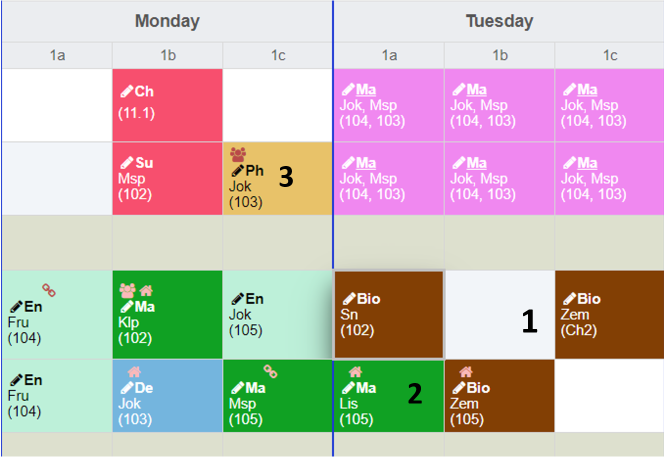
8.1.10 Takeover timetable entries from other years
The couplings and subjects are transferred to the current timetable
with all positions that are available in the timetable version from
which they are taken. The prerequisite is that the coupling or subject
exists in the current timetable version with the abbreviation. If the
abbreviation does not exist, the timetable entry will be ignored and not
adopted. For subjects, you can also specify which years should be
adopted. If no year is selected, the subjects are copied for all
years.
The procedure is as follows:
- The planning view for the new timetable to be created is loaded. The timetable is still empty in the example
: 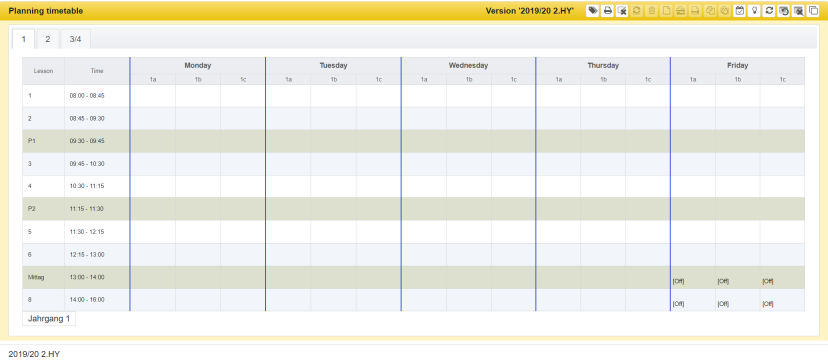
- In the dialog for transferring entries, you select the school year from which the entries are to be copied
: 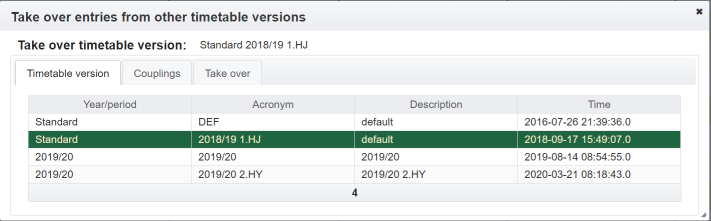
- If desired, mark the transferring couplings
: 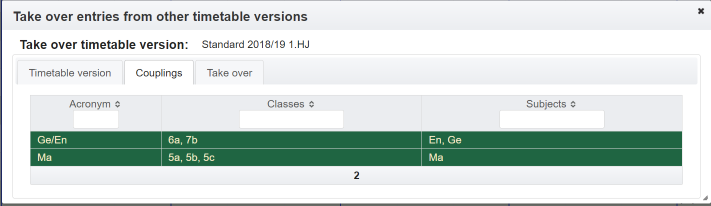
- In addition, you choose subjects and years
: 
- After pressing the
Takeoverbutton, the entries are copied. The desired entries have now been transferred to the timetable
: 
8.1.11 Replace or exchange teacher
In existing timetable entries, the assigned teachers can be replaced or also exchanged in a simple way. This function is very helpful after a change of school year. After taking over the timetable entries certain teachers can be replaced, e.g. if they are assigned to a new year or class.
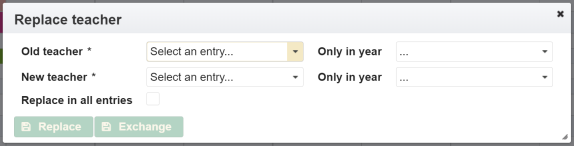
When replacing or exchanging, the following conditions are taken into account depending on the marked entries and the information made in the dialog:
| Replace or exchange in all entries | Timetable entries marked | Year chosen | Process |
| ✓ | - | - | All timetable entries from the current timetable version are taken into account. |
| ✓ | ✓ | - | All timetable entries from the current timetable version are taken into account. \ |
| The previously selected timetable entries are irrelevant. | |||
| * | * | ✓ | The selection is reduced to the selected years, regardless of whether all entries are selected or entries have been marked. \ |
When replacing, both selected years are taken into account. When
exchanging, the teacher is only searched for and exchanged in the year
assigned to him.
If no year was selected, there is no restriction to one year. | - | - |
✓ | The marked years are taken in account only. When replacing, both
selected years are taken into account.
When exchanging, the teacher is only searched for and exchanged in the
year assigned to him. |
Replacing or exchanging teachers only takes place in the currently loaded timetable version. Synchronization does not take place, regardless of whether synchronization is on or off.
8.1.12 Replace rooms
As with teachers, rooms can also be replaced.
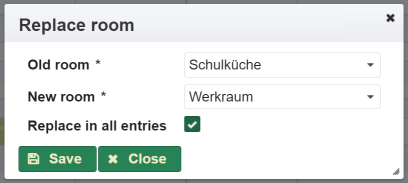
The marked timetable entries are taken into account.
However, if the checkbox Replace in all entries is checked,
all timetable entries from the current timetable version will be taken
into account, regardless of whether timetable entries were previously
marked.
Replacing of rooms only has effect in the currently loaded timetable version. Synchronization does not take place, regardless of whether synchronization is on or off.
8.1.13 Find free places
The question often arises as to where a free place can be found for a class or subject in combination with teachers and rooms. This can be answered with this function.
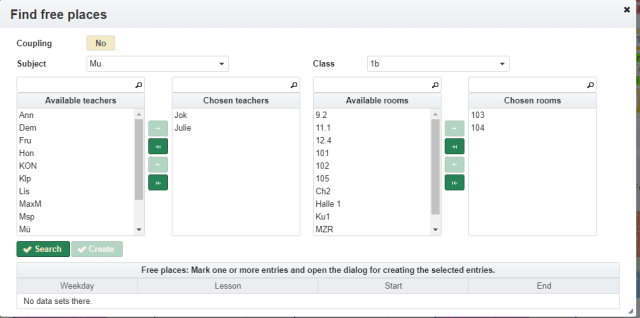
The Search button first lists possible free positions
that are not in conflict. If no location without conflicts is found, the
table remains empty.
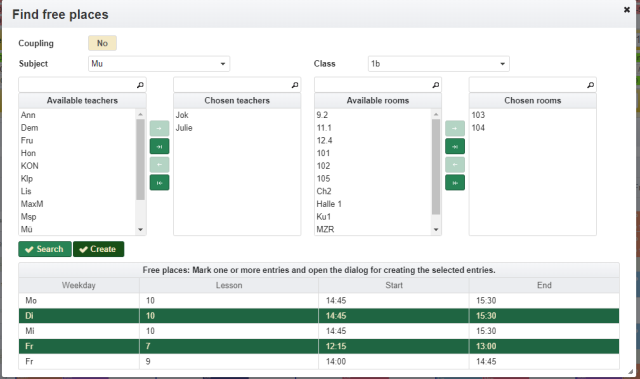
By clicking on the entries in the table, you can select them and then
use the Create button to overtake them to the dialog for
creating timetable entries and create them as usual. The data used in
the search is transferred to the dialog.
Result:
8.1.14 Find free places for graduation requirements
This function allows you to search for free places for complete
graduation requirements configured. If the graduation requirement also
contains teachers and rooms, these are taken into account.
If no teachers/rooms are configured in the graduation requirement, which
should be the standard case, free teachers are selected and assigned
automatically.
Therefore we choose the graduation requirement at first step.
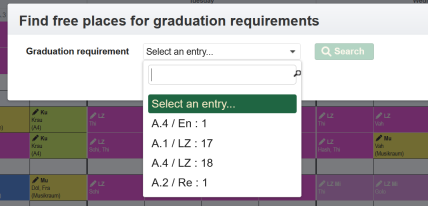
Whereby only the graduation requirements are offered for selection,
which are not yet fully planned. As a result, the vacancies found are
displayed as a suggestion in the weekly schedule.
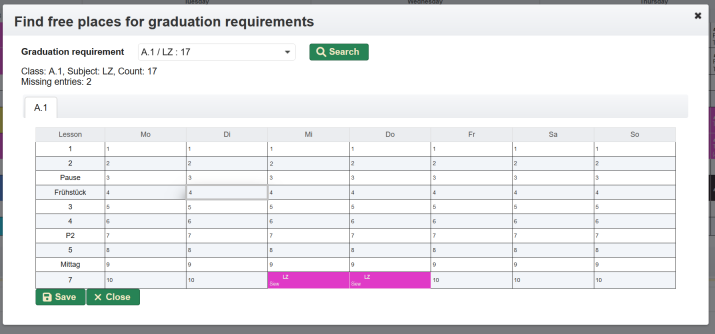
The entries shown can be marked here as usual (multiple entries using the CTRL button) and accepted by clicking on the save button.
8.1.15 Check graduate requirements
In the context menu (right mouse button) there is the action
Check graduate requirements. This starts the examination of
the time table for the class whose schedule entry is marked.
Output is done as a table with all deviations. Deviations are listed if
subjects are missing in the timetable or if the number of hours is
different from that on the graduate requirements. If there are
additional entries in the timetable for subjects that are not listed in
the graduate requirements, no deviation will be shown.
8.1.16 Find and list planned / free teachers and rooms
When planning a lesson, it is often necessary to answer the question
of which teachers or rooms are actually vacant or already scheduled at a
certain point in time. This can be easily determined by activating the
context menu with the right mouse button for a specific entry in the Planning timetable view and one of the
respective menu items  or
or  .
.
A dialog opens that lists the rooms or teachers depending on the
selected checkbox according to various criteria.
Example:
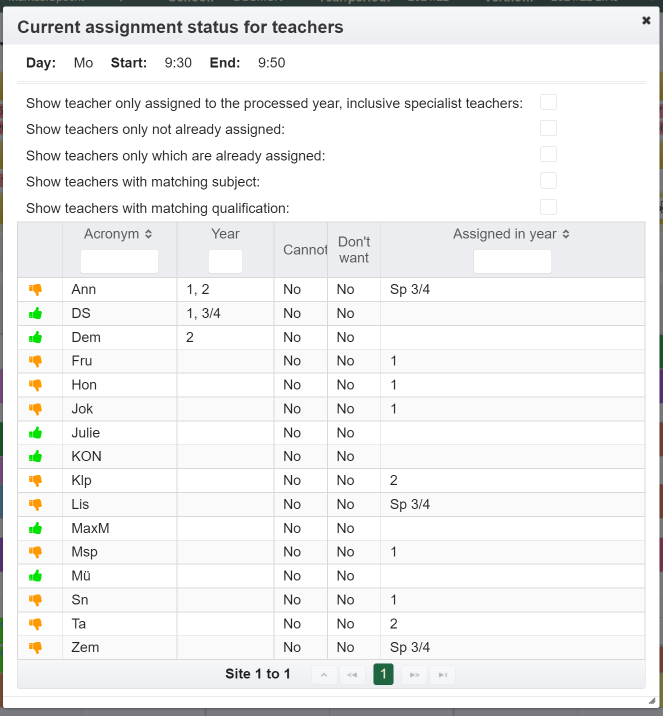
Symbols have the following meaning:
 |
Entry is scheduled or not available. |
 |
Entry is not yet scheduled. |
8.2 Import timetable
A timetable exported in JSON format can be imported again here. A
dialog opens in which the JSON-file is first selected and then uploaded.
If errors occur, they will be listed. A result looks something like
this:
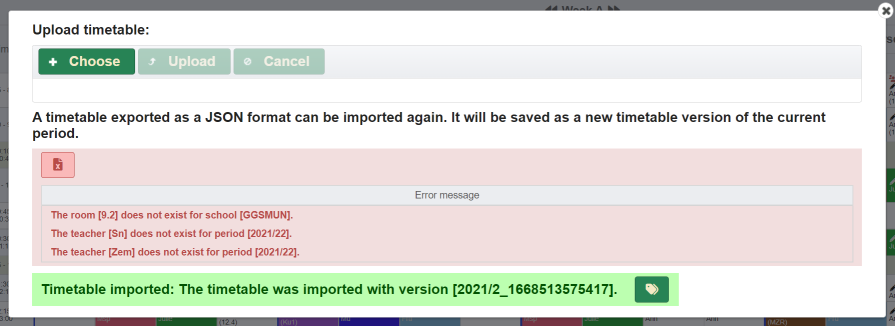
The timetable will be created with a new version name within the current
loaded period. It can be renamed again afterwards under the known menu
item Timetable versions.
An import can also successfully executed with errors. Errors are then
also reported in the dialog, e.g. if a teacher, room or subject no
longer exists or is not assigned to the school year or period. It is
then possible to correct these errors and import the timetable again.
However, timetable versions that are no longer required should be
deleted again.
8.3 Verify
8.3.1 Check timetable
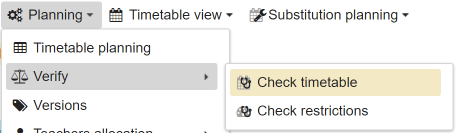
This menu item lists major deviations in a new browser tab that are
important for interactive planning.
These are current:
- Graduation requirements
- Teacher allocation times
The tab can then be moved to another window using the standard tools
of the respective browser and thus serve as a view for checking parallel
to the planning.
To do this, simply place the two windows next to each other on the
screen.
Example:
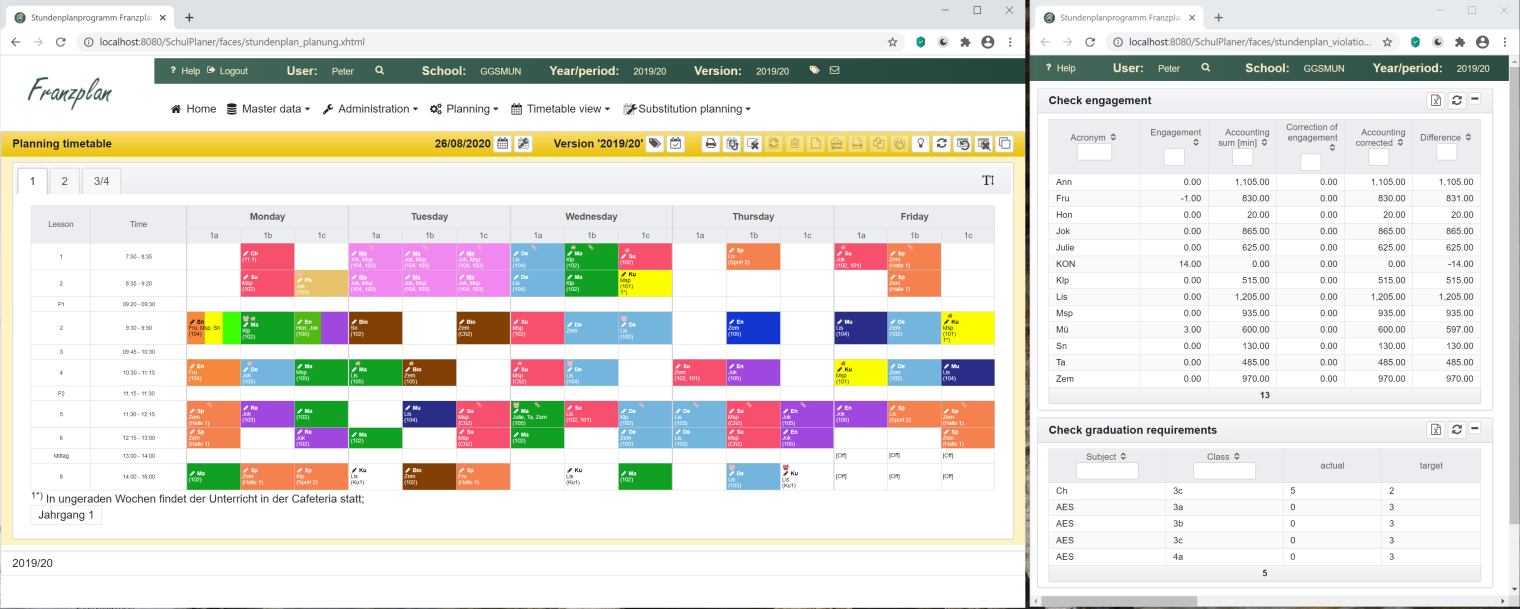
The panels (graduation requirements check, check of teacher
engagement) can be moved to the preferred position within the view using
drag & drop (left mouse button and move).
The following functions are also offered for the panels:
|
The content of the table can be exported as a CSV / Excel file. |
|
Reloads the relevant table. After changes have been made to the timetable, the desired panel must be updated to be up to date. |
 |
Minimizes the panel |
 |
Opens a minimized panel again |
8.3.2 Check restrictions
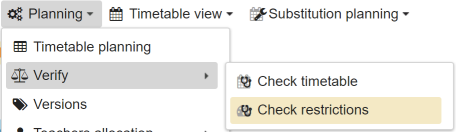
A check of the timetable can be initiated under this menu item. The
result is a table with collisions of every type. The result of the last
test is displayed.
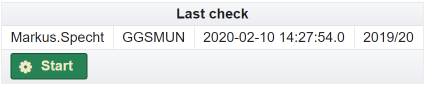
If the Start button is pressed, a new check is carried
out.
8.4 Timetable versions
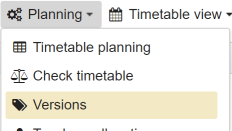
There can be several variants of timetables in parallel. This makes
it possible to create substitution plans or to prepare a timetable
change at certain times. However, only one version of a school’s various
timetables is currently active. This active variant is loaded by default
and is displayed in the various views of the timetable if no further
details are given. When you click on the menu item ‘Versions’, the list
of all timetable variants with the following attributes is
displayed.
When working on the timetable, it is advisable to pay attention to the
currently active timetable variant in order to ensure that the current
changes are made to the desired version.
Example for displaying the timetable version within the planning view:
| Attribute | Meaning |
|---|---|
| Acronym | A clear short description of the timetable variant. The variant is identified here. The abbreviation must not appear more than once. |
| Description | The desfription of the version. |
| Time | Der Zeitpunkt, zu dem die Variante erzeugt wurde. |
| erzeugt von | User name of the user who created the timetable. |
| basiert auf | Reference to the abbreviation of the timetable variant that was copied. |
| published | Indicates whether this variant can be seen by users with the role of
teacher. Such users see the timetables that are either
‘active’ or listed here with ‘Yes’. |
| Relevant for accounting | Marks the version relevant for accounting of the teacher hours. A distinction can be made between timetables that are only created for testing or as substitute planning and those that should be included in the accounting. |
| From | Valid from (date), based on the from-to range, it is recognized whether a teacher is included in the acconting for the entire school year or only on the basis of certain timetable versions. |
| To | Valid until (date), based on the from-to range, it is recognized whether a teacher is included in the acconting for the entire school year or only on the basis of certain timetable versions. |
| Time period | Period in weeks to be taken care for accounting. The corresponding teacher hours from this plan are taken into account proportionately. |

The following activities can be carried out to manage the timetable
variants:
|
Create new entry |
 |
Publish the marked entry |
|
Reload table |
|
Delete marked entry |
|
Change marked entry |
|
Copy marked entry |
 |
Load marked entry |
|
Delete all timetable entries entries for the marked timetable version |
The menu is also available with the right mouse button.
8.5 Teachers allocation
8.5.1 Accounting
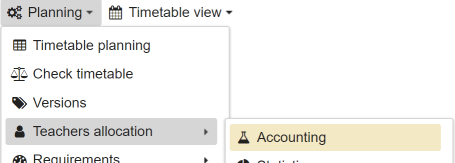
For each teacher, a weekly target time is set in minutes in the master
data. It could be done also in hours. It depends on what settings have
been made for the school. This is the
teaching obligation that should be achieved in the planning.
Here, for each teacher, it is listed what their actual assignment based
on the timetable looks like and which deviation (positive or negative)
from the teaching obligation exist.
However, there are subjects that should not be counted against the time
that is shown according to the timetable. Correction values can be
specified for such subjects in the configuration (see Manage subjects)). Such a time correction is
also possible for a teacher or at the
level of an individual timetable
entry.
The header shows which timetable version it is
with its abbreviation and activation status.
Example:
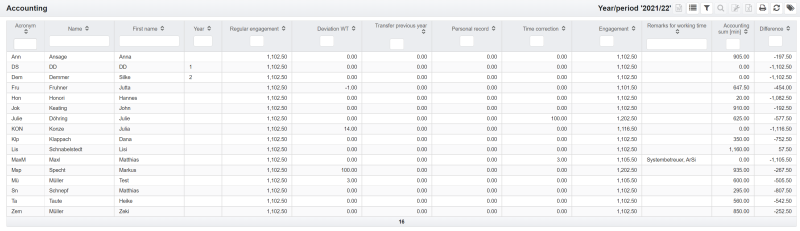
The column Corrected engagement contains the value that is
used as the basis for calculating the deviation. The exact details for
accounting are then visible by marking the line of a certain teacher and
right-clicking on the menu item Show accounting details.
Example:
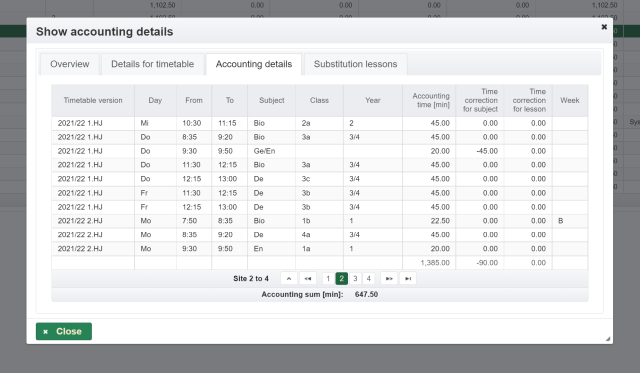
When the teacher hours are calculated, all timetable versions that are
marked with ‘relevant to accounting’ in the current school year (period)
are taken into account. When calculating the target and operating times,
the average is formed across all appropriately marked versions. The time
period (from-to) stored for the timetable version is also included. It
is taken into account in weeks.
Example:
| Timetable version 1 | Timetable version 2 | resulting value | Calculation formula | |
|---|---|---|---|---|
| Period [Wochen] | 20 | 10 | ||
| Engagement [min] | 920 | 800 | 880 | ((920 x 20)+(800 x 10))/(20+10) |
| Calculated time [min] | 1000 | 700 | 900 | ((1000 x 20)+(700 x 10))/(20+10) |
| Deviation [min] | 20 |
If teachers starts during the year, they may not be considered in all
timetable versions. For example, a teacher who starts at the end of the
half year is not included in the timetable version for the first half of
the year. This can be achieved by defining the period of use of the
teacher (from-to) outside the validity period (from-to) of the timetable
version.
Example:
Teacher 1: Operation period from 03/07/2017 to 12/31/2099
Teacher 2: Operation period from and to is empty
Teacher 3: Operation period from 10/10/2016 to 06/07/2017
| From | To | Teacher 1 | Teacher 2 | Teacher 3 |
|---|---|---|---|---|
| Timetable version 1 | 09/01/2016 | 01/30/2017 | X | |
| Timetable version 2 | 02/01/2017 | 06/30/2017 | X | X |
In the tab Details for timetable only those versions of
the timetable are shown for the teacher that match the period of the
assignment and are therefore taken into account in the calculation.
8.5.2 Create accounting as Word template
The teacher’s calculation can be exported as a Word document. To do
this, click on the link  . The required
template is uploaded under System
settings. It can also be downloaded and modified again for further
processing if it already exists. It can then be uploaded again. If
several entries are selected, the settings for all of these entries are
generated simultaneously in a Word document. They are separated by a
form feed.
. The required
template is uploaded under System
settings. It can also be downloaded and modified again for further
processing if it already exists. It can then be uploaded again. If
several entries are selected, the settings for all of these entries are
generated simultaneously in a Word document. They are separated by a
form feed.
8.5.3 Replacement pattern for Word template
Die Word-Vorlage arbeitet mit Ersetzungsmustern. Diese werden beim Erzeugen des Word-Dokuments mit den tatsächlichen Werten ersetzt. Folgende Ersetzungsmuster werden verwendet. Sie können einfach ins Word-Dokument eingefügt werden:
| Substitution pattern | Meaning |
|---|---|
| ${NAME} | Surname of the teacher |
| ${VORNAME} | First name of the teacher |
| ${KUERZEL} | Acronym of the teacher |
| ${VARIANTE} | Timetable version |
| ${PERIODE} | School year / period |
| ${JG} | Teachers preferred year |
| ${UNTPFLICHT} | Calculated engagement of the teacher |
| ${REGPFLICHT} | Regular engagement: Count of lessons defined by the school authority without taking account of crediting times or overtime |
| ${VORJAHR} | Übernahme aus dem Vorjahr |
| ${KARTEIKARTE} | Value out of the personal documentation of the teacher |
| ${ABW_AZ} | Planned deviation from the regular engagement, e.g. part time |
| ${ZEITKORR} | time correction |
| ${ZEITKORR_BEM} | Remarks to time correction |
| ${EINSATZ} | Accounting sum |
| ${ABWEICHUNG} | Deviation between calculated count of lessons and engagement |
8.5.4 Statistics
This menu item lists various statistics that can be used to check the timetable or for the substitution plan.
8.5.4.1 Assignment per class
Shows the time spent by teachers for each individual class.
8.5.4.2 Assignment per subject
Shows the time spent by teachers for each individual subject.
8.5.4.3 Double occupancy
Shows all timetable entries in which more than one teacher is scheduled in a class or coupling.
8.6 Requirements
Before planning the timetable, it makes sense to define some border
conditions. With automatic scheduling, this is urgently required in
order to receive reasonably useful timetables. But manual planning is
also made easier if previously defined constraints can be checked for
compliance immediately during the planning and any deviations can be
displayed.
The boundary conditions are entered here in the submenus:
- Graduation requirements
- Requirement settings
- Teacher-subjects
- Teacher-classes
- Cannot/don’t want
- Priorities
8.6.1 Graduation requirements
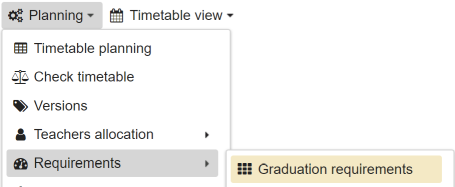
Entering graduation requirements also makes sense if only manual
timetable planning is carried out, because compliance with the
graduation requirements can be checked.
The number of lessons that are assigned to the respective subjects in
the various school types and classes or years is specified in the
graduation requirement. The combination of subject and class determines
how many hours a week the lessons take place. In addition, the teachers
and rooms can also be assigned here. However, this is optional
only.
As with most views, the content is presented in tabular form:
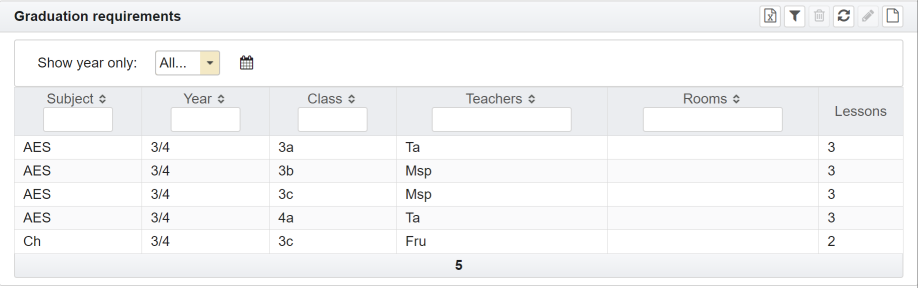
These attributes are relevant:
| Attribute | Meaning |
|---|---|
| Subject | Acronym of the subject. |
| Year | Each class is assigned to a year, the abbreviation of which is shown here. |
| Class | Short designation of the classes, e.g. 7.1, 8.2, 12.4 … The class is identified via this number. |
| Teacher | Abbreviation of the teacher. This is optional. |
| Room | Acronym of the rooms. This is optional. |
| Lessons | Number of hours per week to be given. |
The list of entries can be reduced to a specific year via list box. Via
the link you can create the
graduation requirements from one of the already existing timetables. The
respective timetable is selected from a list with the timetable
versions. However, the new graduation requirements are only saved when
the subsequent question regarding the acceptance of the graduation
requirements has been confirmed. Die Liste der Einträge kann über die
Listbox auf einen bestimmten Jahrgang reduziert werden.
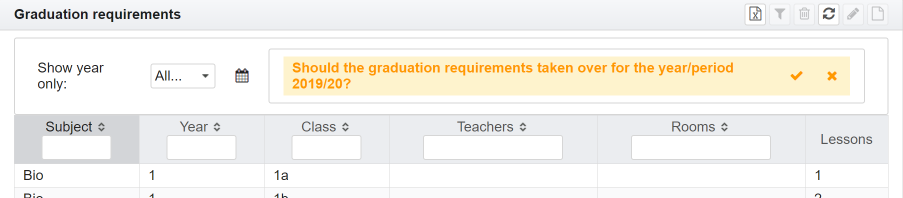
The graduation requirements can be processed as follows:
|
Create new entry; graduation requirements can be entered for a complete year or for individual classes. But independent on that are they always saved for a class. So it is possible that e.g. Class 3a is taught in math at 4 hours, but class 3b is taught at 6 hours. |
|
Reload table |
|
Delete marked entries |
|
Change entry |
|
Delete filter |
The graduate requirements are checked either in the Planning or under menu Planning - check timetable.
8.6.2 Requirement settings
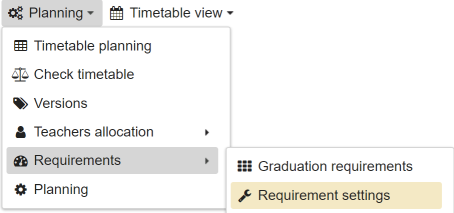
Generally applicable settings are made here. The current values
are:
| Parameter | Meaning | Default |
|---|---|---|
| Lessons per day for a class and a subject | Maximum number of hours a teacher teaches per day for a certain class in the same subject | 2 |
| Additional times for teachers | Maximum number of hours that a teacher can be scheduled in addition to the target value. This information is checked if a lesson with the available teachers cannot be taken into account at a certain time without running into conflicts. | 90 |
| Fall below times for teachers | Maximum number of hours that a teacher can be scheduled less than the target value. This information is taken into account when the conflict check is carried out. If this value is undershot, a conflict is reported. | 90 |
8.6.3 Requirement teacher subject
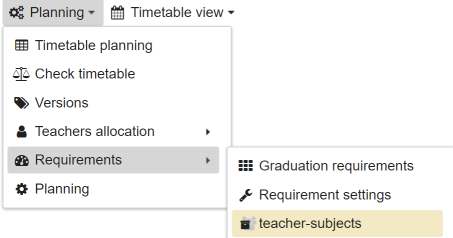
Here you can determine whether a teacher would like to teach as much or as little time in a particular subject per year. By checking the box at the maximum number of hours it is determined that the number of hours should be as high as possible. Otherwise an attempt will be made to assign the smallest possible number of hours. By specifying the priority, an additional differentiation can be made within the list of entries.
8.6.4 Requirement teacher class
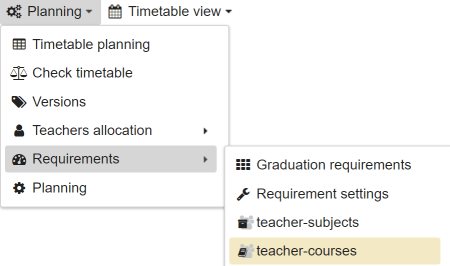
Control is possible here if a teacher wants to spend as many or as few hours in a class as possible. By checking the box at the maximum number of hours, it is determined that as many hours as possible are assigned. Otherwise an attempt will be made to assign the smallest possible number of hours. By specifying the priority, you can make an additional differentiation within the list of entries.
8.6.5 Cannot/don’t want
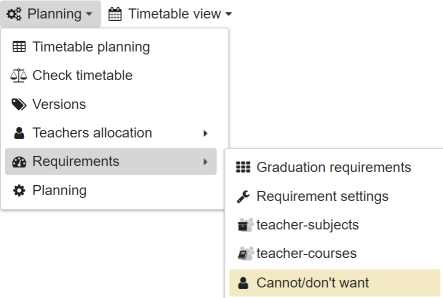
The temporal restrictions for teachers are managed on this
page.
The following restrictions apply:
- Cannot
- This restriction specifies the time restrictions for which the corresponding colleague cannot work.
- Don’t want
-
This is rather a wish of the colleague, which should be taken into
account, but can also be violated if there is no other way, i.e. no
other reasonable timetable can be achieved.
List of attributes:
| Attribute | Meaning |
|---|---|
| Acronym | The short name of the teacher. The teacher appears under this abbreviation in the timetable. |
| Name | Surname |
| First name | First name |
| School | Acronym of the school |
| Cannot | Restriktionen ‘Cannot’ |
| Don’t want | Restriktionen ‘Don’t want’ |
The following activities can be carried out to manage the
restrictions:
|
Create new entry |
|
Reload table |
|
Delete marked entries |
|
Change entry |
New creation or modification takes place in a dialog in which all
restrictive time periods per teacher are specified.
Example of change:
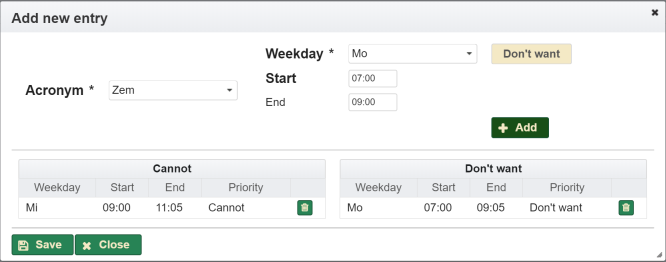
The button Cannot orDon't want switches
between the two restrictions. The button + Add leads to the
transfer of the entry in the tables below. It is only when you click the
Save button that the schedule is accepted and taken into
account.
8.6.6 Priorities
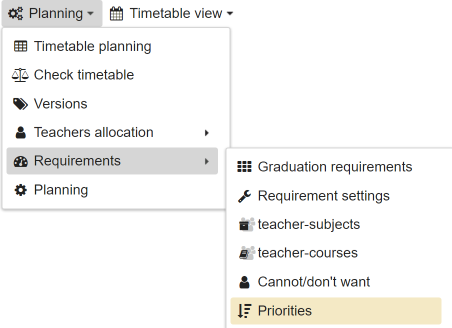
In the case of automatic lesson planning, the machine processes the
individual steps according to a predetermined system and carries out
collision checks. It will rarely be the case that the timetable complies
100% with the specifications and no collisions occur. Priorities can be
used to control how the machine evaluates the new timetable and decides
in the event of a collision or if several options are available. The
higher the priority of the respective criterion is choosen, the more
important it is to comply with the criterion and the sooner the machine
will take the criterion into account.
The parameters configured here are utilized during automatic scheduling with the optimization tool.
In this context, scheduling is modeled as an optimization problem involving various constraints and conditions. These conditions often conflict with one another, making it inevitable that no single solution will satisfy every requirement perfectly.
These constraints are assigned specific values which the optimizer interprets as a ‘penalty’ if violated. After each planning step, the system calculates the total penalty and compares it to the previous step. If the penalty is lower, the current result is judged as superior and used as the new baseline.
The system distinguishes between ‘hard’ and ‘soft’ penalties:
- Hard penalties are non-negotiable and must always be observed.
- Soft penalties can be weighted here, allowing you to influence the outcome of the automatic scheduling.
The higher the value, the more the system will strive to satisfy that condition. Conversely, the lower the value, the more likely the system is to violate that condition if no other solution is found.
Some penalties are dependent on specific variables that can also be adjusted here—for example, the maximum number of hours a teacher may teach per day.
The following sections explain the available soft penalties:
| Parameter | Description |
|---|---|
| Prefer double lessons for couplings | Couplings should be scheduled as double periods whenever possible. |
| Teach preferred subjects | Teachers should be assigned to the subjects specified in their teacher configuration. Only the assigned subjects are used; formal teaching certifications are not considered. |
| Treat missing subject assignment of teachers as wrong assignment | If no subject is assigned in the teacher configuration, the Optimizer assumes that practically every subject is considered preferred. Checking the checkbox reverses this logic; in that case, no subject is preferred. |
| Enable free days for classes | This value influences the chance that students will have entire days without any scheduled lessons. |
| Enable free days for teachers | This value adjusts the possibility of providing teachers with full days off. |
| Balance lessons for couplings | The system attempts to distribute couplings as evenly as possible across the schedule. |
| Teach in own year group | Teachers should be assigned to their own grade level/year, using the value from the teacher configuration. |
| Teach preferred in year groups assigned to teachers | Teachers should be assigned to year groups for which they have been designated as specialist teachers in the teacher configuration. |
| Treat missing year group assignment of teachers as wrong assignment | If no year group is assigned in the teacher configuration, the Optimizer assumes that the year is irrelevant for scheduling purposes. If the corresponding checkbox is selected, this logic is reversed; teachers without an assigned year group are then scheduled with lower priority. This applies both to a teacher’s primary year group and to year group assignments as a specialist teacher. |
| Teach preferred in classes assigned to teachers | Teachers should be assigned to the classes where they are designated as the Tutor in the class configuration. |
| Treat missing class assignment of teachers as wrong assignment | If no class is assigned within the teacher configuration, the Optimizer assumes that the class is irrelevant for scheduling purposes. This logic can be reversed by checking the corresponding checkbox. Teachers without a class assignment will then be scheduled with lower priority. It is absolutely essential to ensure that this does not create a conflict with the year-group configuration. |
| Prefer rooms which subjects are assigned to | Rooms that have been linked to a specific subject in the room configuration should be prioritized. |
| Avoid using specialized rooms for subjects which are not assigned to | Rooms that have not been linked to a specific subject in the room configuration should be avoided. |
| Consider teacher preferences | This value adjusts the likelihood that times marked as “Don’t want” remain free for the teacher. |
| Prefer consecutive double lessons for hard subjects | Subjects marked as “Hard” in the configuration should be scheduled as double periods. |
| Prefer high-priority slots for ‘Hard’ subjects | Time slots marked as “High” or “Mandatory” in the weekly schedule should be used for subjects marked as “Hard”. |
| Avoid break times for lessons | Lessons should not be placed during breaks. If this is desired, this value should be set high. |
| Avoid low-priority times for lessons | Time slots marked as “Unlike” in the weekly schedule will be avoided. |
| Prefer the same teacher for a subject within a class | The system will attempt to ensure the same teacher consistently handles the instruction for a specific subject in a class. |
| Avoid teacher underflow of teachers duty | This constraint interacts with the “hard” criterion that a teacher’s mandatory hours must not be exceeded. If the total available teacher hours exceed the hours required by the curriculum, some teachers may barely be assigned. This value helps counteract that. |
| Avoid consecutive days for same subject | This value provides the option to prevent subjects from being scheduled on back-to-back days, avoiding long gaps between lessons in those subjects. |
| Avoid overflow of teachers maximum daily lessons | Teachers should not exceed a maximum number of teaching hours per day. The maximum limit is also configurable. |
| Maximum daily lessons for teachers | This value refers directly to the row above. It is not a penalty itself, but rather the specific threshold at which the penalty is triggered. |
8.7 Automatic planning
Automatic scheduling takes place in the same view as interactive scheduling. Depending on your preference, planning can be done completely automatically or used partially to support and accelerate manual scheduling.
There are two methods of varying power for automatic scheduling:
- Planning for graduate
requirements
This is a simple type of planning using an empirical algorithm. It allows for the relatively quick creation of a timetable that at least takes the curriculum tables into account. However, beyond that, not all specifications are considered. - Planning using
optimizer
This method is significantly more powerful because it is based on an optimization tool that treats timetable scheduling as an optimization problem. It is capable of creating much more complex timetables that can still deliver acceptable results even under difficult constraints. However, scheduling with the optimization tool is also significantly more demanding, as it requires more data and the calculation takes much longer.
8.8 Procedure for automatically supported planning
Timetable scheduling is a complex matter. It is not to be expected that it occurs completely automatically. Rather, the planning process takes place as a combination of automatic assistance and manual planning/correction.
The following sections examine the planning process and the individual adjustment parameters. In particular, it discusses which variables influence timetable scheduling.
It is appropriate to perform the planning in an unpublished version of the timetable. To do this, a new version is created or an existing, unused version is cleared. You can simply delete all entries in a version to achieve this.
Subjects and couplings whose placement in the weekly schedule must not be changed should then be placed in the traditional, manual way. Existing entries are adopted by the planning tool without changes, including the assigned teachers and rooms.
8.8.1 Weekly schedule
Times are defined and priorities are assigned in the weekly schedule. These priorities control the order in which the machine assigns possible time slots. The priorities have the following influence:
- ‘High’ and ‘Mandatory’: An attempt is first made to place the lesson times in positions that are marked in this way. This applies regardless of the subjects. Additionally Subjects marked ‘Hard’ are scheduled at these times as a default.
- ‘Reluctantly’: The machine always tries to avoid these times.
- ‘K.U.’: These times are not scheduled. There is no teaching.
Example:
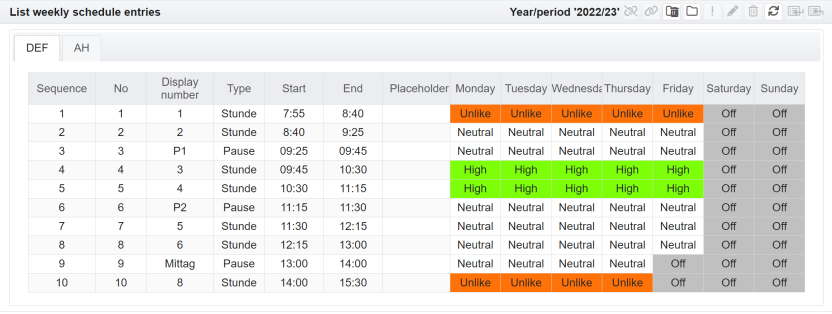
8.8.2 Subjects
Subjects marked as ‘Hard’ are scheduled first. Additionally, the system prioritizes placing them in time slots defined as ‘High’ and ‘Mandatory’ within the weekly schedule.
8.8.3 couplings
Once subjects are assigned to couplings, they are scheduled as a unit using the number of hours specified in the curriculum tables. To ensure consistent results, it is important that the subjects involved in a coupling have the same number of hours where possible. Otherwise, the system will schedule the overlapping hours as a coupling and attempt to place the remaining “excess” hours as an individual subject.
Example:
- A coupling ‘Ma/Ph’ contains the subjects ‘Math’ and ‘Physics’ for class 5A.
- In the curriculum table, Math is defined with three hours and Physics with two hours per week.
- The system will first schedule the ‘Ma/Ph’ coupling for two hours per week (the overlap). The remaining hour of Math will be scheduled as a standalone subject.
Teacher assignment in couplings differs between the two planning methods:
With Optimization Tool:
The list of teachers from the curriculum table is used as the pool of available staff. All teachers are only considered available if no specific teacher is assigned in the curriculum table. The system prioritizes teachers assigned to the coupling; however, if an assigned teacher is unavailable, they will be ignored or replaced.Without Optimization Tool:
The system attempts to assign the teachers linked to the coupling. If an assigned teacher is unavailable, they are ignored or replaced. Unless configured otherwise, couplings are scheduled first.
8.8.4 Teachers
There are different attributes considered by the machine:
- Year: The assigned year is preferably selected.
- Subjects: Teachers are placed first in these subjects.
- Specialist teacher in: These years are also assigned preferentially by the machine.
- Engagement: By default, teachers with these lesson times are taken into account and are no longer assigned when this value is reached.
- Usable for automatic planning: If this box is not checked, the teacher will not be considered for automatic scheduling. This can be used to exclude teachers from automatic scheduling if they are only available for a few hours or if they have very specific requirements that cannot be easily met by the machine.
8.8.5 Rooms
Rooms that are assigned to a subject in the room configuration are preferred for scheduling that subject. Also, there is a checkbox for marking rooms as usable for automatic scheduling. If this box is not checked, the room will not be considered for automatic scheduling. This can be used to exclude rooms from automatic scheduling.
8.8.6 Graduation requirements
The graduation requirements are strictly required to perform automatic scheduling. They must be maintained and updated beforehand.
8.8.7 Cannot/don’t want
Teachers will not be assigned to times marked as ‘Cannot’.
The system will avoid, as much as possible, assigning teachers to times
marked as ‘Will Not’.
8.8.8 Priorities:
- With optimization tool:
The machine uses the priorities specified here to calculate a “score,” provided they are not set as concrete values.
In addition to “hard” penalties (non-negotiable), there are “soft” penalties where the weighting can be configured here.- Example of a ‘hard’ penalty (non-configurable):
- A teacher cannot work in a specific time slot.
- A teacher cannot teach different classes simultaneously.
- Example of a concrete value:
- Maximum number of hours per day for a teacher.
- Example of a ‘hard’ penalty (non-configurable):
See Priorities for more information.
8.8.9 Planning for graduate requirements
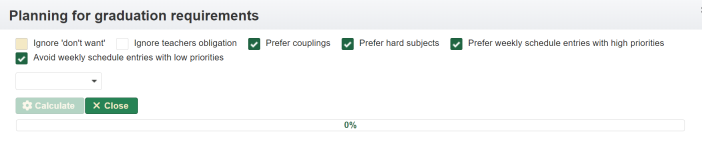
To do this, the graduation requirements that are to be placed
automatically are selected first.
The list of entries can be limited by filters. However, it is also
possible to select all entries.
Example:

The result of the calculation is displayed in a timetable view to the
years.
Example:
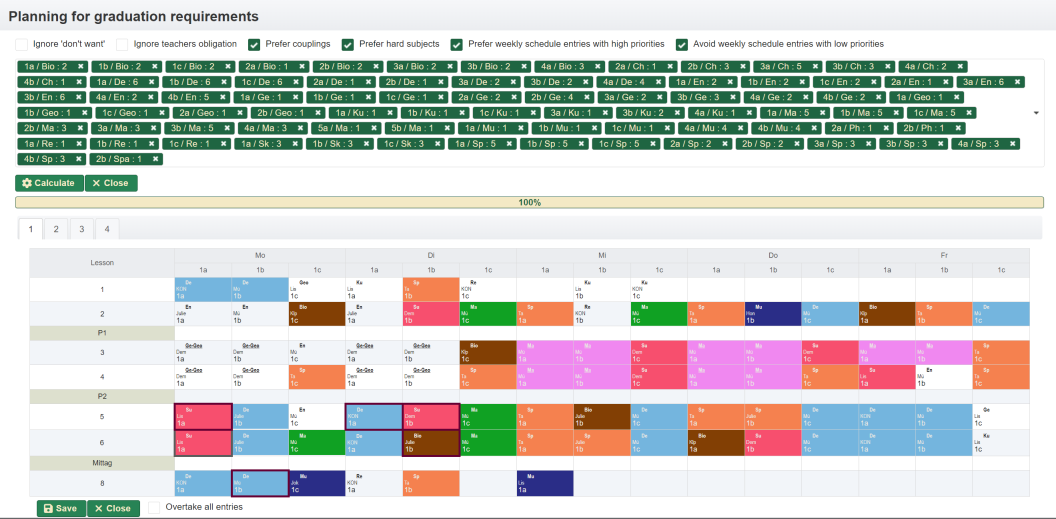
Here it is now possible to mark and save certain entries or to accept
all the entries displayed completely.
If only certain entries are to be adopted, the entries are marked as in
manual planning by clicking on the entries with the mouse. If several
entries are to be accepted, these are clicked on while holding down the
CTRL key. Marked entries are marked with bold border.
8.8.10 Planning using optimizer
The planning takes place step-by-step.
In the first step, the parameters for weighting violations are set or adjusted. These are exactly the same values found in the Priorities dialog.
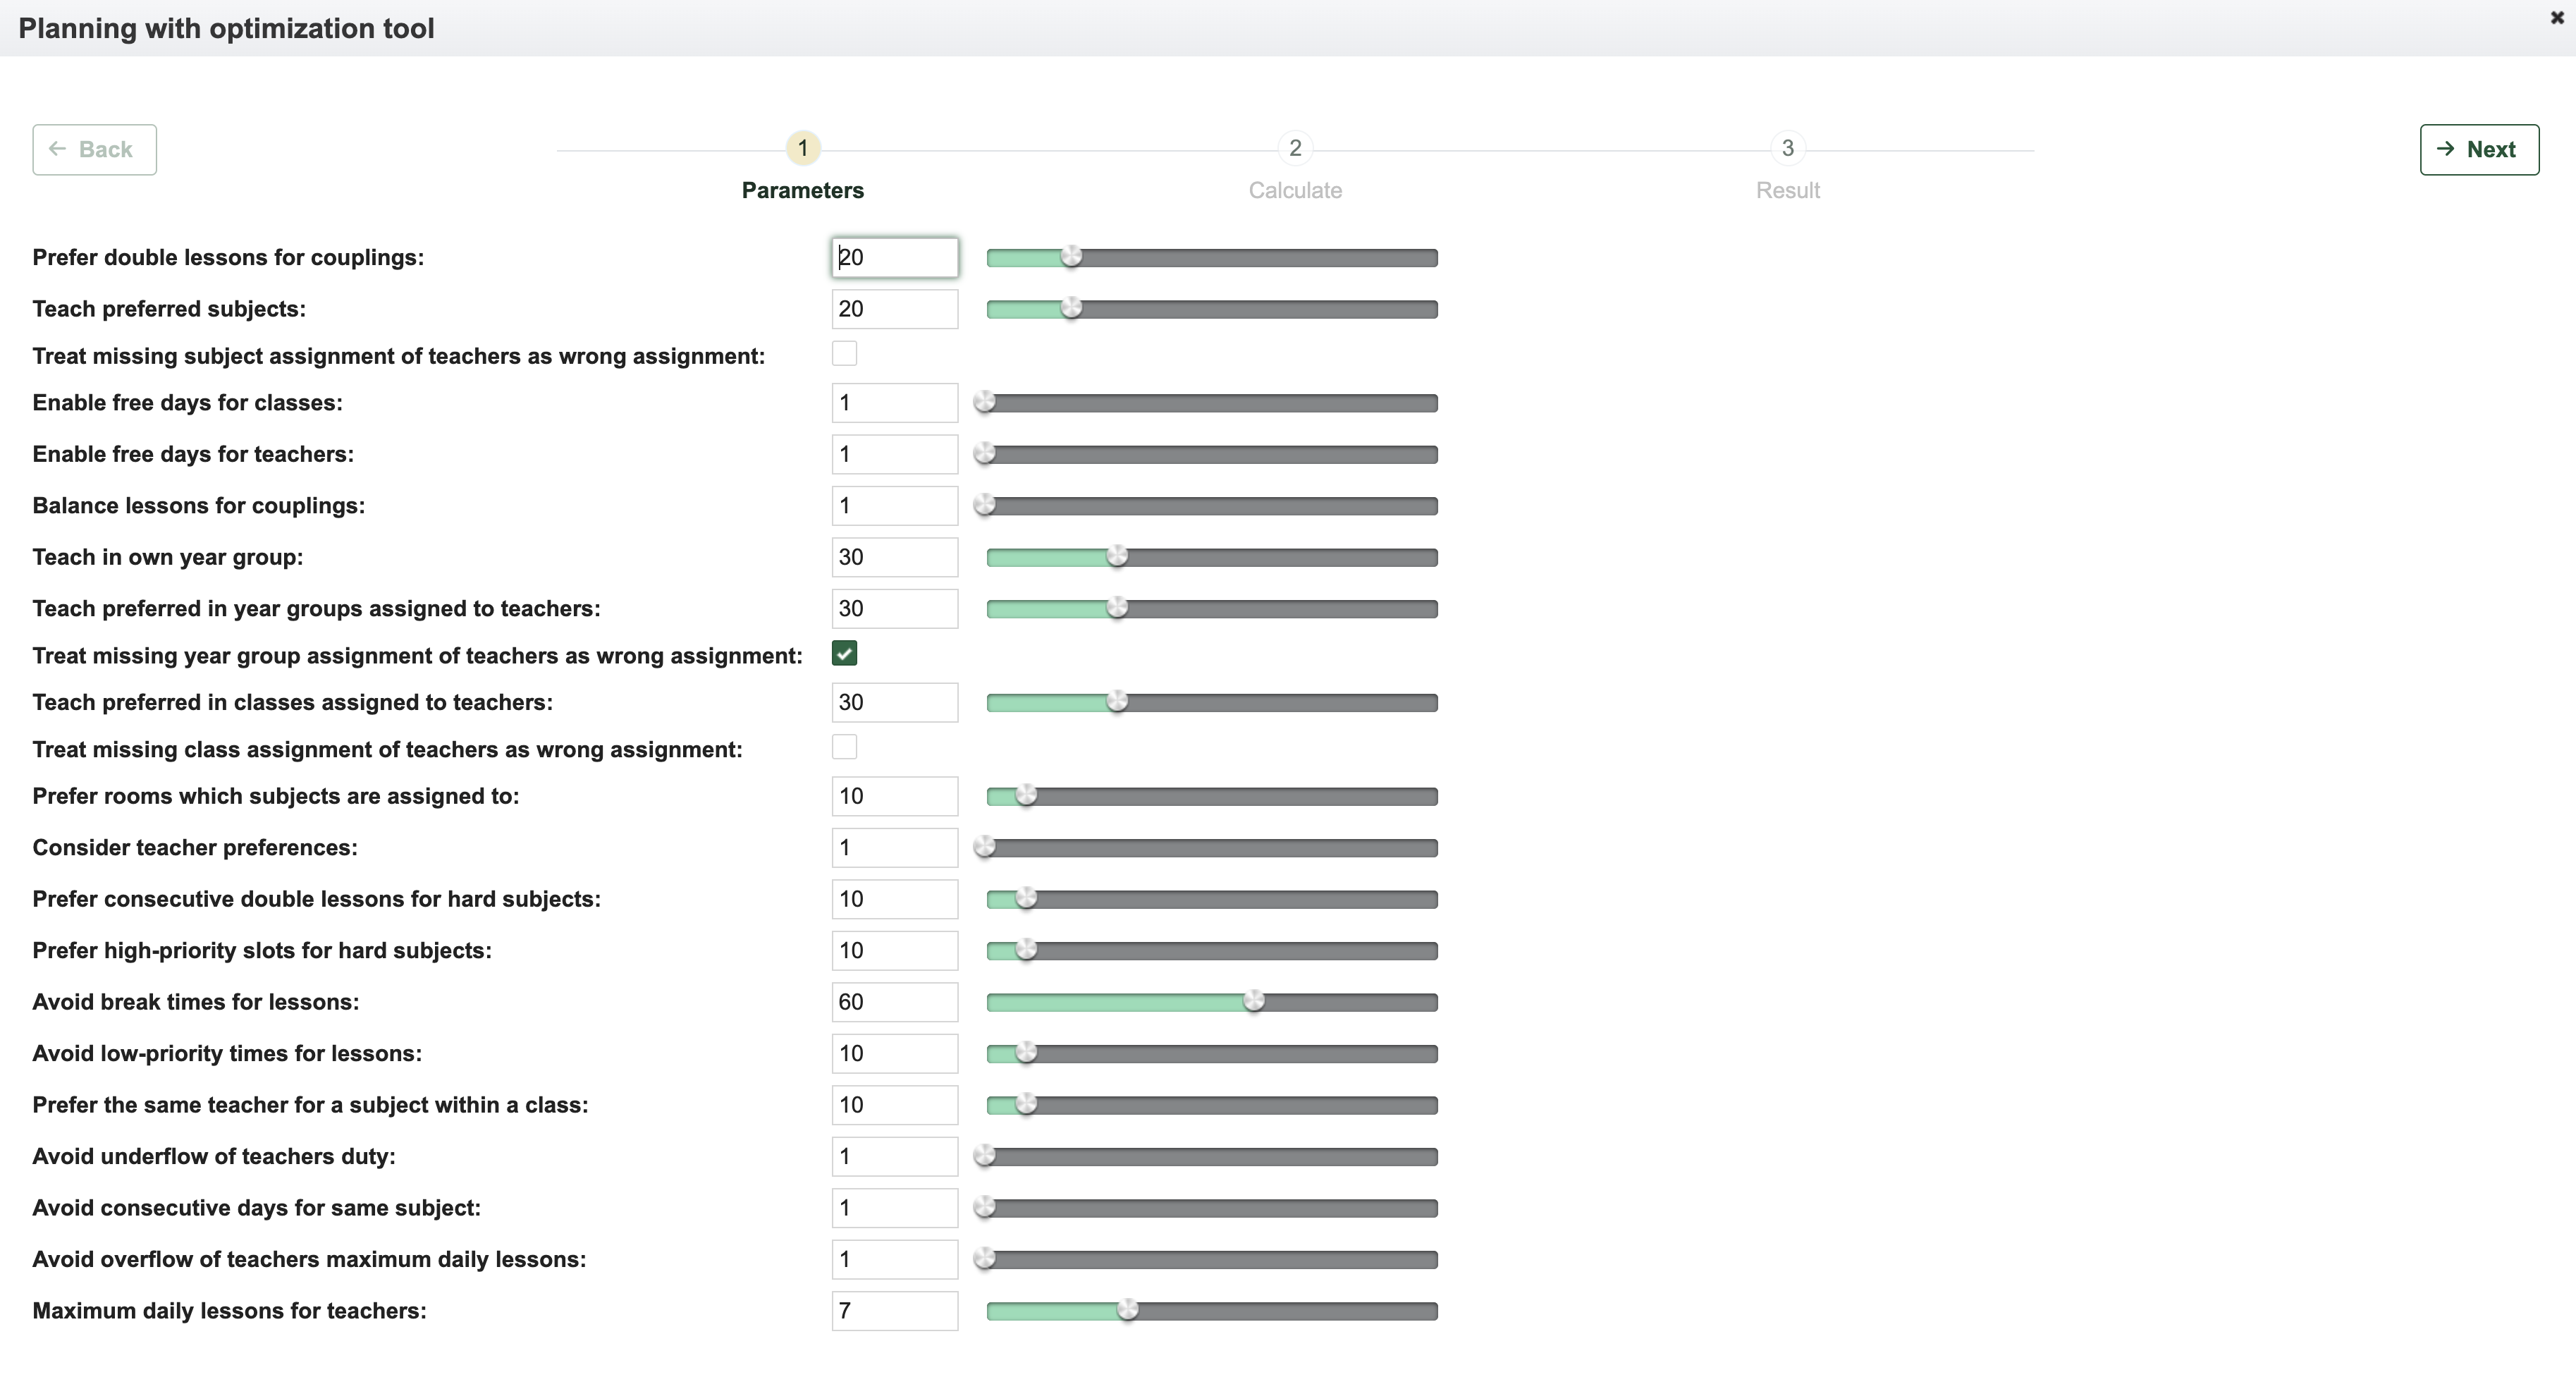
Once you are satisfied with the parameter settings, click
Next to proceed to the calculation start view.
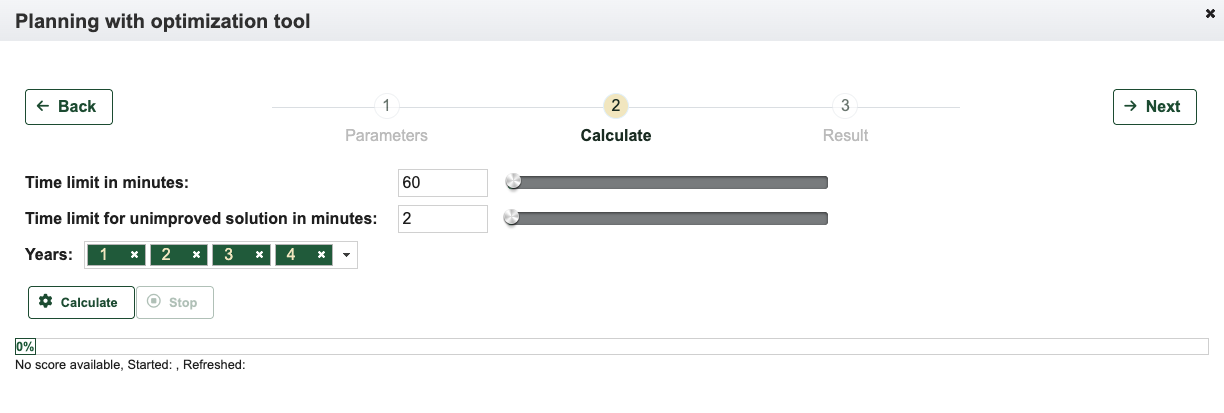
In this view, you can now configure settings for the calculation itself:
| Attribute | Description |
|---|---|
| Time limit in minutes | This refers to the maximum calculation time available to the optimizer. |
| Time limit for unimproved solution in minutes | The system continuously searches for solutions that reduce the score—essentially the penalty for deviations. It would normally continue this process until a score of 0 is reached, though this occurs relatively rarely or only with very simple problem sets. With this value, you can specify that the calculation should be terminated if no further improvements are found over a certain period of time. |
| Years | You can select the specific year groups for which the planning should be performed. It is also possible to plan for all year groups (default setting). |
Clicking the Calculate button starts the
calculation.
This is an asynchronous process that provides status updates on its progress once started.
The calculation process can be canceled at any time by clicking
Stop.
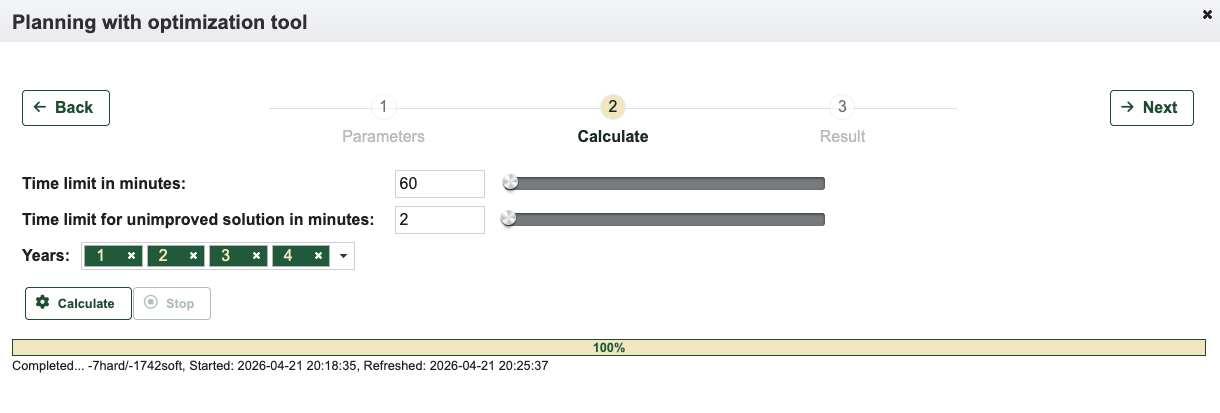
Once the calculation is complete, you can click Next to
proceed to the results view.
In this view, you can select and save specific entries or adopt all displayed entries entirely.
To select only specific entries, click them with the mouse—just as
you would in manual planning. To select multiple entries, hold down the
CTRL key while clicking. Selected entries are highlighted
with a thick border.
Click Save to commit the entries to the current
timetable version.
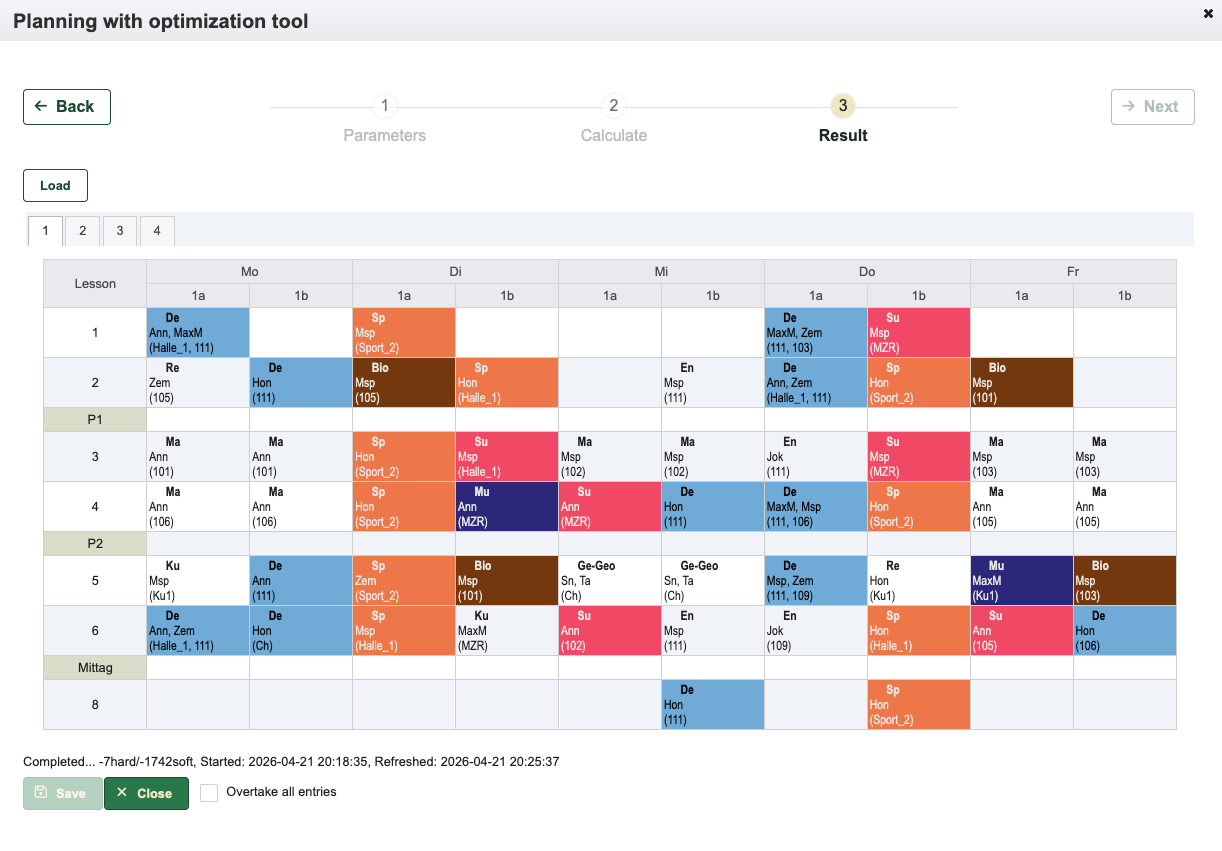
An active calculation will continue even if you switch views or interrupt your work in Franzplan.
In this case, simply reopen the planning dialog and click
Next to go to the results view. From there, click the `Load
button to display the most recent result.
9 Timetable view
9.1 View to years
The years view shows the timetable for all years and classes and
gives a complete overview. The header shows which timetable version it is as well as the
activation status.
Example:
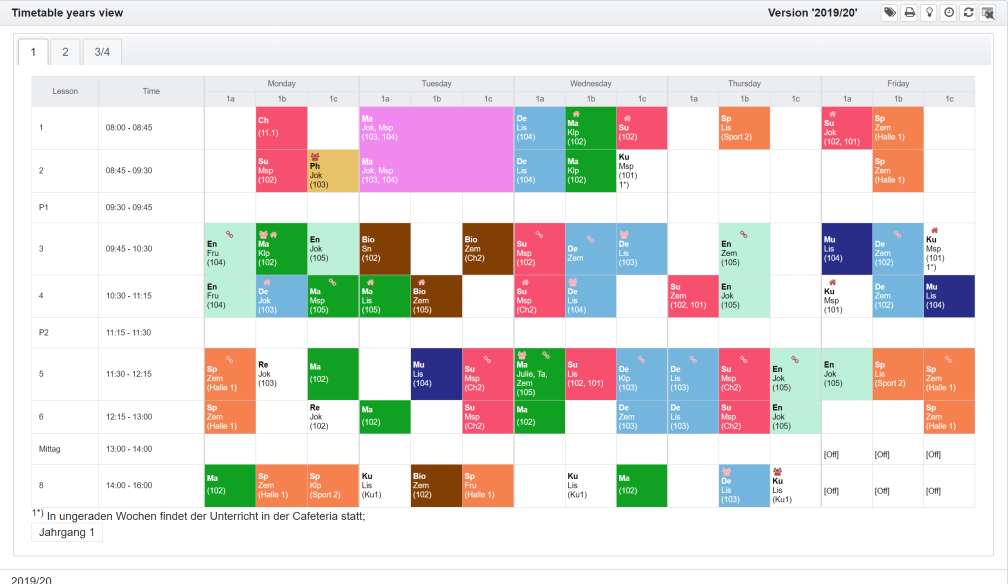
The following functions can be carried out:
|
Reload the timetable |
|
Print the timetable. The print view of the appropriate Browser opens then. Some additional settings can be done there (scaling, layout settings, margins, …). The function has been tested with Firefox as well as Chrome. |
 |
Export timetable to Excel. It can then be printed from Excel. |
|
Load another timetable version |
|
Switch colors for the subjects on or off |
|
Switch the schedule collision check on or off |
 |
Turn kiosk-mode on or off. |
 |
Switches the information about the supply board on or off. If it is switched on, the current substitution cases are also displayed. \ |
In kiosk mode, the supply board for the current days are also displayed. Supply boards for days behind are ignored, even if they are actually part of the released supply board.
9.2 Teachers view
The teacher view shows the timetable for a specific teacher, all
teachers of one year or all teachers of the school. Switching between
these options is done using the radio button and then pressing the
button  . If you specifically
select a teacher, the timetable for all timetable versions of the
current school year / period is shown in a tab.
. If you specifically
select a teacher, the timetable for all timetable versions of the
current school year / period is shown in a tab.
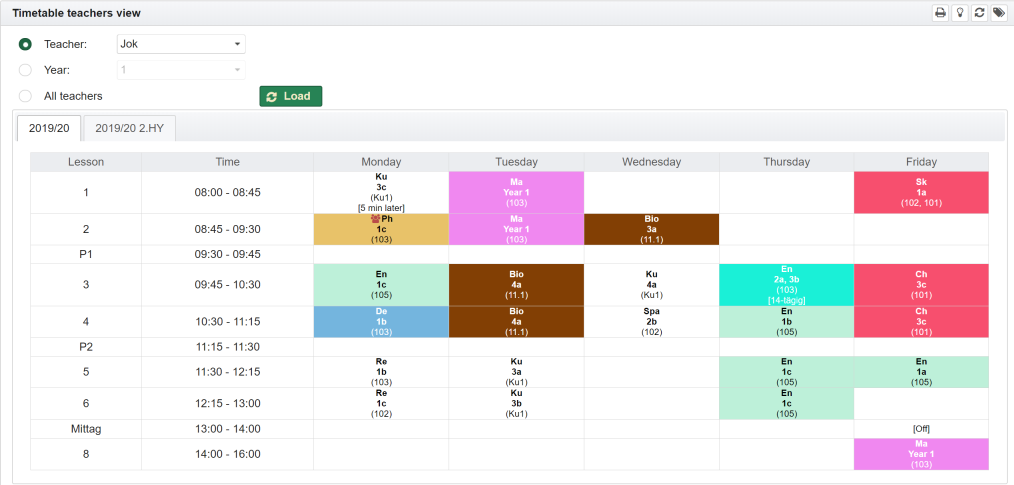
With the button it can be downloaded in
an Excel view and printed accordingly.
With the button it can be printed
directly using the Browsers print function.
Conflicts are represented as follows:
|
An affected teacher is scheduled several times. The tooltip when hovering over the icon with the mouse provides more detailed information about the schedule entry with which this conflict exists. |
9.3 Classes view
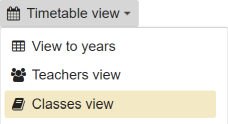
The timetable for each class can be displayed and printed here.
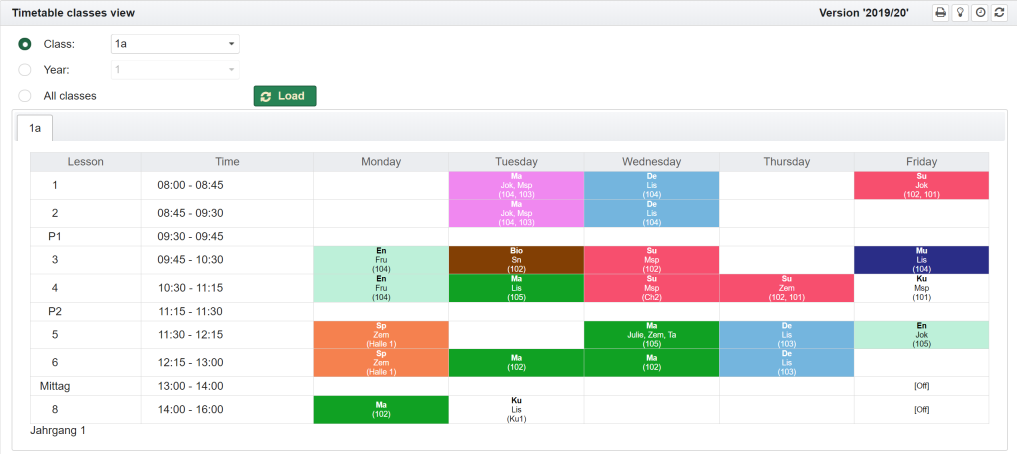
The class is selected in the list box. By pressing the button the timetable will be displayed.
With the button it can be downloaded in
an Excel view and printed accordingly.
With the button it can be printed
directly using the Browsers print function.
9.4 Rooms view
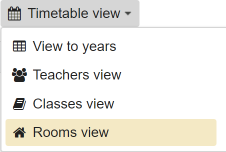
The timetables for the occupancy of a room can be displayed and
printed here.
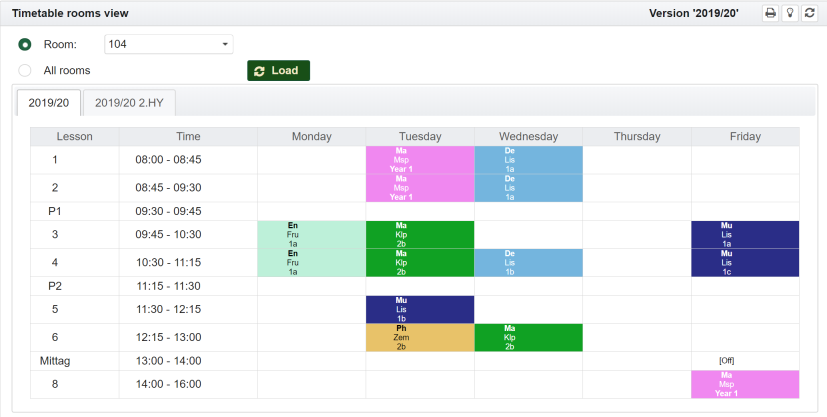
To do this, the desired room is selected in the list and the button is clicked.
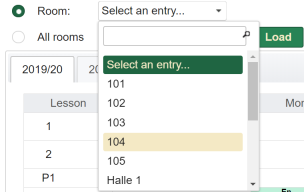
The list of rooms can be restricted using the search filter.
The room view shows the timetable for a specific room or all rooms of
the school. Switching between these display options is done using the
radio button. If you specifically select a room, the timetable for all
timetable variants of the current school year or the current period is
displayed in a tab.
With the button it can be downloaded in
an Excel view and printed accordingly.
With the button it can be printed
directly using the Browsers print function.
Conflicts are represented as follows:
|
A room is planned more than one times. The tooltip when hovering over the icon with the mouse provides more detailed information about the schedule entry with which this conflict exists. |
9.5 Kiosk-mode
In kiosk-mode, the plans for the years are automatically displayed one after the other at defined time intervals. The time interval can be set under User settings.
The kiosk-mode for the display of timetable entries can easily be
switched on or off under any user by clicking the button in the year or
class view. The header then outputs the information that the kiosk-mode
is activated.

The kiosk-mode then only starts after logout and login again.
In addition, the time interval can be changed by the parameters under User settings depending on the view
Time interval for kiosk-mode in years viewTime interval for kiosk-mode in classes viewTime interval for kiosk-mode in teachers view
It is advisable to use the kiosk mode if the timetables are to be displayed automatically on a screen like on a scoreboard. To do this, the browser can be set to full screen mode. With Firefox, this is achieved by pressing the F11 key. Another way to set up such a scoreboard is to configure a small computer that is connected to a television or monitor. Here’s a quick guide on how to do this with a Raspberry Pi: Configure a Raspberry Pi for Kiosk-Mode.
9.6 Configure a Raspberry Pi for Kiosk-Mode
In the following it is assumed that
- the user is already configured to work in kiosk mode as described Systeme settings,
- the Kiosk-Mode is already switched on for the user,
- the Raspberry Pi is already loaded with an operating system (e.g. Raspbian),
- the Raspberry Pi is already able to connect on a command line
level.
In addition, the following steps can then be carried out:
- Approve if auto-login is configured: If not already done, auto-login needs to configured. A check is executed via command line:
$ cat /etc/lightdm/lightdm.conf | grep autologin-user=pi
autologin-user=pi- install unclutter: Little tool for hiding the mouse pointer
$ sudo apt-get install unclutter- Configure the Kiosk user:
The Kios user specified in the URL must be known in the Franzplan for the school. He may only have the School Assistant role here. It is assigned under Systeme settings.
If the IP address is also to be checked (recommended), this can be determined by calling up the Franzplan in the browser on the Raspberry and logging in with the kiosk user. In the details of the registered user, you can then view the IP address with which the user is currently working.
To do this, click on the link in the header and note the IP
address.
in the header and note the IP
address.
The IP address is then also entered under System Settings:
A regular expression, e.g. 157.123.3., can also be used as the IP address. This is helpful if the IP address is assigned dynamically in the subnet, meaning that the last digits can change with each start.
9.6.1 Using the Epiphany browser
- install matchbox-window-manager: Needed for suppressing the title line
$ sudo apt-get install matchbox-window-manager- configure the Epiphany Browser: In the following, it is assumed that
the user ‘pi’ is defined as the Raspberry user (usually the default).
Follow these steps:
- Create the startup script:
Therefore the file startup_epiphany.sh have to be created in the home directory of the user. The attributes ‘kioskUser’ and ‘kioskSchool’ refer to the configuration of the respective school. In the example, it is the school GGSMUN. The kiosk user ‘kioskUser’ must be configured here. You can decide whether the year timetable or the class timetable is displayed (corresponding lines are commented out). Please note the escaped special characters ‘&’ and ‘?’ if they are used as text in a shell script:
- Create the startup script:
#!/bin/sh
xset -dpms &
xset s off &
unclutter -idle 1 &
matchbox-window-manager -use_titlebar no &
#
# start browser
# - important: ampersand have to be escaped by '\'
# - a: kiosk mode
#WEBKIT_DISABLE_TBS=1 epiphany-browser -a --profile /home/pi/.config \
#https://test.franzplan.net/SchulPlaner/faces/stundenplan_jg.xhtml\?kioskUser=kiosk\&kioskSchool=GGSMUN
WEBKIT_DISABLE_TBS=1 epiphany-browser -a --profile /home/pi/.config \
https://test.franzplan.net/SchulPlaner/faces/stundenplan_klasse.xhtml\?kioskUser=kiosk\&kioskSchool=GGSMUN- Now the startup script needs to be added to autostart:
Therefore a line is added to the file ~/.config/lxsession/LXDE-pi/autostart:
/home/pi/startup_epiphany.sh &- Adapt the display:
The browser window should take up the whole screen. Therefore, the size of the display should still be configured to the number of pixels for height and width that corresponds exactly to the screen used. The example shows the corresponding entries for a television with a resolution of 1920 x 1080. Adjustments are made in the file ~/.config/states.xml.
<?xml version="1.0"?>
<ephy_states version="1.0">
  <node id="30">
    <property id="2" value_type="gchararray">main_window</property>
    <property id="3" value_type="gint">1920</property>
    <property id="4" value_type="gint">1080</property>
    <property id="5" value_type="gboolean">1</property>
    <property id="8" value_type="gboolean">1</property>
    <parent id="4"/>
  </node>
</ephy_states>- Optimise the Browser Window
If the timetable does not fit the browser window in full screen view, the zoom factor can be adjusted. To do this, start the browser from the command line with the menu bar. Please note the escaped special characters ‘&’ and ‘?’ if they are used as text in a shell script:
$ epiphany-browser --profile /home/pi/.config https://test.franzplan.net/SchulPlaner/faces/stundenplan_jg.xhtml\?kioskUser=kiosk\&kioskSchool=GGSMUNNow the zoom-factor can be adjusted via Settings - Zoom
in.
After the next restart, the zoom factor last set will be applied
automatically.
9.6.2 Using the Chromium browser
- Create the shell script:
We also need a shell script for the Chromium, in which the settings are made, e.g. ~/kiosk.sh. Please note the escaped special characters ‘&’ and ‘?’ if they are used as text in a shell script:
#!/bin/bash

xset s noblank
xset s off
xset -dpms

unclutter -idle 1 &

sed -i 's/"exited_cleanly":false/"exited_cleanly":true/' /home/$USER/.config/chromium/Default/Preferences
sed -i 's/"exit_type":"Crashed"/"exit_type":"Normal"/' /home/$USER/.config/chromium/Default/Preferences

/usr/bin/chromium-browser --noerrdialogs --disable-infobars --kiosk https://test.franzplan.net/SchulPlaner/faces/stundenplan_klasse.xhtml\?kioskUser=kiosk\&kioskSchool=GGSMUN &- Overtake the shell script to the startup of the
Raspberry-User:
therefore we have to add the following line to the file ~/.config/lxsession/LXDE-pi/autostart:
/home/pi/kiosk.sh &10 Substitute planning
The modul for substitute planning is optional and can be activated separately.
10.1 Overview
The strategy when working with substitution planning depends on the
planner’s preferred perspective. Basically you can plan in two
ways:
Based on the representation case:
Here the planning is carried out in several steps based on an representation case, which means that a resource that is included in the regular timetable is not available at a certain time.
Then it has to be checked which impacts it has.
One or more actions should be defined.
The actions are then summarized in a supply board, which is valid for a certain period of time.
Based on the supply board:
This is initially the simpler version because it involves fewer steps. Here the supply board is created first.
Actions are defined also directly here. The substitution plan can be released immediately.
The maximum period for a substitution plan is one week.
If the supply board has been released, it is taken into account in the
timetable view and also used for the accounting of the teacher
assignment. The supply boards can be
displayed and printed also.
10.2 Representation cases
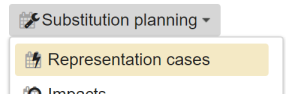
To create an event, click on the corresponding date field in the
calendar. Now you can give the representation case a title and enter the
period of time during which the event continues. By default, it is
booked for the selected day. If no all-day absence is to be taken into
account, the All-day check must be removed. Also at least
one resource (teacher, room, class) must be selected. 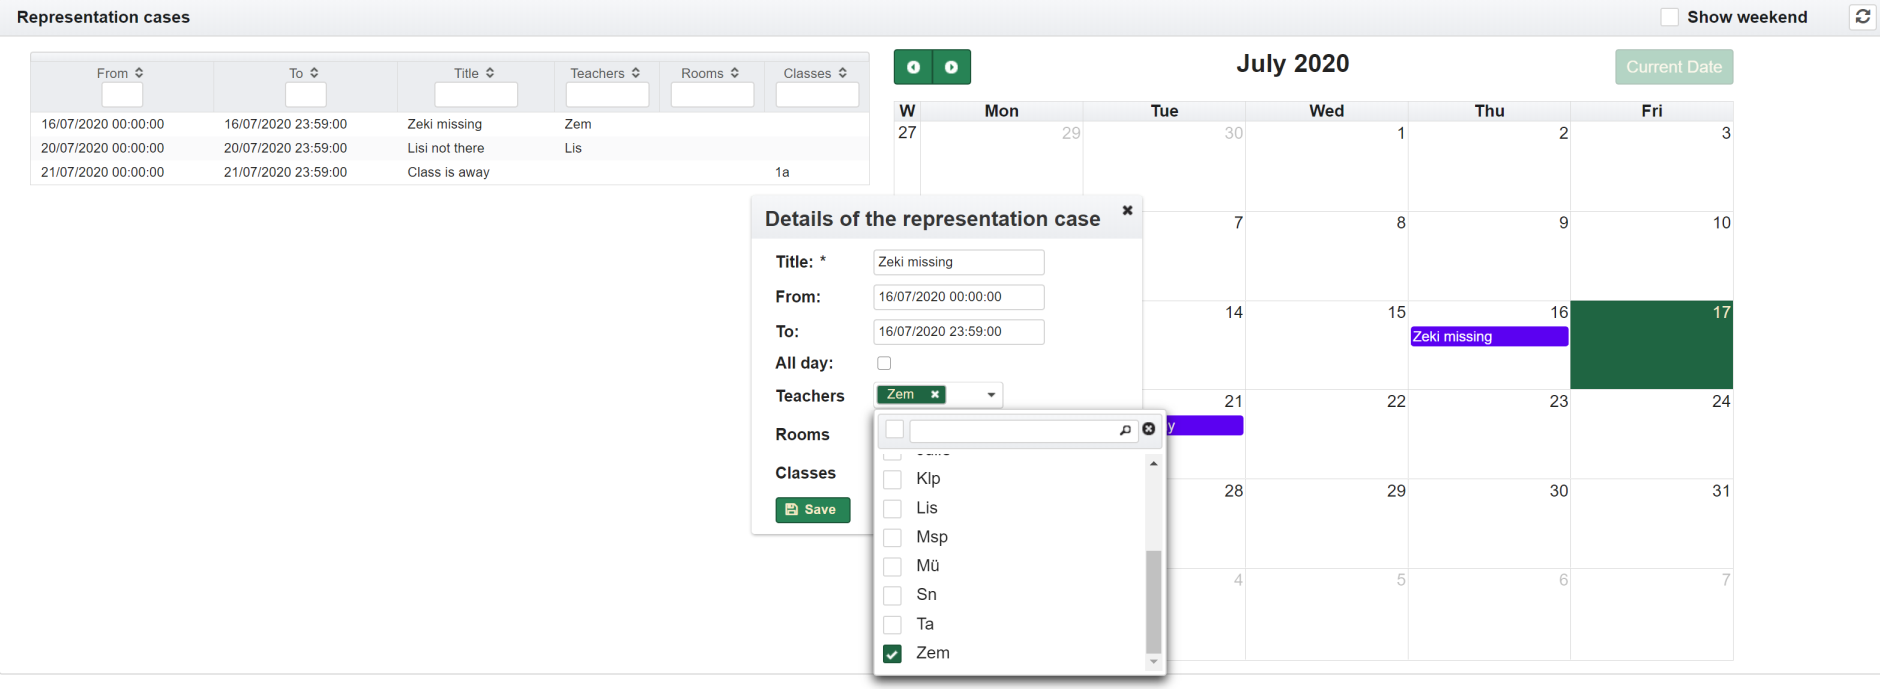
After saving the new event, it is included in the list of representation cases and you can continue working with the event by marking the representation case. The possible activities can be carried out with the right mouse button.
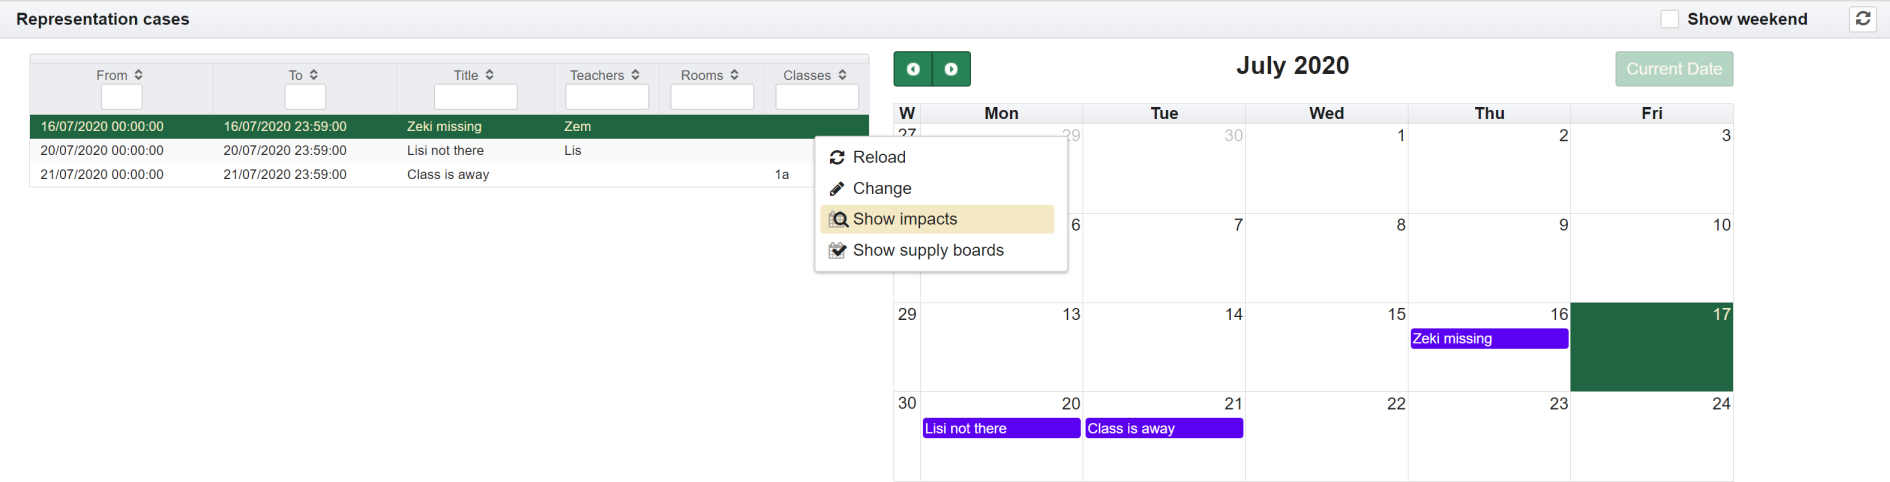
| Action | Meaning |
|---|---|
| Reload | The page including the event list is reloaded here. |
| Change | The event/representation case can be changed. Complete deletion is also possible here. |
| Show impacts | Here the impacts can be shown. |
| Show supply boards | The list of supply boards is shown. |
Since substitution planning always relates to a specific date, it is important, in contrast to timetable planning, that the times for the start and end of the school year / period and also for the timetable versions are correct. Representation cases, actions and also the supply boards have to match these periods for the planning to work. Otherwise a corresponding error is reported.
10.3 Impacts
To display the effects of a substitution case, you can select the
substitution case in the
Substitute planning - representation cases menu or select
it directly in this view.
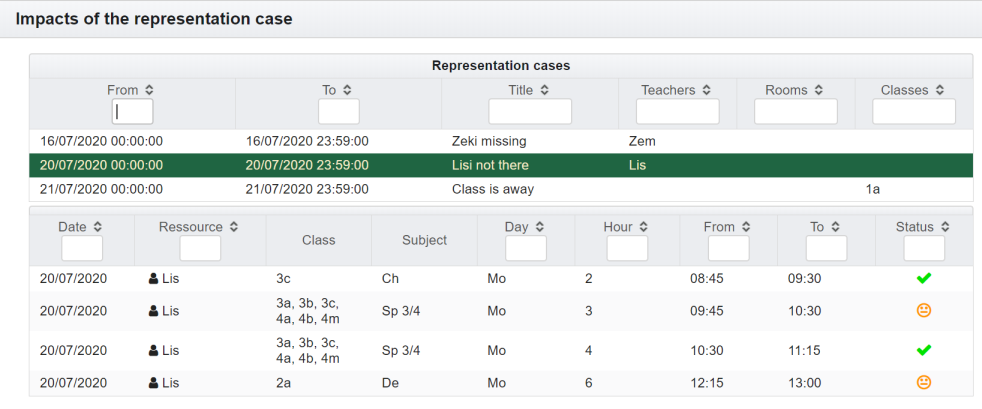
Then the list of impacts is shown with the following details:
| Detail | Meaning |
|---|---|
| Date | Date when the impact occurs. This is particularly important if the substitution case remains over several days. |
| Ressource | The resource concerned is listed here with its abbreviation / room number. The symbol shows which type the resource is related to \ |
 - a teacher is not available
 - a teacher is not available. There are
more than one teacher assigned. The tooltip contains the list of
teachers assigned. Depending on how the settings were made, double
allocations are displayed or hidden as long as at least one resource is
available.
- a teacher is not available. There are
more than one teacher assigned. The tooltip contains the list of
teachers assigned. Depending on how the settings were made, double
allocations are displayed or hidden as long as at least one resource is
available.
 - a room is not available
 - a class is not there | Klasse | List
of affected class | Fach | Affected subject | Tag | Day the event
effects | Stunden | Lesson or break the event effects | Von/Bis | Time
span of the lesson | Status | Processing status
- a class is not there | Klasse | List
of affected class | Fach | Affected subject | Tag | Day the event
effects | Stunden | Lesson or break the event effects | Von/Bis | Time
span of the lesson | Status | Processing status
 - Initial: There is no supply
board yet.
- Initial: There is no supply
board yet.
 - Working: An supply board
exists but there is no action yet.
- Working: An supply board
exists but there is no action yet.
 - Action existing: There is a
supply board and at least one action, but none that match the
resource.
- Action existing: There is a
supply board and at least one action, but none that match the
resource.
 - Solution existing: There
is a supply board and at least one action, but none that match the
resource. The supply board is not approved yet or an action has changed
after last approvement.
- Solution existing: There
is a supply board and at least one action, but none that match the
resource. The supply board is not approved yet or an action has changed
after last approvement.
 - Released: The supply board is
released. The approval date is valid.
- Released: The supply board is
released. The approval date is valid.
Marking an impact causes the impact to be displayed in the timetable. In addition, you can then select various activities with the right mouse button.
| Activity | Meaning |
|---|---|
| Reload | The page including the impact list is reloaded here. |
| supply boards | Here creating a supply board is possible or switching to view of supply boards. |
| Show impacts | Switching to actions is possible directly. |
| Settings | Further settings can be made here. \ |
- Show double occupancies: Double occupancies are hidden in the list as long as at least one resource is available.
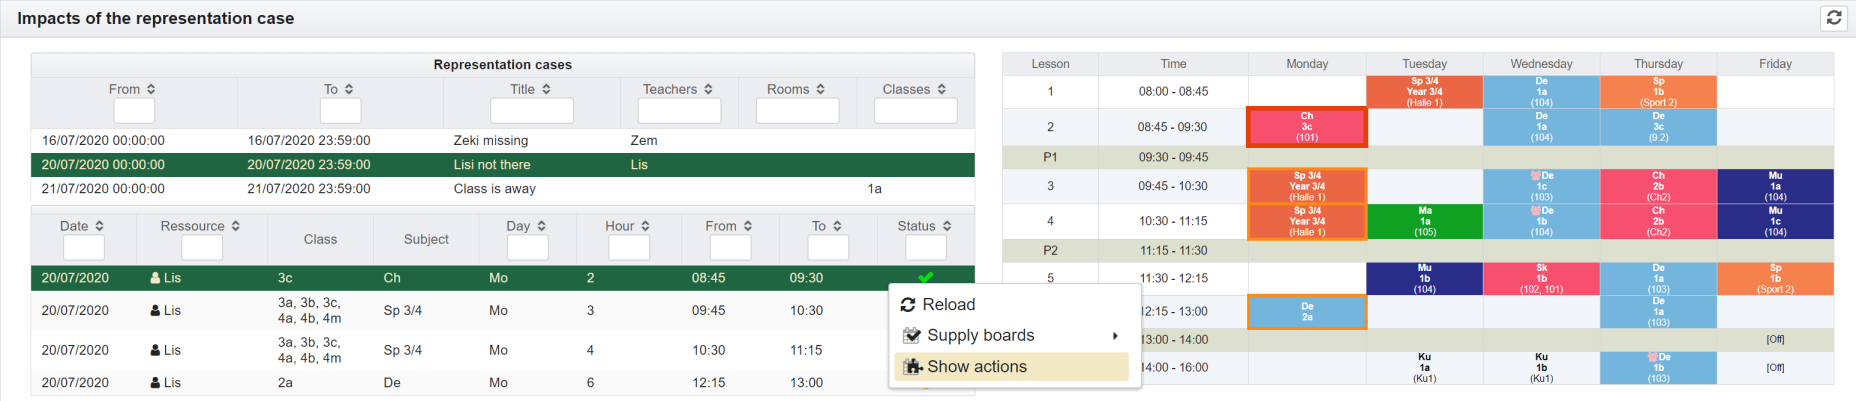
10.4 Actions
Insgesamt teilt sich die Ansicht in drei Abschnitte:
- Supply board:
Actions usually relate to a specific representation case. This is listed in the header of the view. - Substitute hours:
Hier handelt es sich um die Maßnahmen, die festgelegt werden. Es kann sich um Stundenausfall, geänderte Stundenbelegung oder komplett neu geplanten Unterricht handeln. - Impacts
Example:
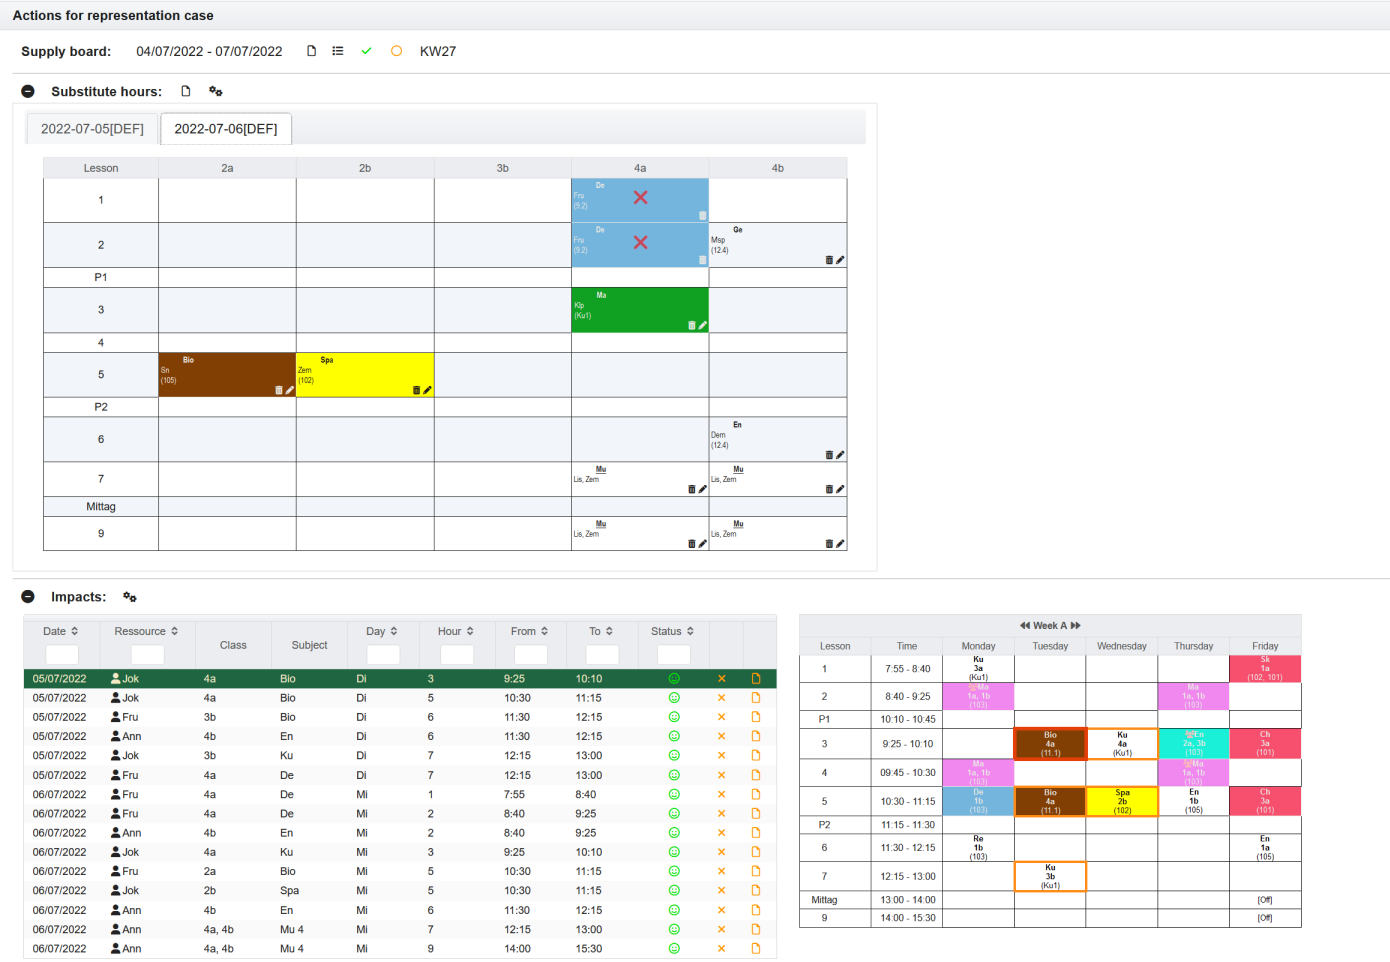
10.4.1 Supply board
If no representaion case is selected, at least one supply board must
be assigned so that actions can be presented.
To select a representaion case, you can use the button  in the header to switch directly to the
view of the representation cases and select an appropriate event
there.
in the header to switch directly to the
view of the representation cases and select an appropriate event
there.
A supply board is needed to create an action. If no supply board exists
up to now, the follwing message will be displayed:
No substitution plan has yet been assigned. A substitution plan is required so that actions can be defined in the supply board.`In this case, you can simply create a new one in the
Substitute hours section or
assign an existing out of the list  .
.
Since substitution planning always relates to a specific date, it is important, in contrast to timetable planning, that the times for the start and end of the school year / period and also for the timetable versions are correct. Representation cases, actions and also the supply boards have to match these periods for the planning to work. Otherwise a corresponding error is reported.
10.4.2 Impacts
The section Impacts conatins the same elements as
descriped in impacts. In addition, however, you
can store actions directly.
Using  you can create
cancelations directly. Clicking
you can create
cancelations directly. Clicking  opens the dialog for creating a lesson.
Further settings can be made using the button  .
.
In detail these are:
- Show double occupancies:
Double occupancies are hidden in the list as long as at least one resource is available.
10.4.3 Actions
The entries for substitution hours can also be created in the section
Substitution hours directly via . A dialog opens for the selection of the
schedule entry.
Existing substitution hours can be deleted with the trash can symbol
 .
.
They can also be changed directly by clicking the pen .
Further settings can be made using the button .
In detail these are:
- Show all classes:
Here you can determine whether only the classes involved in substitution hours are shown or whether all classes are shown in the table.
If the substitution plan extends over several days, a separate entry with date is created for each day, which can be selected via the tab.
10.5 Supply boards
Ultimately, the substitute planning is displayed on the basis of
released supply boards. These can be displayed and released in this
view. To do this, mark the corresponding entry in the list of supply
boards.
The corresponding details for the selected plan are then displayed:
- actions
- considered representaion cases
- impacts
The link ![]() in the header
line of the view offers the possibility to switch directly to the
appropriate view of the chosen item.
in the header
line of the view offers the possibility to switch directly to the
appropriate view of the chosen item.
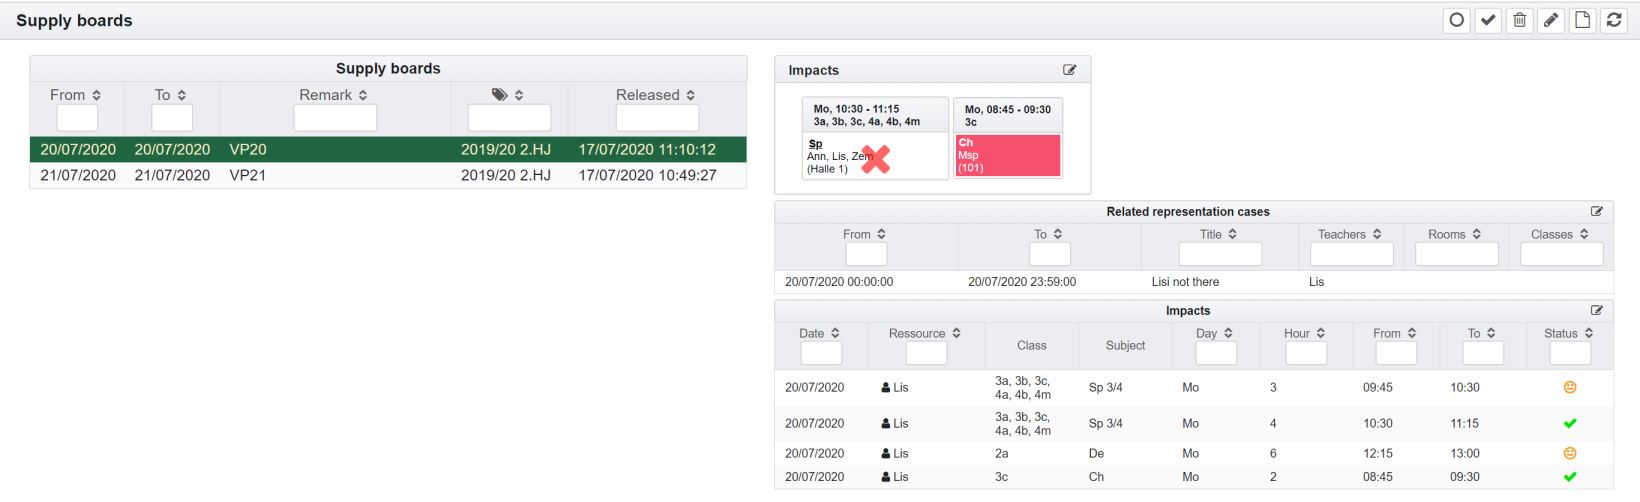
Depending on the marked plan, the following activities can be carried out:
| Activity | Meaning |
|---|---|
|
Here the page including the impacts, representation cases and actions is reloaded. |
 |
Allows the creation of a substitution plan. |
|
The marked substitution plan can be changed. |
|
The marked substitution plan can be deleted. |
 |
The marked substitution plan can be released. |
 |
The approval for the marked substitution plan can be withdrawn. |
Since substitution planning always relates to a specific date, it is important, in contrast to timetable planning, that the times for the start and end of the school year / period and also for the timetable versions are correct. Representation cases, actions and also the supply boards have to match these periods for the planning to work. Otherwise a corresponding error is reported.
10.6 Show supply boards
The current supply boards can be displayed under this menu item.
First, the current week from Monday and the subsequent 14 days is
selected as the time period. If there is no substitution plan in the
period, a message is displayed:
There are no entries in the period which is under review. Maybe there are no released supply boards or none of the supply boards contain any action.
Every suitable supply board gets a separate a tab.
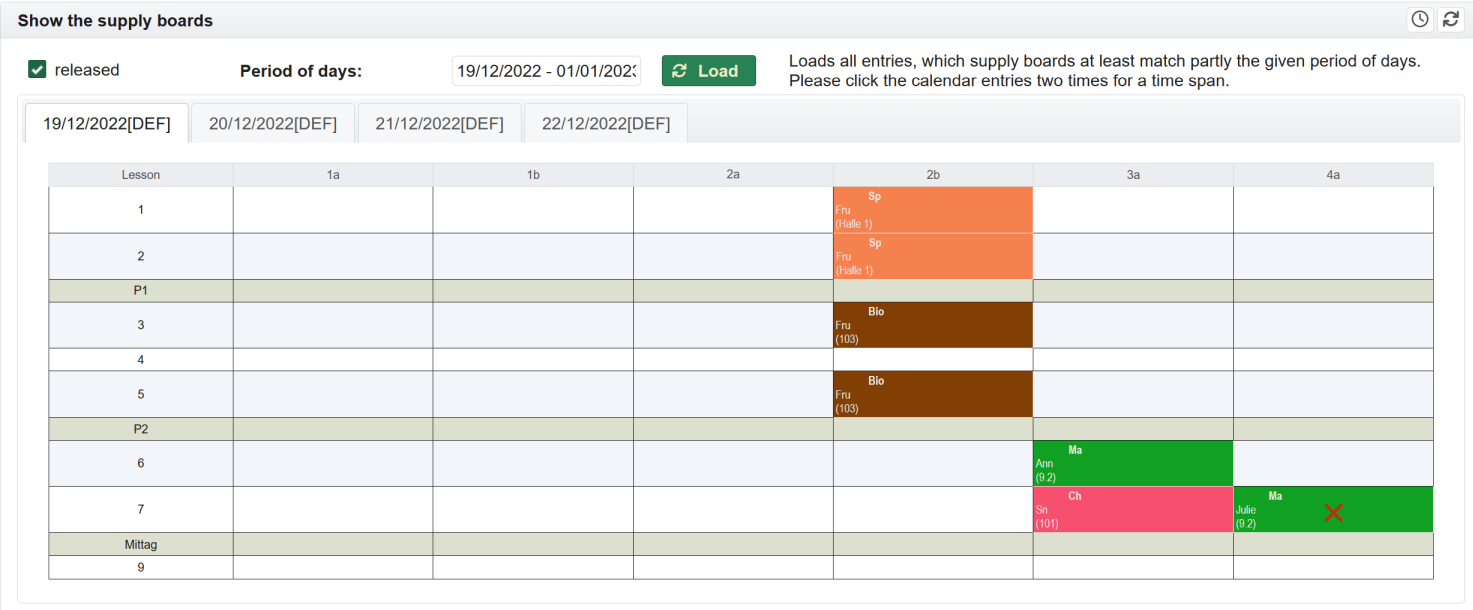
By default, only approved plans are displayed. If plans that have not
yet been released are also to be listed, the checkmark at
released can be removed.
Only approved supply boards are taken into account in the teachers allocation. The same applies to
the display of supply boards in the planning view.
It is also possible to use to
display the supply boards on an electronic display board in kiosk mode.
The setup is described here: Kiosk-Modus
…
11 Interfaces
11.1 Timetable
The timetable can be exported from the planning view Timetable planning. A JSON format is created than.
Essentially the following sections are contained:
11.1.1 headData
This section contains the header data with the interface version, time of data export and error information. In detail these are:
| version | The interface version with which the JSON file was generated. \ |
| Example: ‘1.1.0’ | |
| creationDate | The time when the JSON file was generated. It conforms to the ISO8601 format. \ |
| Example: ‘2022-05-16T22:35:11+02:00’ | |
| returnCode | A return code. If no error occurred, return code 200 is generated. |
| errorMessage | An additional error description. \ |
The following return codes with corresponding error information are
possible:
200 - OK
400 - Not able to process the request. The timetable could not be
created.
411 - The specified timetable variant does not exist for the school. The
timetable could not be created. |
11.1.2 timeTable4Classes
This section contains the timetable for all classes.
The current JSON schema can be found here: timetable4ClassesSchema.json
12 The Franzplan-App
The Franzplan-App is available for devices with Android operating
systems.
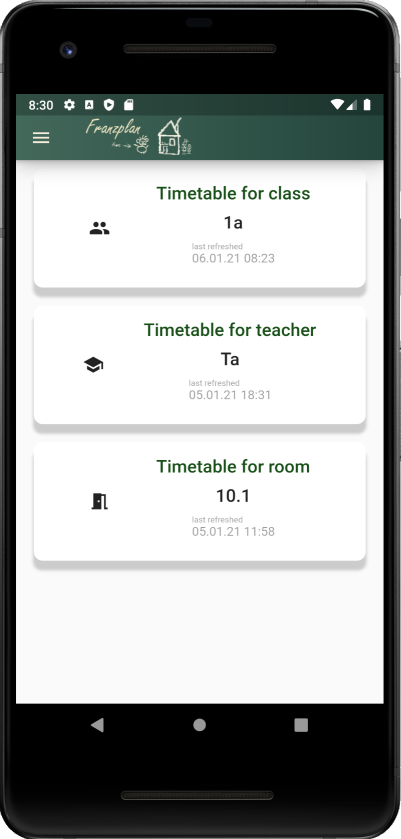
It is possible to download the software from the App-Stores. For
Android it can be found at Google Play
Store.
Franzplan-App
The app is used to view the current, approved timetables for
teachers, rooms or classes. However, the planning cannot yet be carried
out with it. This feature is in progress.
12.1 Installation and Setup
For installation just go to the Appstore
and install it.
After the installation, a few configuration steps have to be carried
out.
12.1.1 Schools settings
To configure the school server, open the menu  in the
header and click on the menu item
in the
header and click on the menu item School parameters. 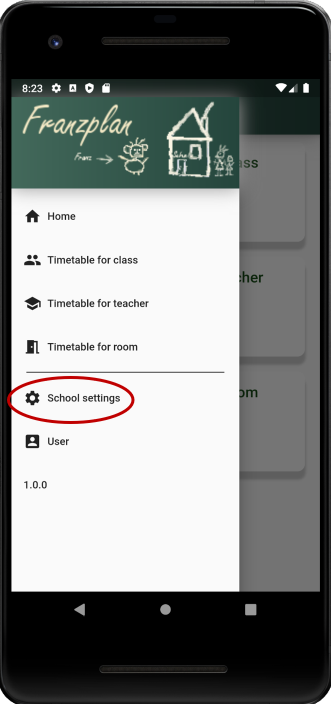
Here the address of the school server can be selected directly from
the list of available entries. If the school server does not appear in
the list, it is possible to enter the address manually. This will be
Check the box for Self-defined IP address and adjust the
text field Address of the server that is actually used
accordingly.
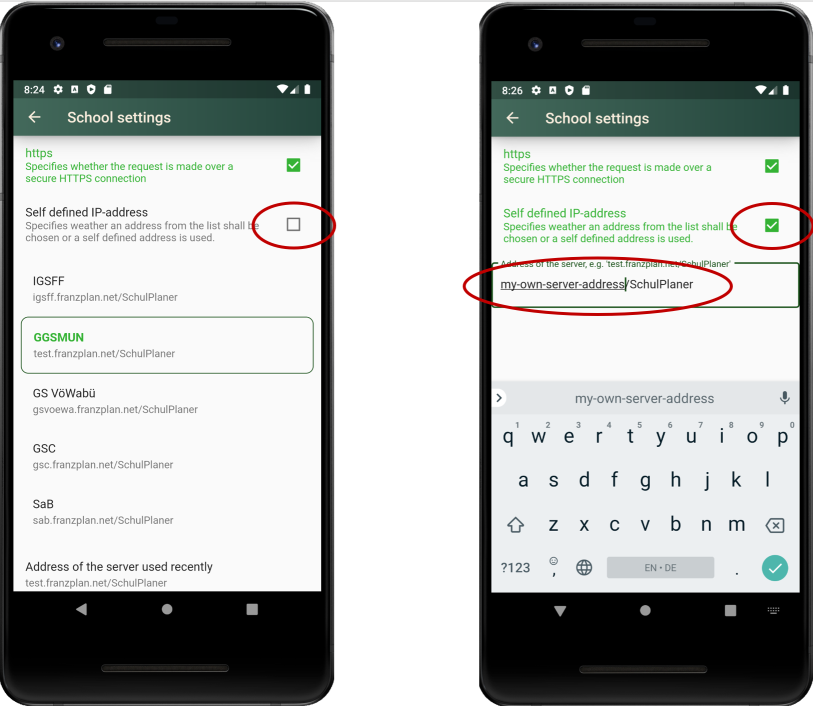
12.1.2 Set user and password
Username and password are assigned under the menu item
User.
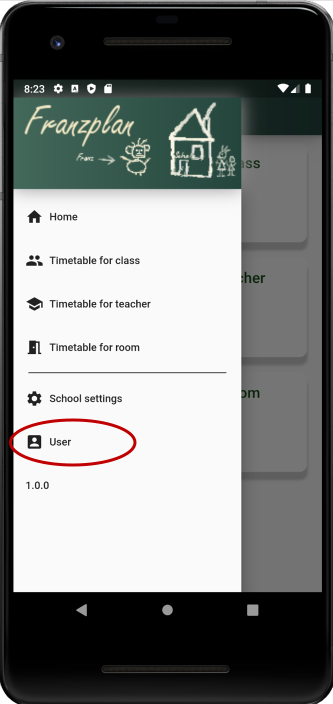
Username and password can be saved in the local area at the
Smartphone/Tablet, so that this data does not have to be re-entered
every time.
To do this, check the box next to Save password.
If this is not desired, the user dialog is called up each time the
timetable is queried.
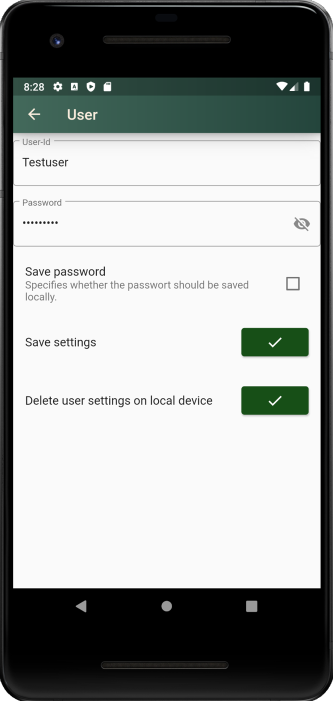
12.2 View the timetables
To view the timetables, you can click directly on one of the tiles on
the home screen or select the timetable from the menu.
Showing the timetables for classes, teachers or rooms is essentially the
same. It is explained below using the example of the view for a
class.
If a timetable has never been called up, you will first be asked for the
desired class (teacher or room). If the entered class (the room or the
teacher) does not exist, a message appears with suggestions as to which
classes might be suitable.
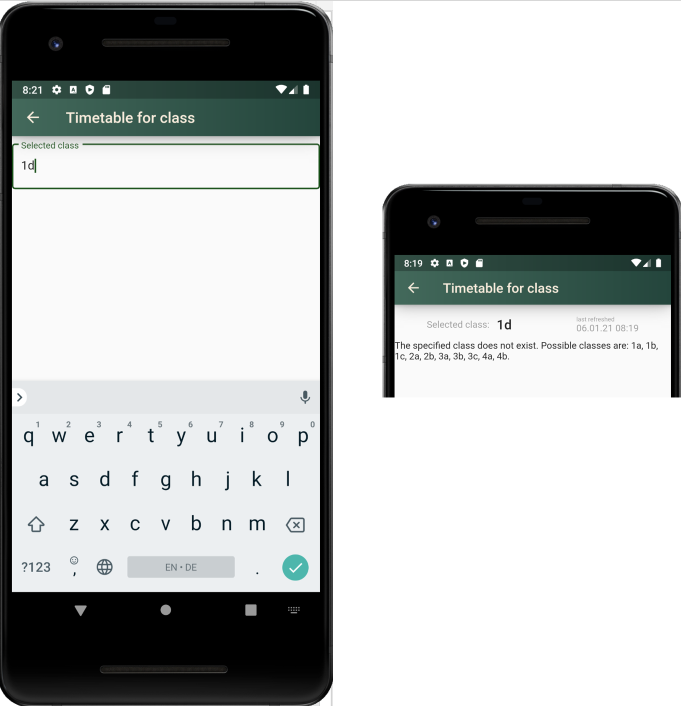
By clicking on the wrong entry, the input field opens again and the
entry can be corrected.
The timetables are displayed in both portrait and landscape views.